102. Getting Started for HandL UTM Grabber V3
How to Use HandL UTM Grabber / Tracker
How to add custom parameters
How to Enable GDPR
How to Set Cookie Duration
How to Append UTM
First / Last Touch Attribute
How to Track Organic Traffic
There is no UTM collected?
- How to use?
- How to add custom parameters?
- Adding a Custom Parameter
- How to Add a fbclid as a custom parameter to track and collect?
- How to add a 'affid' as a custom parameter to track and collect?
- Track and capture fbclid, _fbc and _fbp
- Track and capture gclid, wbraid and gbraid
- How to Enable GDPR?
- How to Set Cookie Duration?
- How to Append UTM?
- Appending UTM Globally
- Appending UTMs to the buttons using class name attributes (Selectively)
- Appending UTMs to the Iframe src
- Appending UTMs using Shortcode
- Append UTMs upon DOM change
- Selecting specific parameters for append utm
- Skip Appending UTMs on Some Links
- First / Last Touch Attribute
- How to Track Organic Traffic?
- There is no UTM collected
- WP Engine is my webhost
- I have WP Rocket installed
- Common Troubleshooting Tips
- I am with FlyWheel
- I have SiteGround (SG) installed
- I'm hosting with Pair
- I'm hosting with Pantheon
- I'm using CloudFlare (CF)
- I'm using HummingBird WP plugin
- Kinsta is my webhost
- I use WP Super Cache
- I'm using W3 Total Cache
- I'm on CloudFront
- I'm using LiteSpeed caching plugin
- I've NitroPack plugin
- I'm hosted on CloudWays
- I'm using WP Fastest Cache
- I'm using Wordfence
- I've WP Optimize
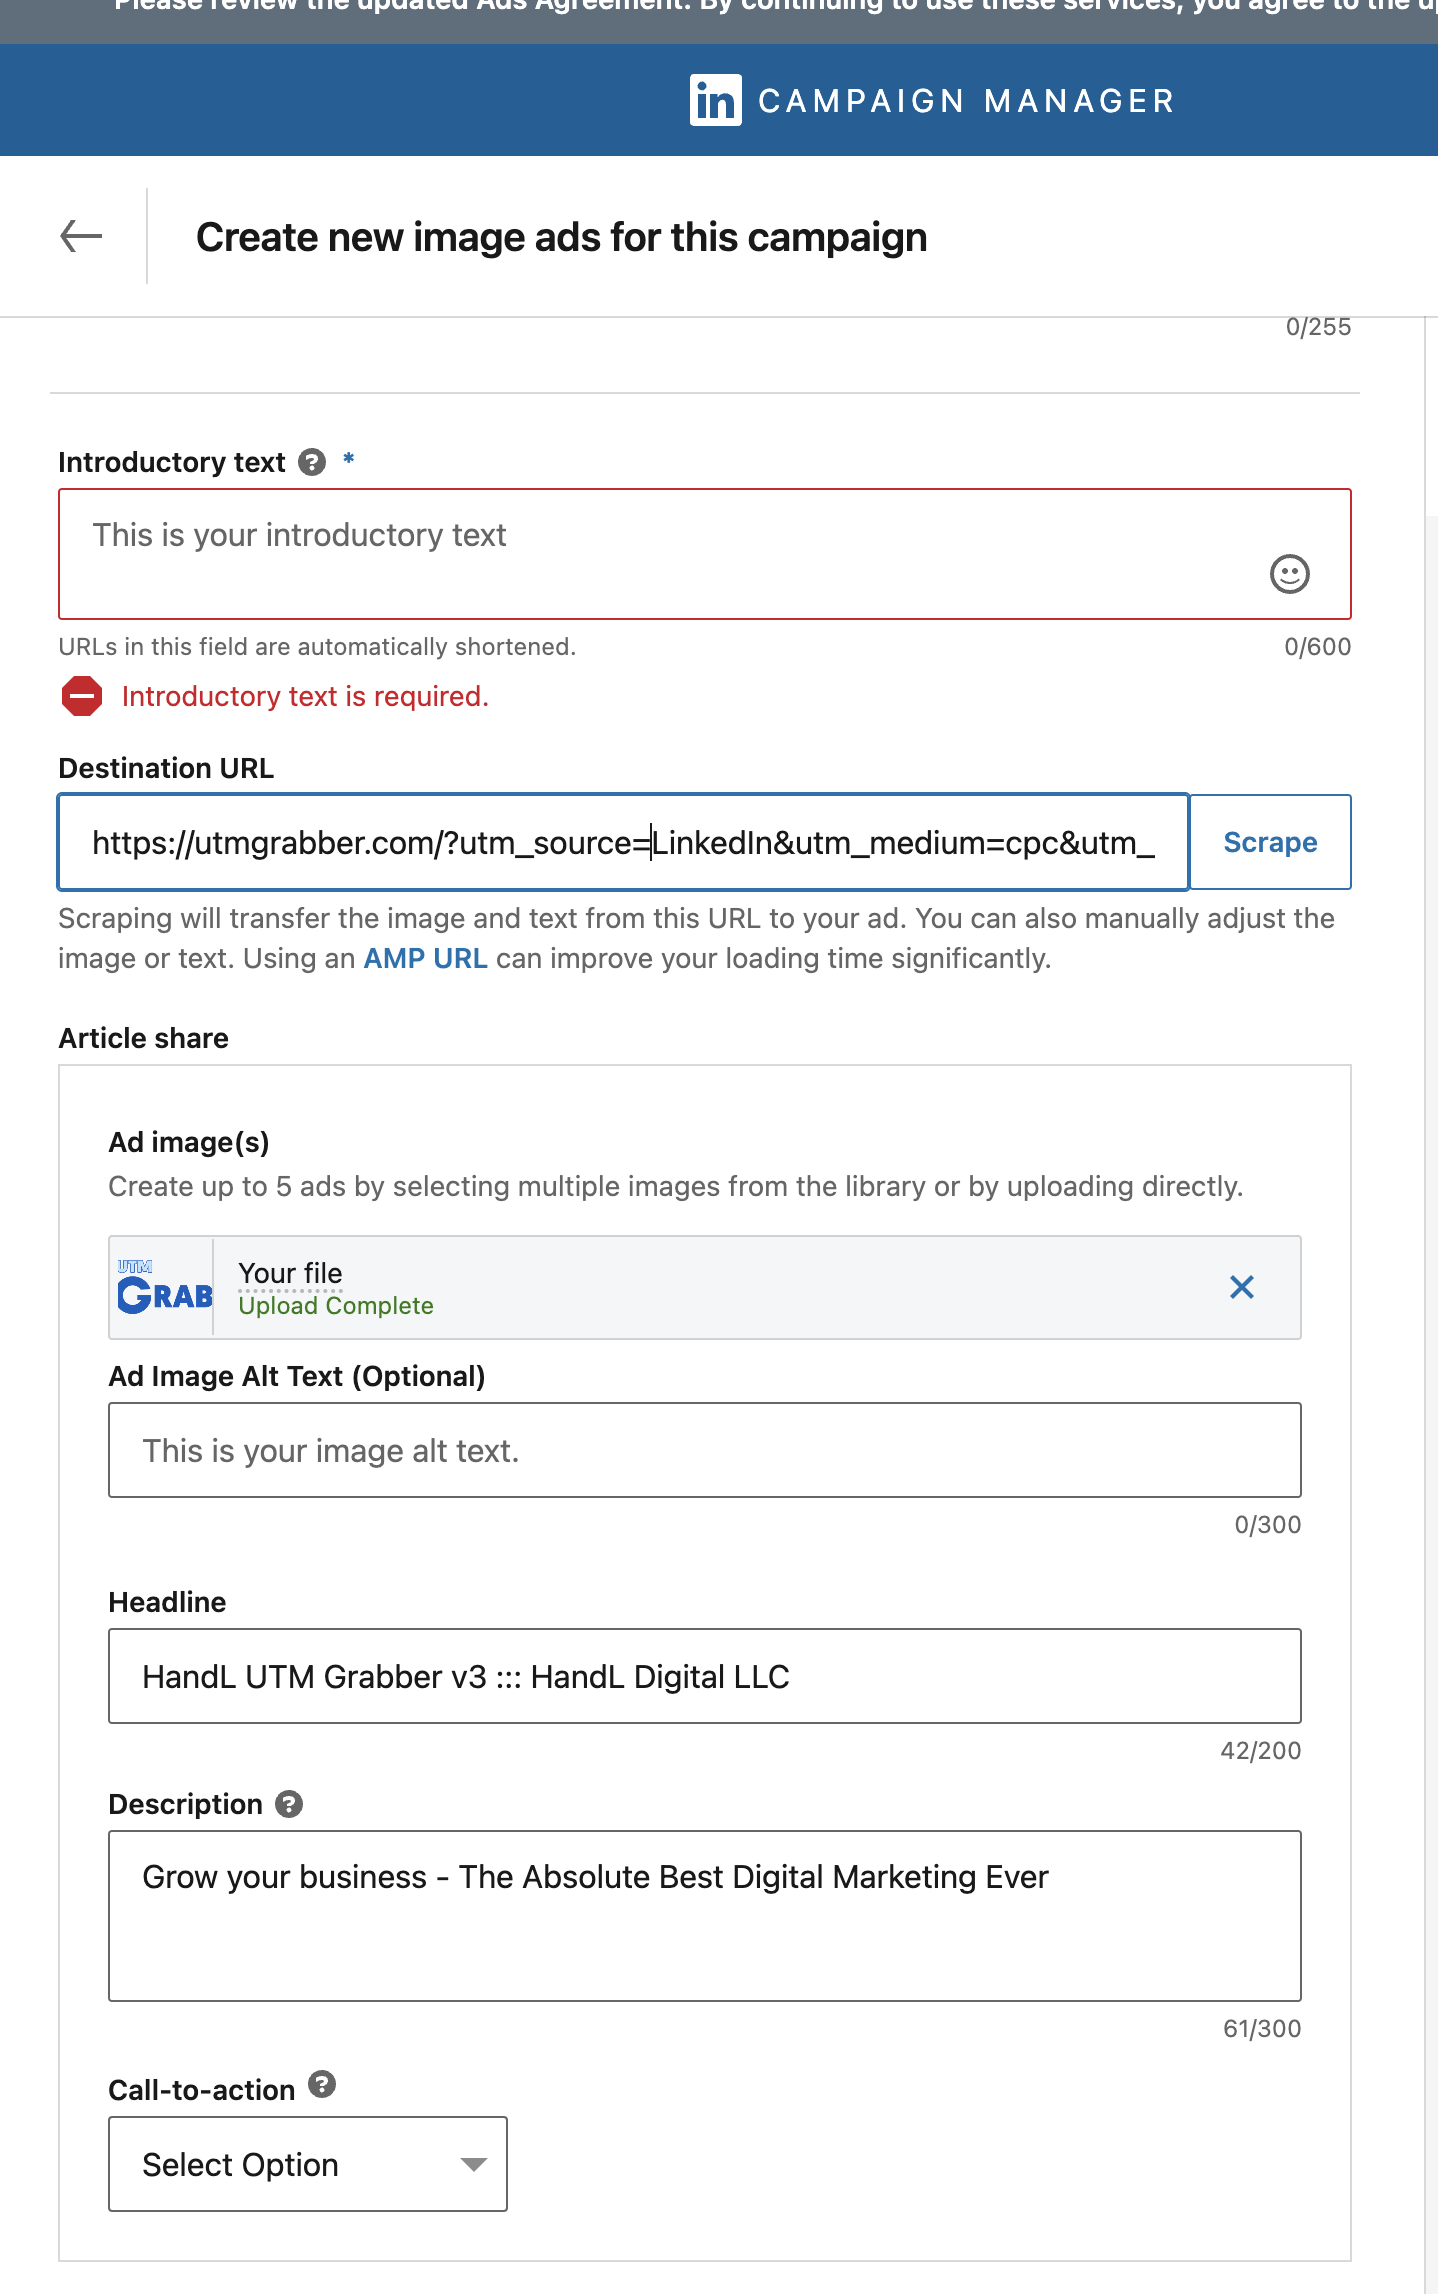
- How to track Paid Ads?
- Setting domain name
- What does new IOS 14 release (privacy) change in terms of tracking?
- Predefined parameters
- UTMs disappear in URL, does the plugin still track?
- Generating dynamic content based on UTM parameters
- Differentiate whether Paid / Organic / Direct / Referral
- What is the difference between all the handl params?
- Can't activate the license - Not Found
- Facebook Conversion API (FB CAPI)
- Tracking conversion start time, end time, and duration
- No License Key Field Appears in WP Admin > Plugins
- Define Your Own Custom Logic
- Enforce Consent From 3rd Party (e.g. GTM)
- Full Tracking Mode
- Auto-Populate Source/Medium Documentation
- Implementing Custom Consent Management with HandL UTM Grabber Plugin
- Enable Session Cookies
- Disable Server Side Tracking
- Phone Tracking (to boost Call Rail etc)
- GDPR Implementation Guide for HandL UTM Grabber Plugin
- MCP (Model Context Protocol) for UTMGrabber Reports
How to use?
1-WP’s Native Short Codes
2-Input Field Wrapper
3-Hassle Free Implementation (No Short code)
Native WP Shortcodes
One great feature of the plugin is the UTM variables are saved in client’s browser and even though there is no UTM variables in URL, the variables can still be accessible via shortcode across any page/widget of your website.
UTM Parameters (Last Touch)
[utm_campaign] – Prints out utm_campaign variable.
[utm_source] – Prints out utm_source variable.
[utm_term] – Prints out utm_term variable.
[utm_medium] – Prints out utm_medium variable.
[utm_content] – Prints out utm_content variable.
[gclid] – Prints out gclid variable. Google Ads click ID
[fbclid] – Prints out fbclid variable. Facebook Ads click ID
[msclkid] – Prints out msclkid variable. Bing Ads click ID
UTM Parameters (First Touch)
[first_utm_campaign] – Prints out utm_campaign variable for first touch.
[first_utm_source] – Prints out utm_source variable for first touch.
[first_utm_term] – Prints out utm_term variable for first touch.
[first_utm_medium] – Prints out utm_medium variable for first touch.
[first_utm_content] – Prints out utm_content variable for first touch.
Facebook Ads Related Parameters Facebook Ads Dynamic Parameters - These values should be added as Custom Parameters in the Plugin
[ad_id] - Facebook Ad Id
[adset_id] - Facebook Ads Id
[ad_name] - Facebook Ads Name
[adset_name] - Facebook Adset Name
[placement] - Facebook Placement
//you can add many more using custom paramaters.
Google Ads Related Parameters Google Ads ValueTrack Parameters - These values should be added as Custom Parameters in the Plugin
[campaignid] - Google Ads ValueTrack Campaign Id
[adgroupid] - Google Ads ValueTrack Ads Group Id
[keyword] - Google Ads ValueTrack Keyword
[placement] - Google Ads ValueTrack Placement
//you can add many more using custom paramaters.
Other HandL UTM Grabber Parameters
[handl_original_ref] - original referral - first touch!
[handl_landing_page] - landing page - first touch!
[handl_landing_page_base] - - landing page base domain - first touch!
[handl_ip] - ip of the user
[handl_ref] - last touch referral
[handl_ref_domain] - last touch referral - domain only
[handl_url] - last touch url
[handl_url_base] - base URL only of handl_url
[organic_source] - organic source href (e.g. https://www.google.com/some/path)
[organic_source_str] - organic source (Google, Bing, Instagram etc)
[gaclientid] - Google Analytics clientid
[user_agent] - user (browser) agent
[traffic_source] - (Last Touch) Paid, Organic, Direct, Referral, Social
[first_traffic_source] - (First Touch) Paid, Organic, Direct, Referral, Social
[handlID] - Unique ID generated by HandL UTM Grabber
See what is the difference of all the handl_ params here What is the difference between all the handl params?
You get the gist by now, you can add ANY custom parameter you defined in the settings
[user]
[email]
[affid]
[cid]
Other internal COOKIES not meant for tracking, but needed for our plugin to function
HandLtestDomainName - to automatically get the domain for tracking (via client side) - you can overwrite this using Domain under settings.
HandLtestDomainNameServer - to automatically get the domain for tracking (via server side) - you can overwrite this using Domain under settings.
Input Field Wrapper
There are some places you are not able to use WP’s native shortcodes. One example is when you use HTML in WYSWYG editor. If you directly copy paste the HTML below in your WP editor, you will see that the shortcode breaks.
In order to prevent this, we recommend using the following shortcode wrappers.
UTM Parameters (Last Touch)
[utm_campaign_i]<input type="hidden" name="utm_campaign" value="%s" />[/utm_campaign_i]
[utm_source_i]<input type="hidden" name="utm_source" value="%s" />[/utm_source_i]
[utm_term_i]<input type="hidden" name="utm_term" value="%s" />[/utm_term_i]
[utm_medium_i]<input type="hidden" name="utm_medium" value="%s" />[/utm_medium_i]
[utm_content_i]<input type="hidden" name="utm_content" value="%s" />[/utm_content_i]
[gclid_i]<input type="hidden" name="gclid" value="%s" />[/gclid_i]
UTM Parameters (First Touch)
[first_utm_campaign_i]<input type="hidden" name="first_utm_campaign" value="%s" />[/first_utm_campaign_i]
[first_utm_source_i]<input type="hidden" name="first_utm_source" value="%s" />[/first_utm_source_i]
[first_utm_term_i]<input type="hidden" name="first_utm_term" value="%s" />[/utm_termfirst_utm_term_i_i]
[first_utm_medium_i]<input type="hidden" name="first_utm_medium" value="%s" />[/first_utm_medium_i]
[first_utm_content_i]<input type="hidden" name="first_utm_content" value="%s" />[/first_utm_content_i]
Facebook Ads Related Parameters Facebook Ads Dynamic Parameters
[ad_id_i]<input type="hidden" name="ad_id" value="%s" />[/ad_id_i]
[adset_id_i]<input type="hidden" name="ad_id" value="%s" />[/adset_id_i]
[ad_name_i]<input type="hidden" name="ad_name" value="%s" />[/ad_name_i]
[adset_name_i]<input type="hidden" name="adset_name" value="%s" />[/adset_name_i]
[placement_i]<input type="hidden" name="placement" value="%s" />[/placement_i]
//many more...
Google Ads Related Parameters Google Ads ValueTrack Parameters
[campaignid_i]<input type="hidden" name="campaignid" value="%s" />[/campaignid_i]
[adgroupid_i]<input type="hidden" name="adgroupid" value="%s" />[/adgroupid_i]
[keyword_i]<input type="hidden" name="keyword" value="%s" />[/keyword_i]
[placement_i]<input type="hidden" name="placement" value="%s" />[/placement_i]
//many more...
Other HandL UTM Grabber Parameters
[handl_original_ref_i]<input type="hidden" name="handl_original_ref" value="%s" />[/handl_original_ref_i]
[handl_landing_page_i]<input type="hidden" name="handl_landing_page" value="%s" />[/handl_landing_page_i]
[handl_ip_i]<input type="hidden" name="handl_ip" value="%s" />[/handl_ip_i]
[handl_ref_i]<input type="hidden" name="handl_ref" value="%s" />[/handl_ref_i]
[handl_url_i]<input type="hidden" name="handl_url" value="%s" />[/handl_url_i]
[organic_source_i]<input type="hidden" name="organic_source" value="%s" />[/organic_source_i]
[organic_source_str_i]<input type="hidden" name="organic_source_str" value="%s" />[/organic_source_str_i]
[gaclientid_i]<input type="hidden" name="gaclientid" value="%s" />[/gaclientid_i]
[user_agent_i]<input type="hidden" name="user_agent" value="%s" />[/user_agent_i]
You get the gist by now, you can add ANY custom parameter you defined in the settings
[user_i]<input type="hidden" name="user" value="%s" />[/user_i]
[email_i]<input type="hidden" name="email" value="%s" />[/email_i]
[affid]<input type="hidden" name="affid" value="%s" />[/affid]
[cid]<input type="hidden" name="cid" value="%s" />[/cid]
To append all the UTMs to your link, you can use handl_all
[handl_all_i]<iframe src="https://someexternaldomain.com?%s" border="0" style="border: none; opacity: 1; visibility: visible;"></iframe>[/handl_all_i]
You can safely use the shortcode wrappers in your HTML content without worrying about breaking the code.
Hassle Free Implementation (No shortcode)
Upon ativation of this plugin, it will fill the elements named “utm_source, utm_medium, utm_term, utm_content, utm_campaign, gclid” AUTOMAGICALLY! (by element name, id and class)
-Simple Examples:
-More Complex Examples:
<div class="input-wrapper" id="utm_campaign">
<input type="hidden" name="foo"/>
</div>
<div class="input-wrapper utm_campaign">
<input type="hidden" name="foo"/>
</div>
If you are already using one of those names either in your form element name, id, or class. You do not have to use the shortcode or shortcode weappers. HandL UTM Grabber will automatically fill the corresponding fields.
Easy peasy 😃
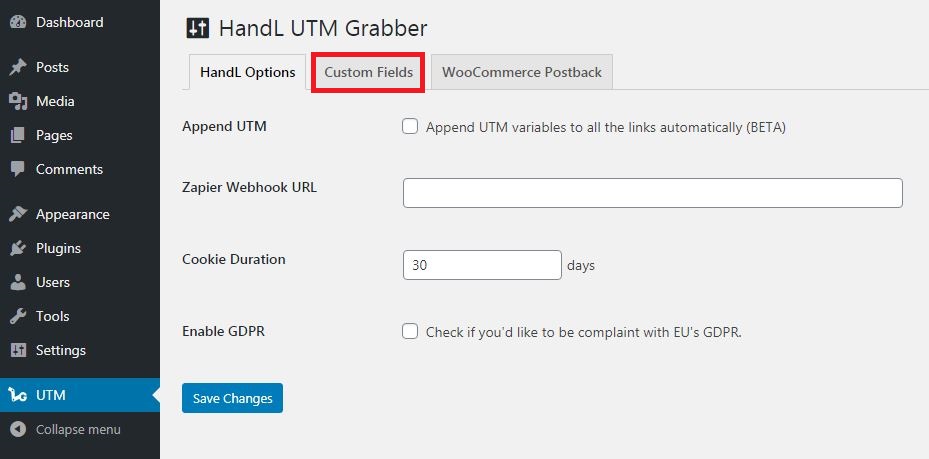
How to add custom parameters?
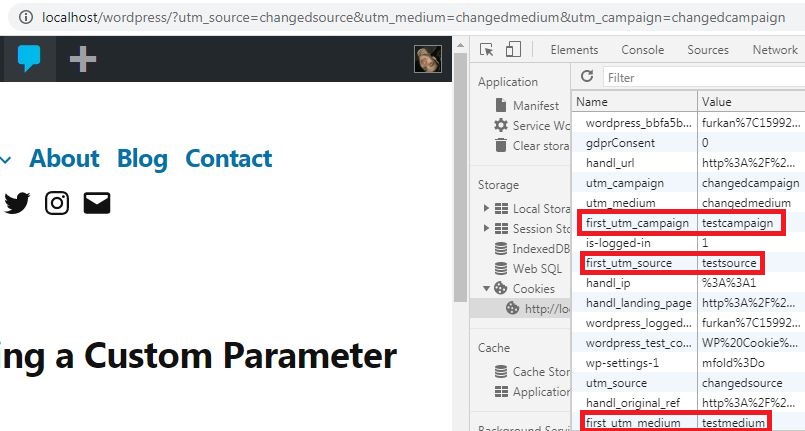
Adding a Custom Parameter
Overview
The Custom Parameters feature allows you to track additional URL parameters beyond the standard UTM parameters that HandL UTM Grabber tracks by default. This feature is particularly useful when you need to capture custom campaign parameters or third-party tracking parameters that aren't part of the standard UTM set.
Default Parameters
By default, HandL UTM Grabber tracks the following parameters here Native WP Shortcodes
Adding Custom Parameters
How to Access
- Navigate to your WordPress admin panel
- Go to HandL UTM Grabber settings
- Click on the "Custom Fields" tab

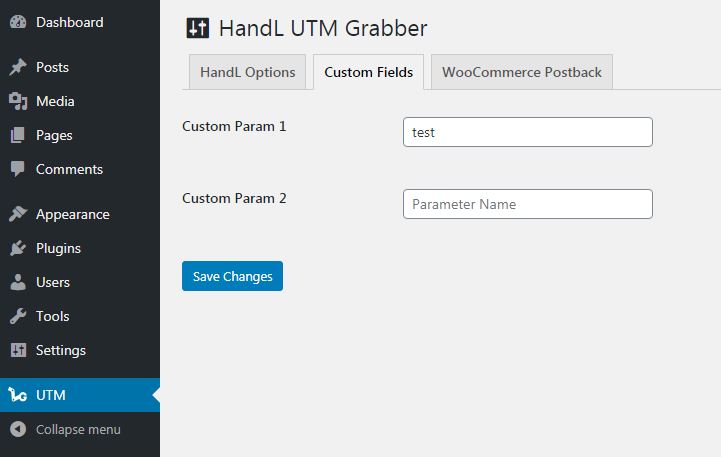
Configuration
- Enter your custom parameter names one by one in the provided input fields
- Each parameter should be entered without any special characters
- Click "Save Changes" to store your custom parameters
Important Notes
All native UTM parameters (utm_source, utm_medium, etc.) and standard tracking parameters (fbclid, gclid) are already tracked by default Only add parameters that aren't already included in the default tracking Make sure to read the documentation before using this feature, as you may not need it for standard tracking scenarios
How It Works
When custom parameters are configured:
- The plugin will automatically look for these parameters in:
- URL parameters
- Existing cookies
- Form submissions
- The parameters are:
- Captured when present in URLs
- Stored in cookies for later use
- Available via shortcodes
- Passed along with form submissions
Usage Examples
Example URL with Custom Parameter
https://yourdomain.com/page?custom_param=value
Using Custom Parameters in Shortcodes
[custom_param]
Dynamic Content Example
[custom_param_i]Your custom parameter value is: %s[/custom_param_i]
Technical Details
- Custom parameters are stored in WordPress options with the key 'custom_params'
- Parameters are automatically filtered to remove empty values
- The plugin ensures parameters are properly sanitized before storage
- Cookies are set with appropriate security flags and domain settings
- Parameters are made available to JavaScript via wp_localize_script
Best Practices
- Only add parameters you specifically need to track
- Use descriptive parameter names
- Test parameters before deploying to production
- Regularly review and clean up unused parameters
- Consider GDPR implications when tracking custom parameters
Limitations
- Parameter names should be URL-safe
- Values are stored as strings
- Cookie duration follows the global plugin settings
- Some parameters may be blocked by privacy settings or browsers
How to Add a fbclid as a custom parameter to track and collect?
Video Tutorial
How to add a 'affid' as a custom parameter to track and collect?
Video Tutorial
please click right to the video below and open link in new tab
Track and capture fbclid, _fbc and _fbp
Add fbclid, _fbc and _fbp as custom parameters under UTM menu
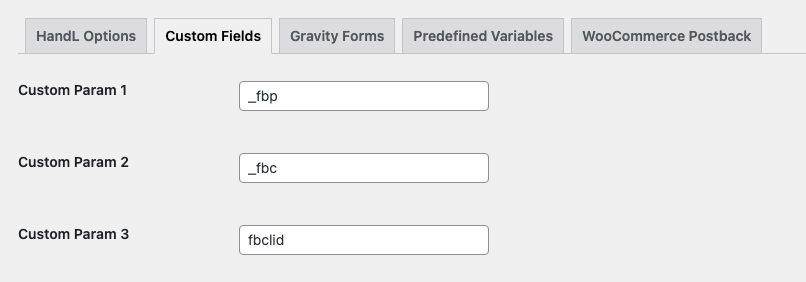
ad they will be tracked and captured just like any other UTM parameters. So easy... :)
Track and capture gclid, wbraid and gbraid
GCLID is already being tracked by default, so no action is required for that.
Add WBRAID and GBRAID as custom parameters under the UTM menu
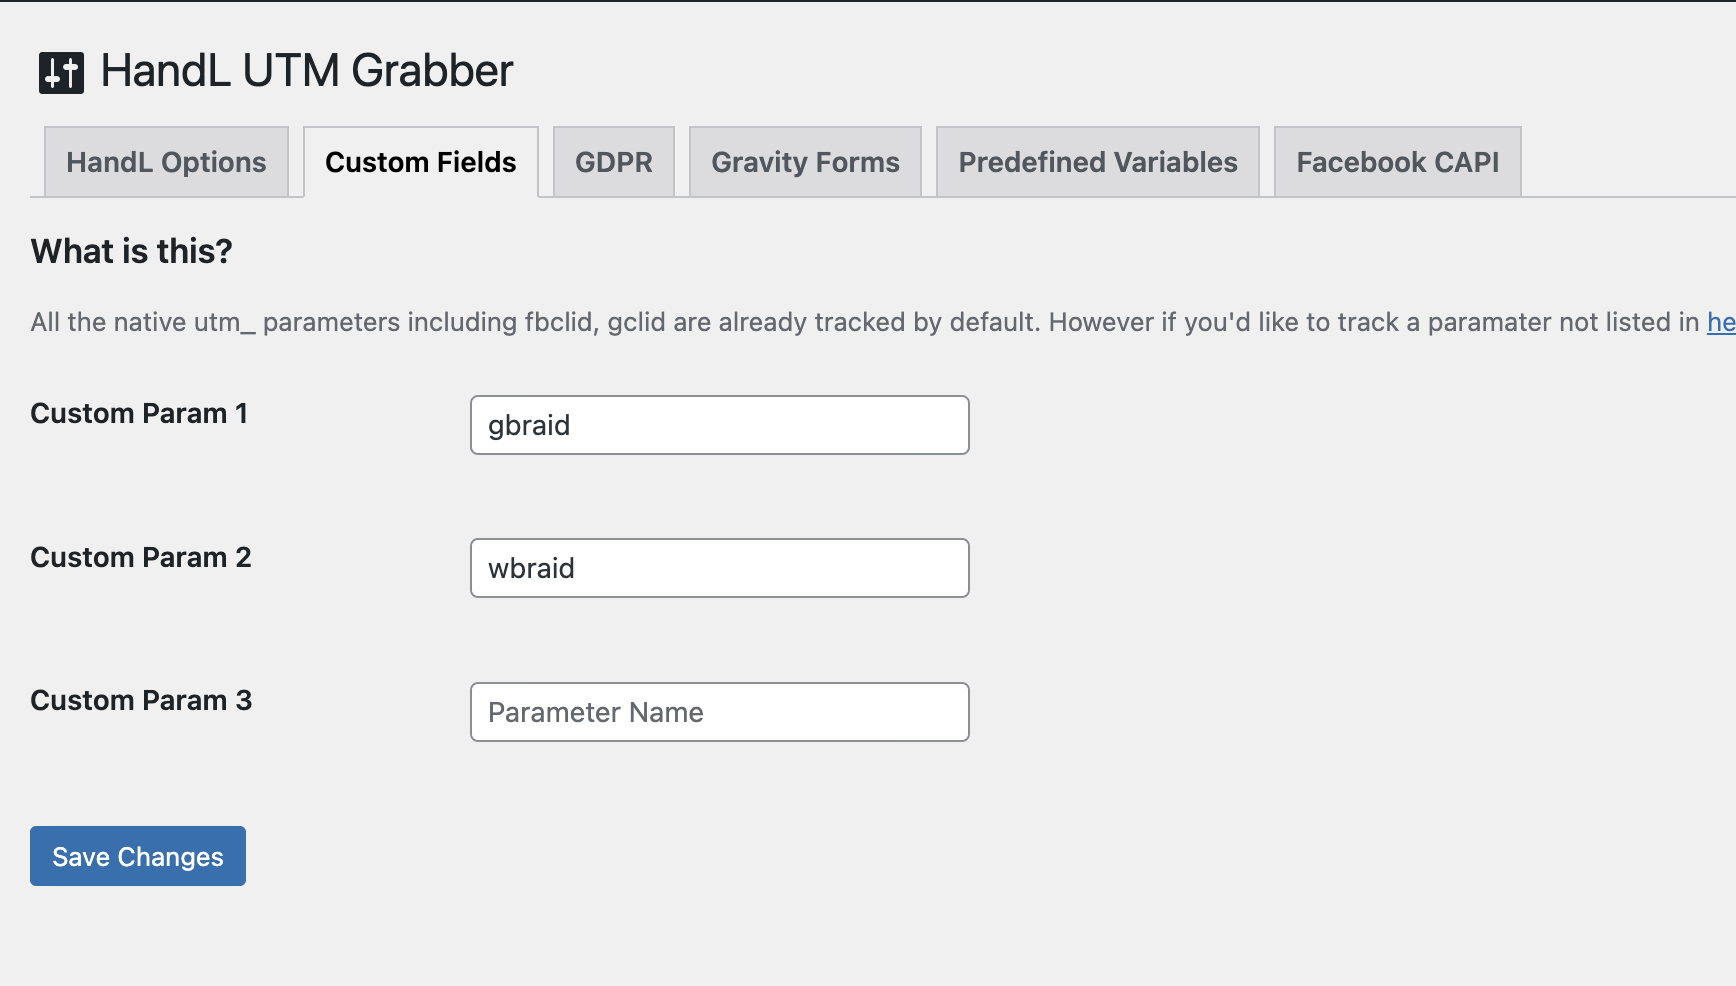
Add these parameters, and they will be tracked and captured just like any other UTM parameters. It's that easy!
How to Enable GDPR?
'Enabling GDPR' documentation with screenshots
1.Click UTM, check the "Enable GDPR" box in the HandL Options tab and save changes
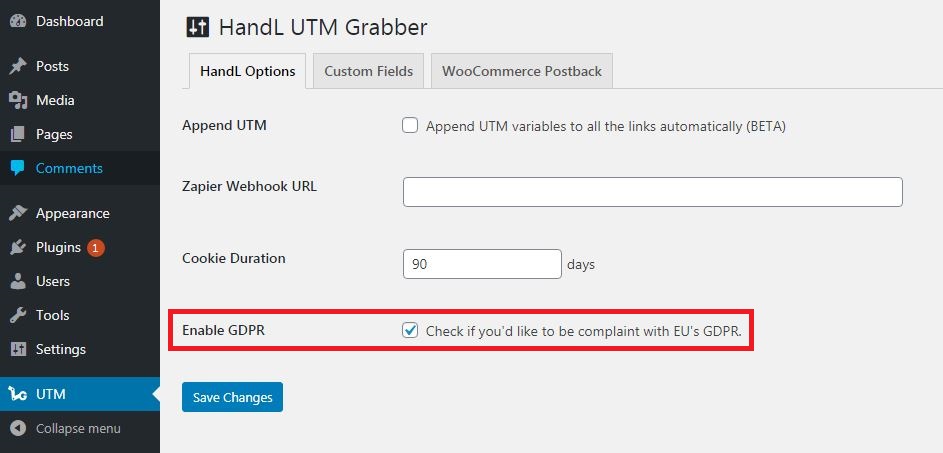
You can see the cookie alert below after refreshing the page

'Enabling GDPR' documentation video tutorial
Please watch the related Video Tutorial below
and click right to the video and open link in new tab
Setting GDPR in HandL UTM Grabber is very easy.
It is literally a click of a button to enable GDPR. Once it is enabled, clients will see a message in the footer to either accept or deny data collection.
If GDPR is active, there will be no data collected in client's browser until client gives consent (hit "Accept" button). User decision will be kept in COOKIES, so when user visits your site, it will honor user's previous decision.
It is also easy to integrate with other similar WordPress plugin developed such as "Cookie Notice" plugin, so basically if you are already using a GDPR plugin, you can integrate HandL UTM Grabber to recognize the GDPR plugin of your choice.
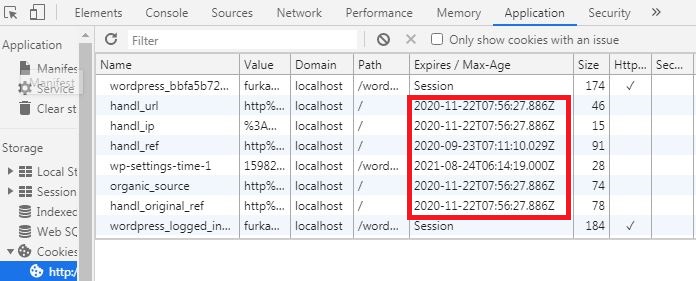
How to Set Cookie Duration?
Setting the Cookie Duration
Video Tutorial
please click right to the video below and open link in new tab
1.Click UTM and set the cookie duration below the HandL Options tab
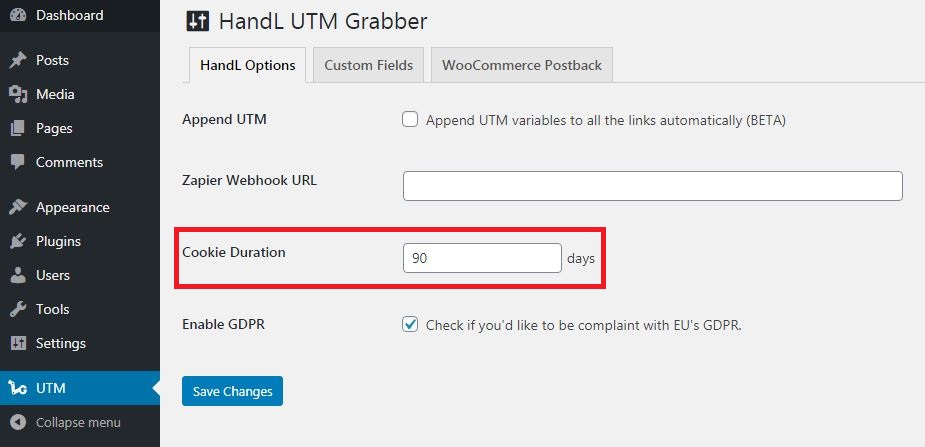
You can see the expiration date on developer console
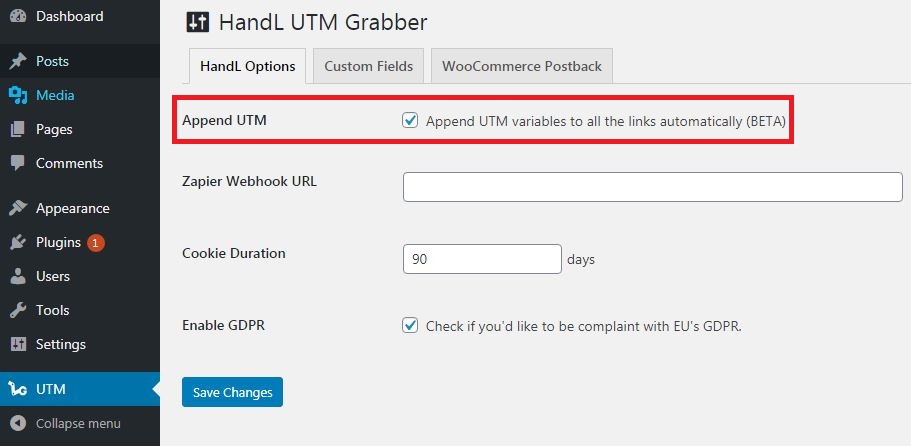
How to Append UTM?
Appending UTM Globally
1.Click UTM, check the "Append UTM" box in the HandL Options tab and save changes
NOTE: This may not work for some of the themes that are not using native wp_content filter. Or may not work for some of the Content builder plugin. If this method does not work, you can always append UTMs individually to your loinks an buttons using class variables utm-out. Please see Appending UTMs to the buttons using class name attributes for more.
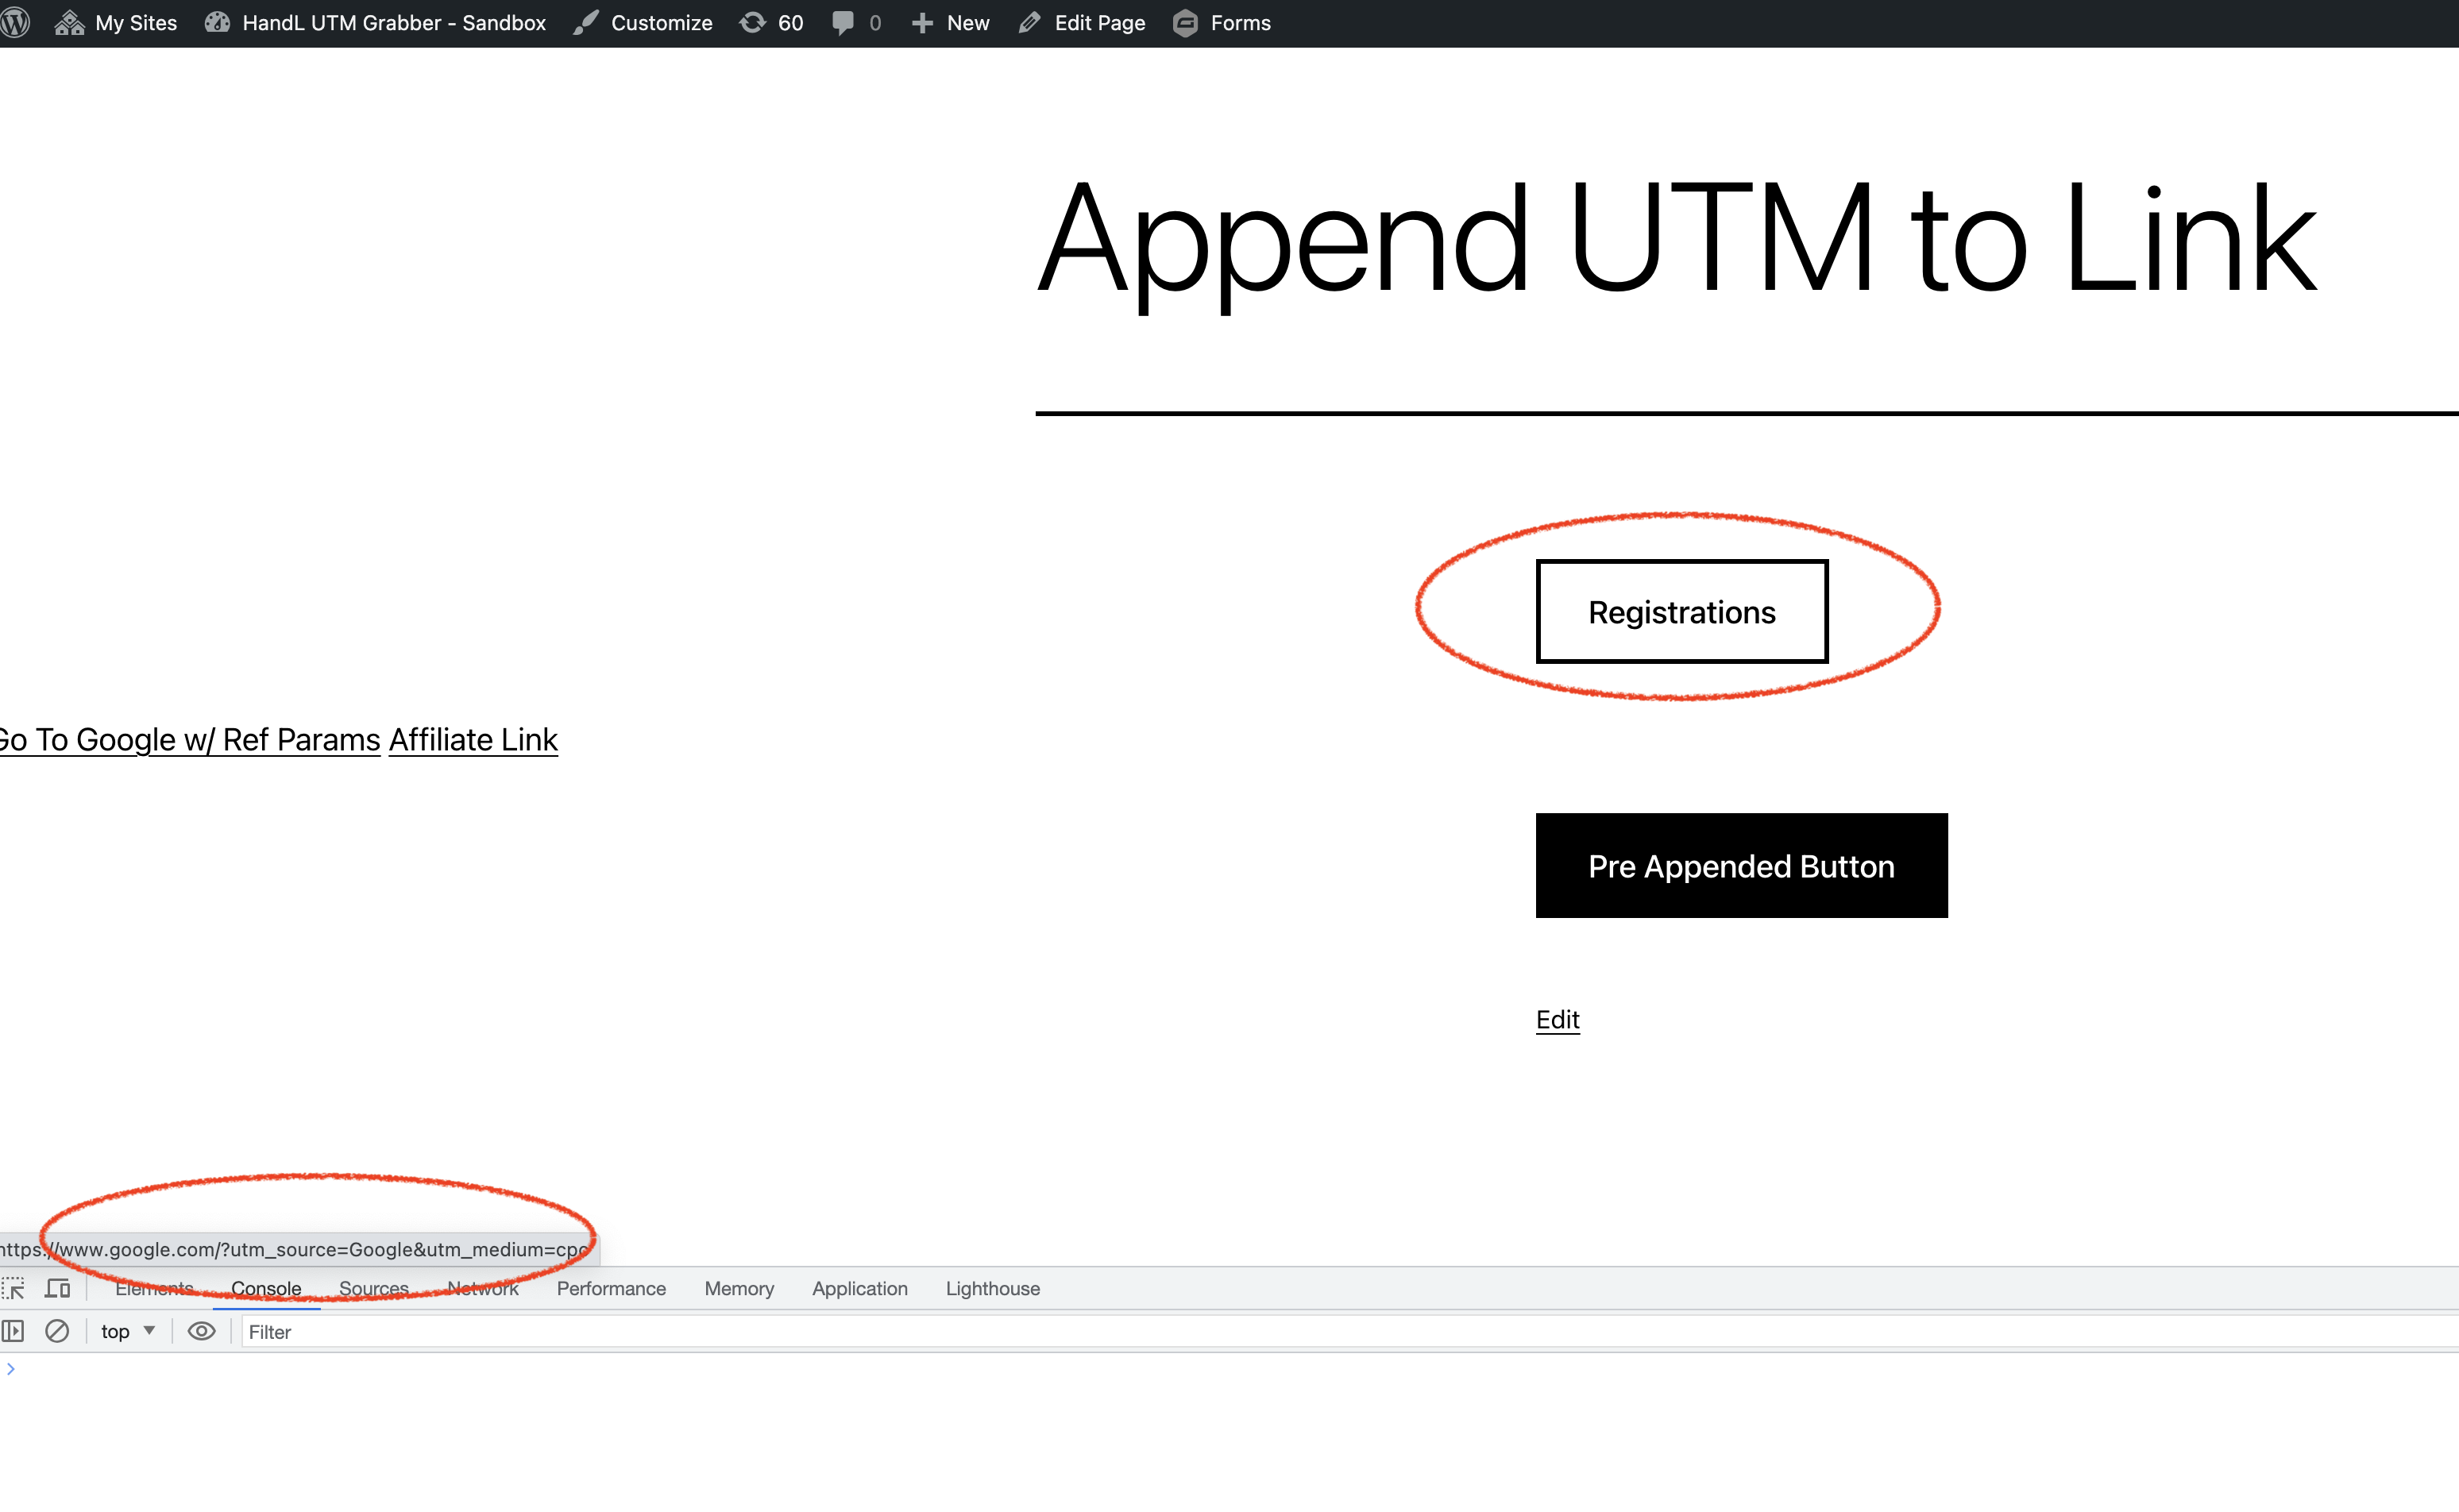
Appending UTMs to the buttons using class name attributes (Selectively)
This technique is extremely useful if you are sending out traffic (ouf of your domain). Or you want to specifically append UTMs to some links.
<a href="https://www.someoutgoinglink.com/" class="utm-out">
HandL UTM Grabber automatically scan all the links and buttons having utm-out class and append all the UTMs automatically so your final URL will be like this.
<a href="https://www.someoutgoinglink.com/?utm_source=google&utm_medium=cpc&utm_campaign=spring_sale&utm_term=term&utm_content=content" class="utm-out">
utm-out also works if it is at the parent level. For example
<div class="parent-div utm-out">
<a href="https://www.someoutgoinglink.com/">
</div>
This will also populate all the UTMs like this
<div class="parent-div utm-out">
<a href="https://www.someoutgoinglink.com/?utm_source=google&utm_medium=cpc&utm_campaign=spring_sale&utm_term=term&utm_content=content">
</div>
Appending UTMs to the Iframe src
You can append all the UTMs to your target website URL within iframe. This is actually very helpful, if you are using iframe for your optin forms and you would like to pass the UTM values captured to prefill your form.
It works very simple.
Your iframe code normally look like this
<iframe src="https://yourwebsite.com/optin-form" frameborder="0" width="1000" height="700" scrolling="no"></iframe>
simply add the utm-src class to your iframe like this
<iframe src="https://yourwebsite.com/optin-form" class="utm-src" frameborder="0" width="1000" height="700" scrolling="no"></iframe>
And you are good to passing all the UTMs to your iframe URL :)
Appending UTMs using Shortcode
If none of the other propsed solutions here How to Append UTM? worked, you can always pull the UTM parameters using the shortcode.
For example
<a href="https://www.domain.com?utm_campaign=[utm_campaign]"></a>
<div class="some-cool-div" data-url="https://www.domain.com?utm_campaign=[utm_campaign]"></div>
Append UTMs upon DOM change
Here is an example of snippet you can use to append UTMs upon a DOM change. This requires advance coding skills.
setTimeout(function(){
var target = document.querySelector('#storepoint-results')
var observer = new MutationObserver(function(mutations) {
console.log(jQuery(target).find('.storepoint-onlinestore').length)
if ( jQuery(target).find('.storepoint-onlinestore').length > 0 ){
var a = jQuery(target).find('.storepoint-onlinestore')
var target_url = a.attr('href')
var merged = jQuery.extend( {}, handl_utm, getSearchParams(target_url) )
var src = target_url.split("?")[0];
if ( !jQuery.isEmptyObject(merged) ){
var final_target = src + "?" + jQuery.param(merged)
}
a.attr('href', final_target)
}
});
var config = { attributes: true, childList: true, characterData: true };
observer.observe(target, config);
}, 500);
Selecting specific parameters for append utm
In some rare instances, you might want to specify certain parameters to append and exclude the rest. Make your selections below, and only the chosen parameters will be appended to the links. This also applies to the utm-out, utm-out-js and utm-src feature. If no selection is made below, all parameters will be appended by default.
Simply click Append UTM tab:
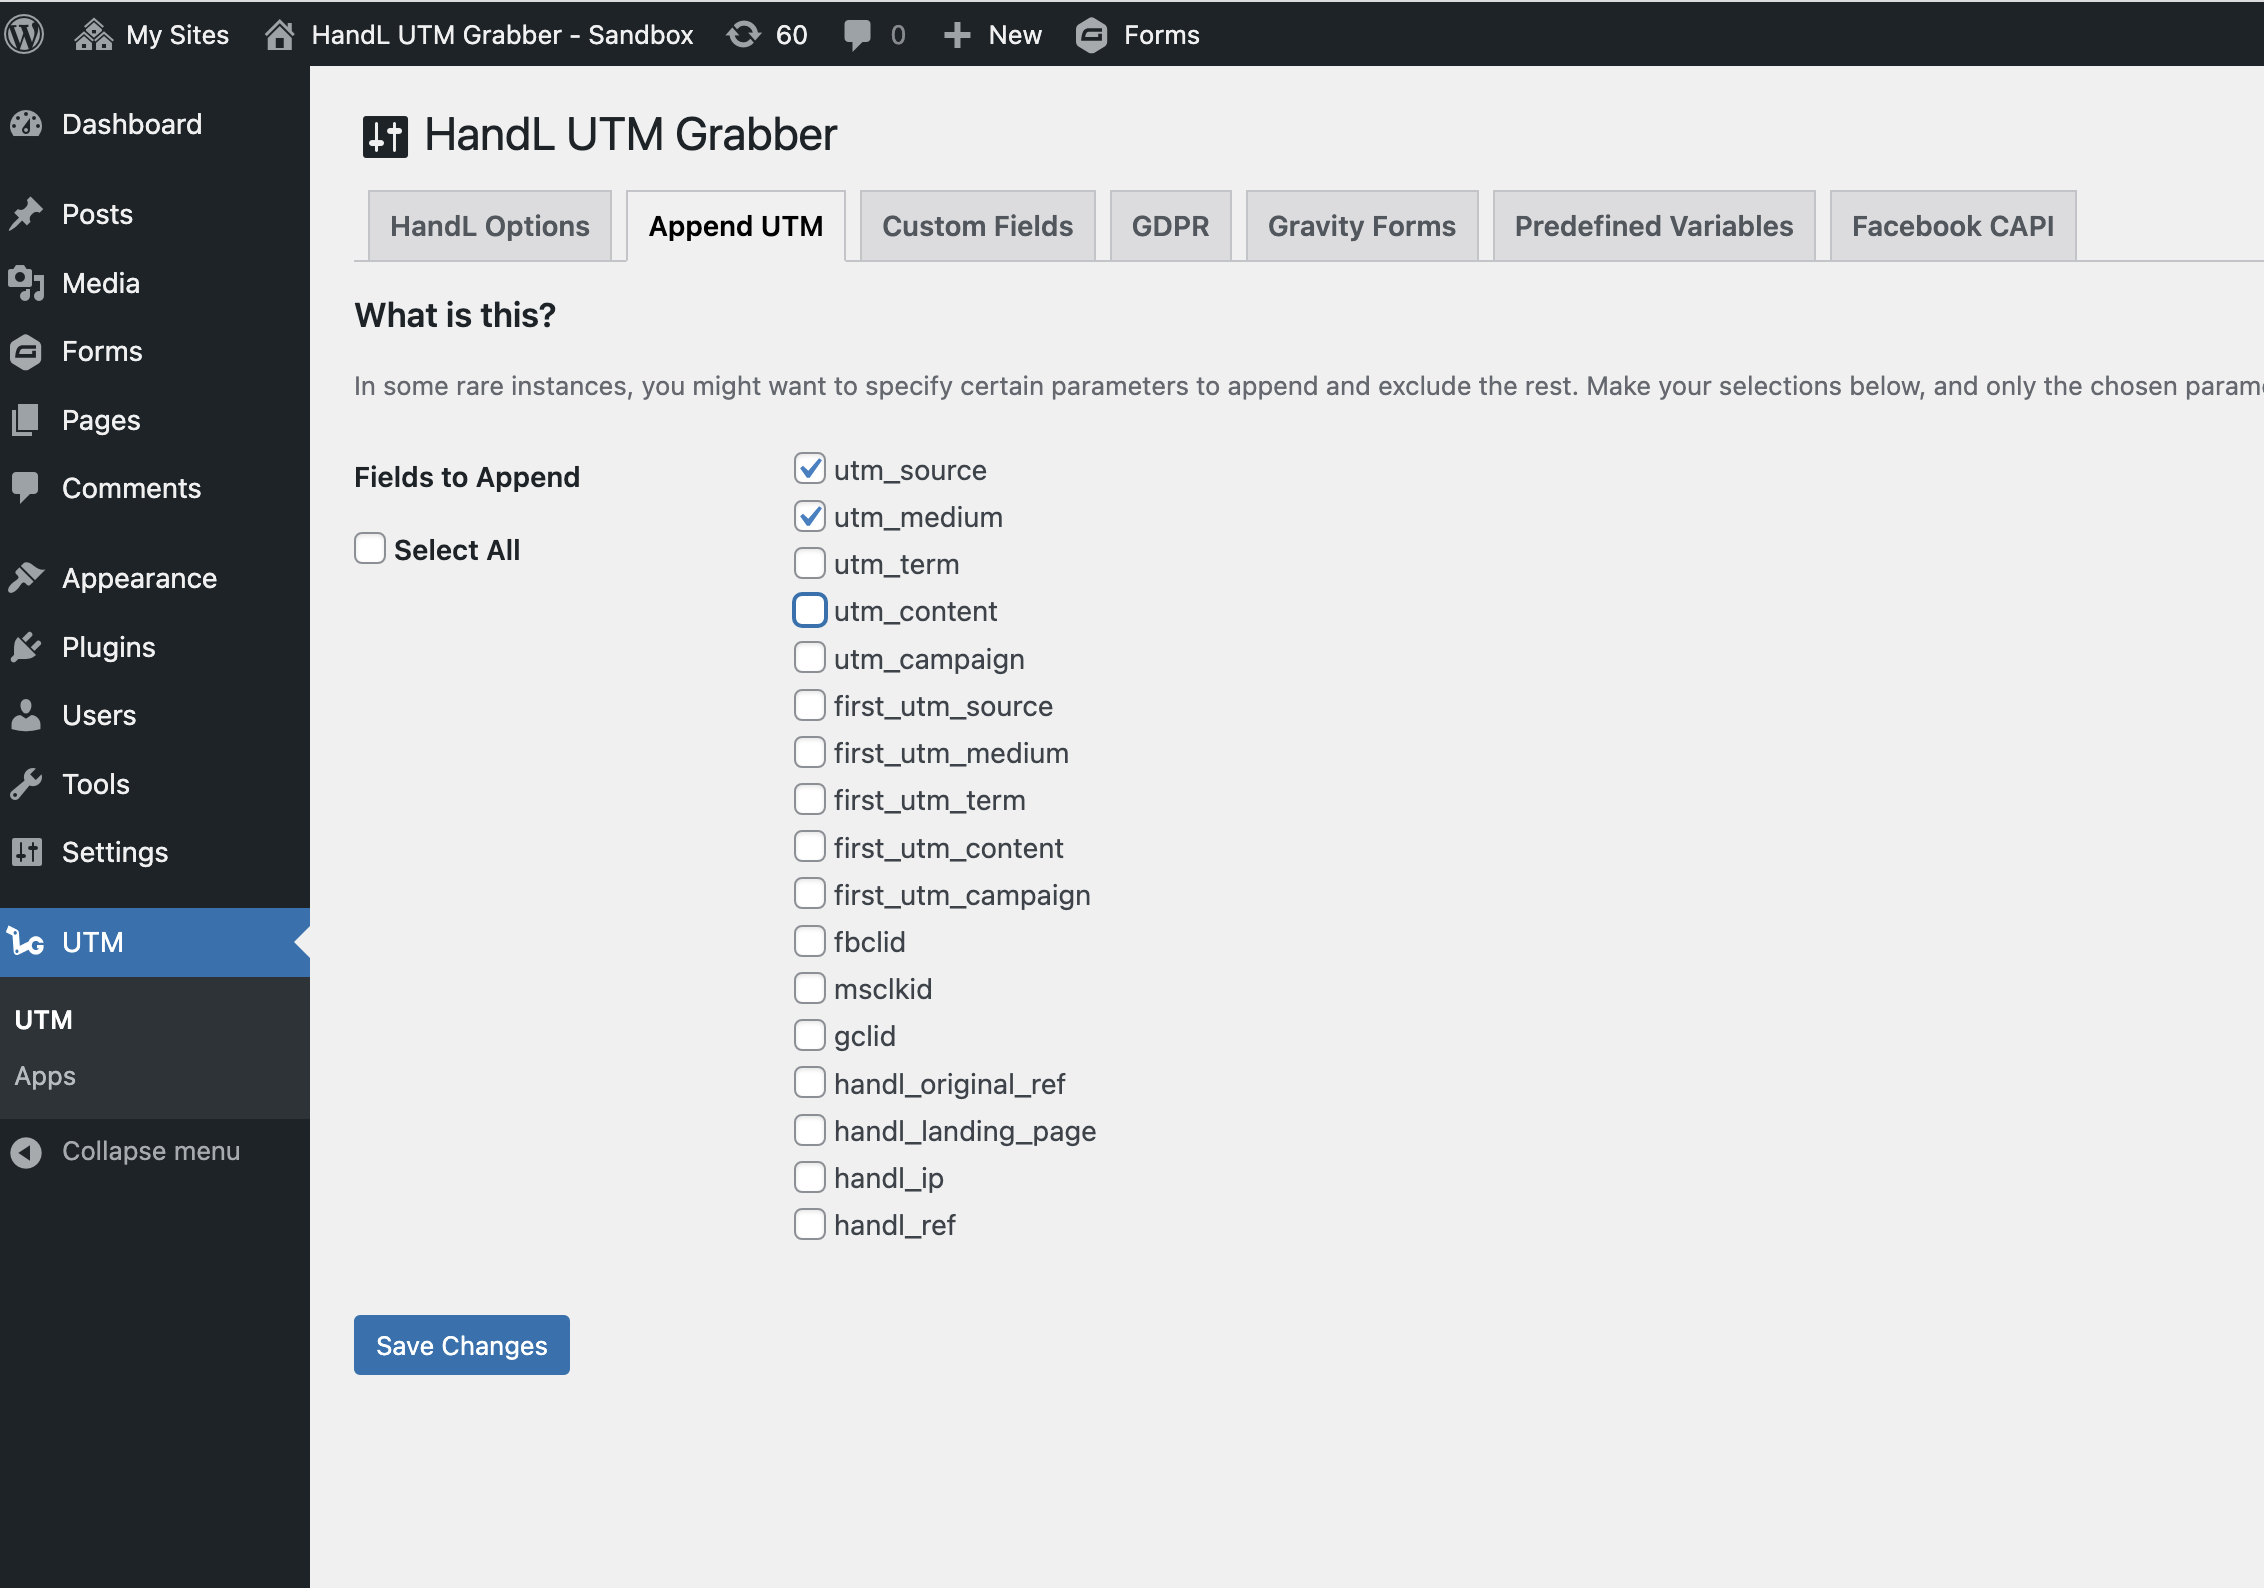
Select the fields you'd like to append.
Save the form.
Only the selected paramters will be appended to your links.
Skip Appending UTMs on Some Links
The no-utm class is used to exclude specific links or elements from having UTM parameters appended to them by the handl-utm-grabber plugin. This can be useful in scenarios where you do not want tracking parameters to be added to certain URLs, such as internal links, mailto links, or other special cases.
Usage
To prevent UTM parameters from being appended to a link or element, simply add the no-utm class to the HTML element.
Example
<a href="https://example.com" class="no-utm">Example Link</a>
In this example, the link to https://example.com will not have any UTM parameters appended to it by the handl-utm-grabber plugin.
Detailed Explanation
The handl-utm-grabber plugin scans the page for links and elements to append UTM parameters for tracking purposes. By adding the no-utm class, you instruct the plugin to skip these elements during its processing.
Common Use Cases
- Internal Links: Prevent UTM parameters from being added to internal navigation links.
<a href="/about-us" class="no-utm">About Us</a> - Mailto Links: Avoid appending UTM parameters to email links.
<a href="mailto:info@example.com" class="no-utm">Contact Us</a> - Telephone Links: Exclude UTM parameters from phone number links.
<a href="tel:+1234567890" class="no-utm">Call Us</a> - Special Cases: Any other links or elements where tracking is not desired.
<a href="https://example.com/special-case" class="no-utm">Special Case</a>
By using the no-utm class, you can have finer control over which links and elements are tracked with UTM parameters, ensuring that only the desired URLs are included in your tracking strategy.
First / Last Touch Attribute
First Touch
1.Paste the link in the campaign url builder and fill the required fields.
2.Copy the link below and search it
3.Open developer console
Last Touch
1.Change values in the url and refresh the page.
New values will be seen in the fields.
The old values are in the "first_utm" field.
'First & Last Touch Attribute' documentation video tutorial
Overview
The HandL UTM Grabber plugin tracks various UTM parameters and other relevant data to help understand the source and behavior of website traffic. This documentation focuses on the first touch parameters, which capture the initial interaction a user has with the website, and the last touch parameters, which capture the most recent interaction.
First Touch Parameters
First touch parameters are captured when a user first visits the website. These parameters are stored in cookies and are not overwritten on subsequent visits. The following are the first touch parameters:
- [first_utm_campaign]: Captures the utm_campaign variable for the first touch.
- [first_utm_source]: Captures the utm_source variable for the first touch.
- [first_utm_term]: Captures the utm_term variable for the first touch.
- [first_utm_medium]: Captures the utm_medium variable for the first touch.
- [first_utm_content]: Captures the utm_content variable for the first touch.
- [handl_original_ref]: Captures the original referral URL for the first touch.
- [handl_landing_page]: Captures the full URL of the landing page for the first touch.
- [handl_landing_page_base]: Captures the base domain of the landing page for the first touch.
How It Works
When a user visits the website for the first time, the plugin checks if the first touch parameters are already set in the cookies. If the parameters are not set, the plugin captures the current UTM parameters and other relevant data and stores them in cookies with the prefix first_. These cookies are set with a long expiration time to ensure they persist across multiple sessions.
Last Touch Parameters
Last touch parameters capture the most recent interaction a user has with the website. These parameters are updated on each visit and provide insights into the latest source of traffic.
Conclusion
The first touch parameters provide valuable insights into the initial interaction a user has with the website, helping to understand the effectiveness of marketing campaigns and the original source of traffic. By capturing and storing these parameters in cookies, the HandL UTM Grabber plugin ensures that this data is preserved across multiple sessions, enabling more accurate tracking and analysis.
Please watch the related Video Tutorial below
and click right to the video and open link in new tab

How to Track Organic Traffic?
Organic Traffic UTM Parameters
Are you tracking all of your Organic traffic in Google Analytics?
[organic_source] - organic source href (e.g. https://www.google.com/some/path)
[organic_source_str] - organic source (Google, Facebook, Bing, Instagram etc)What do the organic tracking values mean?
You will often see the following following if you are tracking organic traffic using HandL UTM Grabber.
- Google: Referrer domain contains the term "google" (google.com, google.co.uk etc.)
- Yahoo: Referrer domain contains the term "yahoo" (yahoo.com etc.)
- Bing: Referrer domain contains the term "bing"
- Instagram: Referrer domain contains the term "instagram"
- Faecbook: Referrer domain contains the term "facebook"
- Twitter: Referrer domain contains the term "twitter"
- Snapchat: Referrer domain contains the term "snapchat"
- YouTube: Referrer domain contains the term "youtube"
- Pinterest: Referrer domain contains the term "pinterest"
- LinkedIn: Referrer domain contains the term "linkedin"
- Tumblr: Referrer domain contains the term "tumblr"
- OpenAI: Referrer domain contains the term "openai" or "chatgpt" (As of 3.1.7)
- Perplexity: Referrer domain contains the term "perplexity" (As of 3.1.7)
- Claude: Referrer domain contains the term "claude" (As of 3.1.7)
- Gemini: Referrer domain contains the term "gemini" (As of 3.1.7)
- Copilot: Referrer domain contains the term "copilot" (As of 3.1.7)
- Internal: If the user is coming from other internal pages. First captured referral is matching the domain itself.
- Other: If none of the conditions above met, it is flagged as Other.
There is no UTM collected
HandL UTM Grabber works well with cache enabled websites. In most of the cases, you do not need to any server-side adjustments. Because our plugin leverages tracking client-side. However, if you feel that the tracking is not working, please do the appropriate steps based on your setup and server configuration.
WP Engine is my webhost
If you are on WP Engine, you need to contact WP Engine support and let them know that you want to whitelist the following QUERY ARGS & COOKIES to prevent caching.
utm_campaign
utm_source
utm_term
utm_medium
utm_content
gclid
first_utm_campaign
first_utm_source
first_utm_term
first_utm_medium
first_utm_content
handl_original_ref
handl_landing_page
handl_ip
handl_ref
handl_url
organic_source
gaclientid
//and all the custom parameters created by you
QUERY ARGS
utm_campaign
utm_source
utm_term
utm_medium
utm_content
gclid
//and all the custom queries you are capturing
Usually, this process takes couple of hours to complete. Hoever, you may want to wait longer for changes to completely take effect.
Still having problems? Let us know, clicking the chat bubble at the bottom right of the page.
I have WP Rocket installed
Before whitelisting the following COOKIES, please make sure to remove UTM query strings from our ignore list. And then continue with the following. You can do this by installing and activating the following small plugin.
If you have WP Rocket installed, you need to go to "Advanced Rules" and put the following entries under "Never Cache Cookies" section.
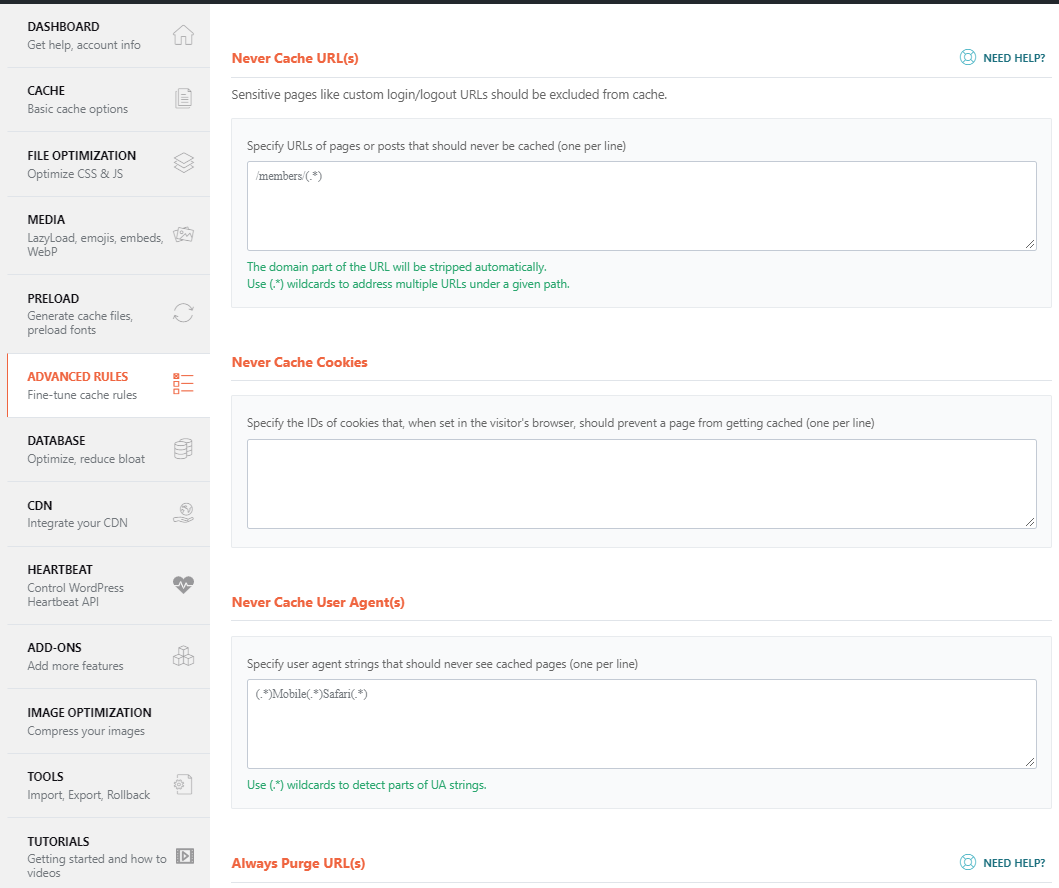
utm_campaign
utm_source
utm_term
utm_medium
utm_content
gclid
first_utm_campaign
first_utm_source
first_utm_term
first_utm_medium
first_utm_content
handl_original_ref
handl_landing_page
handl_ip
handl_ref
handl_url
organic_source
gaclientid
After this is implemented, make sure you start with a clean cache (incognito preferred) or hard refresh your browser and test again. It should work.
Still having problems? Let us know, clicking the chat bubble at the bottom right of the page.
Common Troubleshooting Tips
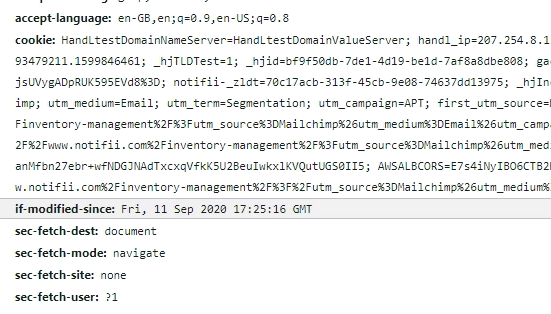
Check whether request is returned from cache
Visit your website making sure UTMs are appended to the URL. Open up the developer console and navigate to "Network" tab and select the page request (usually at the top) and Select "Headers" in the right panel. Check the cache related headers, if your server does not have any cache you should see "Cache-Control: max-age=0, no-cache, s-maxage=10"
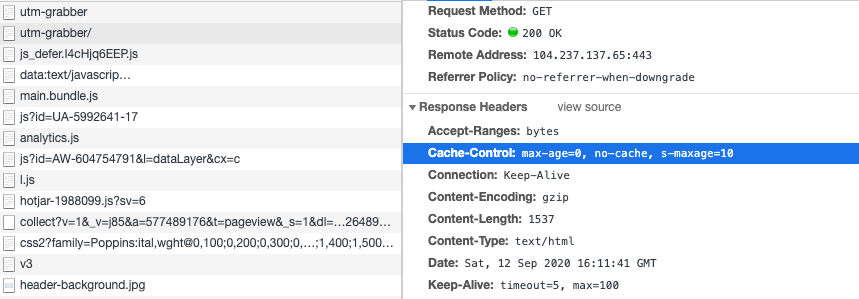
If there is cache, you should see something like "if-modified-since" or other cache related headers.
This will tell you whether caching is coming from server side (Varnish, CloudFlare) or WordPress site (such as WP Rocket, WP Super Cache etc). Your solution will vary depending on where the cache is coming from. You can whitelist the cookie paramters or/and query arguments used in HandL UTM Grabber V3 or you may have to add the page in the exclusion page altogether.
I am with FlyWheel
If you are on FlyWheel, you need to contact FlyWheel support and let them know that you want to whitelist the following QUERY ARGS & COOKIES to prevent caching.
utm_campaign
utm_source
utm_term
utm_medium
utm_content
gclid
first_utm_campaign
first_utm_source
first_utm_term
first_utm_medium
first_utm_content
handl_original_ref
handl_landing_page
handl_ip
handl_ref
handl_url
organic_source
gaclientid
//and all the custom parameters created by you
QUERY ARGS
utm_campaign
utm_source
utm_term
utm_medium
utm_content
gclid
//and all the custom queries you are capturing
Usually, this process takes couple of hours to complete. Hoever, you may want to wait longer for changes to completely take effect.
Still having problems? Let us know, clicking the chat bubble at the bottom right of the page.
I have SiteGround (SG) installed
I'm hosting with Pair
I'm hosting with Pantheon
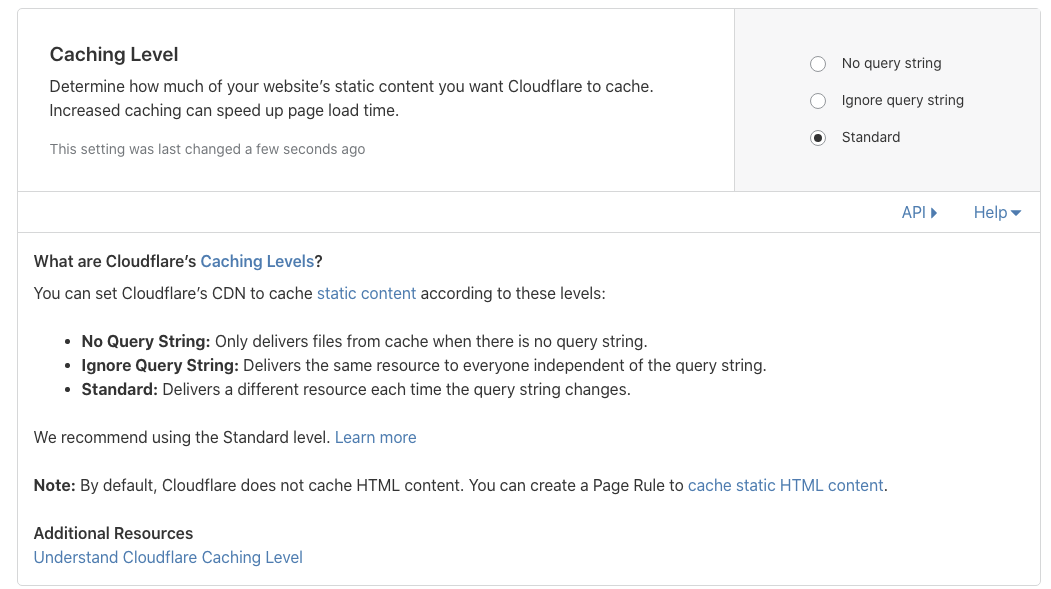
I'm using CloudFlare (CF)
Make sure the caching level is set as "Standard" shown in the image below
I'm using HummingBird WP plugin
Make sure "Cache URL queries" turned off

end exclude the following COOKIES and all the custom parameters created by you.

utm_campaign
utm_source
utm_term
utm_medium
utm_content
gclid
first_utm_campaign
first_utm_source
first_utm_term
first_utm_medium
first_utm_content
handl_original_ref
handl_landing_page
handl_ip
handl_ref
handl_url
organic_source
gaclientid
//and all the custom parameters created by you
Kinsta is my webhost
If you are on Kinsta, you need to contact Kinsta support and let them know that you want to whitelist the following QUERY ARGS & COOKIES to prevent caching.
utm_campaign
utm_source
utm_term
utm_medium
utm_content
gclid
first_utm_campaign
first_utm_source
first_utm_term
first_utm_medium
first_utm_content
handl_original_ref
handl_landing_page
handl_ip
handl_ref
handl_url
organic_source
gaclientid
HandLtestDomainName
//and all the custom parameters created by you
QUERY ARGS
utm_campaign
utm_source
utm_term
utm_medium
utm_content
gclid
//and all the custom queries you are capturing
Usually, this process takes couple of hours to complete. Hoever, you may want to wait longer for changes to completely take effect.
Still having problems? Let us know, clicking the chat bubble at the bottom right of the page.
Customer Provided Feedback
"I have found that the guide you have about Kinsta and the custom cache rules where we need to ask Kinsta to implement specific rules to let Handl work, are not enough. I'm sharing with you a screenshot from the Kinsta dashboard which shows that Kinsta Edge Caching (saving HTML on Cloudflare Edge PoPs) is not compatible with custom cache rules, and thus Handl customers with Kinsta should also turn off Edge Caching. It's logical since Handl rewrites HTML based on query parameters and custom cookies and the HTML in Cloudflare edge are static and not even triggering the HandL plugin."
This feedback was provided by a customer and included in our documentation as is.
I use WP Super Cache
There is known caching issues with WP Super Cache plugin. We'll update this document as we have more information. In the mean time, you can try the adding the following code in your functions.php
function handl_add_wpsc_cookie_banner() {
do_action( 'wpsc_add_cookie', 'utm_campaign' );
do_action( 'wpsc_add_cookie', 'utm_medium' );
do_action( 'wpsc_add_cookie', 'utm_term' );
do_action( 'wpsc_add_cookie', 'utm_content' );
do_action( 'wpsc_add_cookie', 'utm_source' );
}
add_action( 'init', 'handl_add_wpsc_cookie_banner' );
I'm using W3 Total Cache
Please do the following changes in the plugin
Go to Performance > Rejected cookies and copy/paste the following text in there and save
utm_campaign
utm_source
utm_term
utm_medium
utm_content
gclid
first_utm_campaign
first_utm_source
first_utm_term
first_utm_medium
first_utm_content
handl_original_ref
handl_landing_page
handl_ip
handl_ref
handl_url
organic_source
gaclientid
It should look like this.
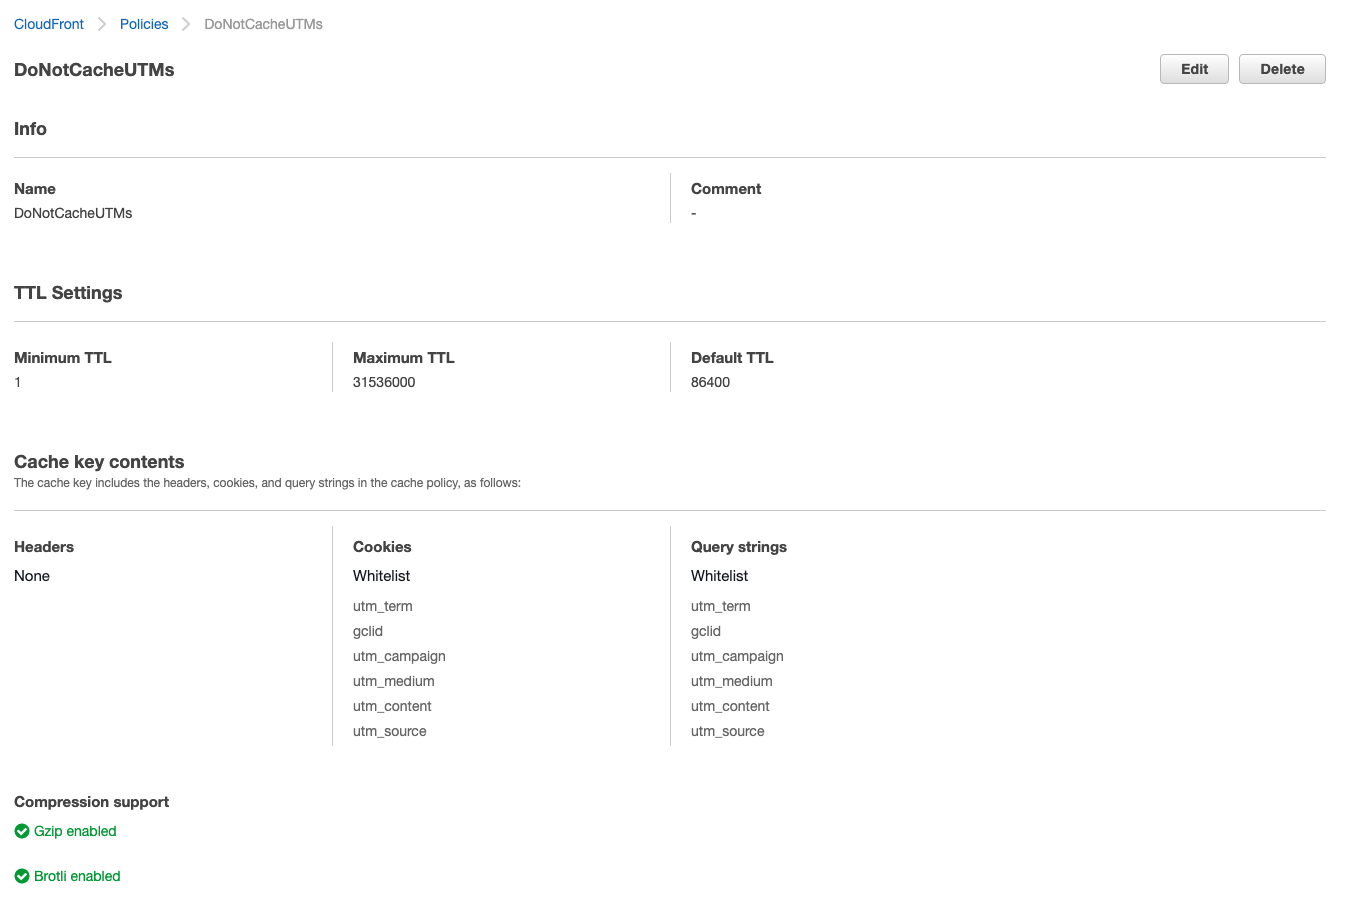
I'm on CloudFront
Please do the following changes in v
Create a new policy in CloudFront and attach it to your distribution.
You can include the following cookie exceptions
utm_campaign
utm_source
utm_term
utm_medium
utm_content
gclid
first_utm_campaign
first_utm_source
first_utm_term
first_utm_medium
first_utm_content
handl_original_ref
handl_landing_page
handl_ip
handl_ref
handl_url
organic_source
gaclientid
It should look like this.
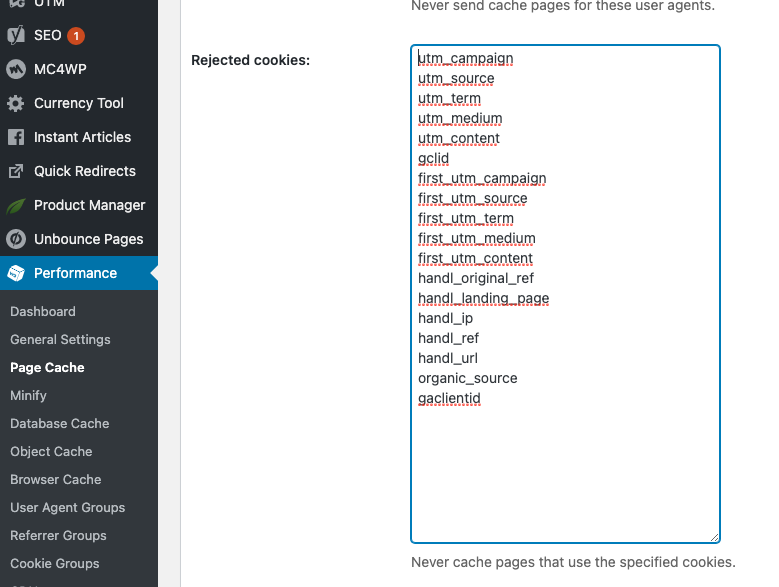
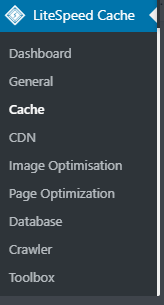
I'm using LiteSpeed caching plugin
If you are using the LiteSpeed caching plugin, you should do the following settings in your WP to effectively capture UTMs.
Go to Settings
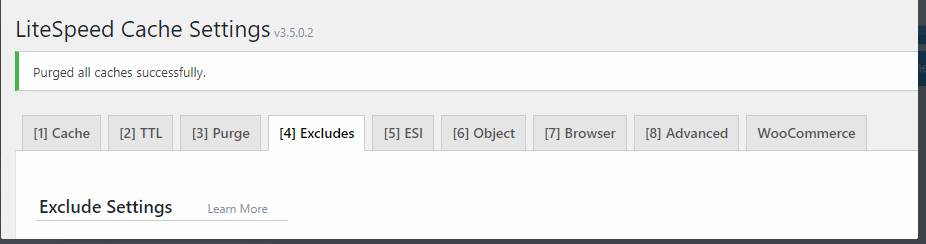
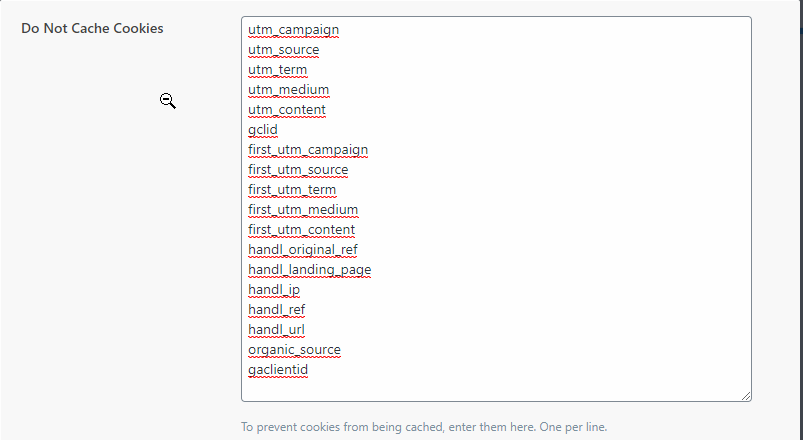
Copy the list below and add it in "Do not cache cookies" field
utm_campaign
utm_source
utm_term
utm_medium
utm_content
gclid
first_utm_campaign
first_utm_source
first_utm_term
first_utm_medium
first_utm_content
handl_original_ref
handl_landing_page
handl_ip
handl_ref
handl_url
organic_source
gaclientid
//and all the custom parameters created by you
Copy the list below and add it in "Do not cache query strings" field
QUERY ARGS
utm_campaign
utm_source
utm_term
utm_medium
utm_content
gclid
//and all the custom queries you are capturing
That's it. You are ready to go collecting UTMs :)
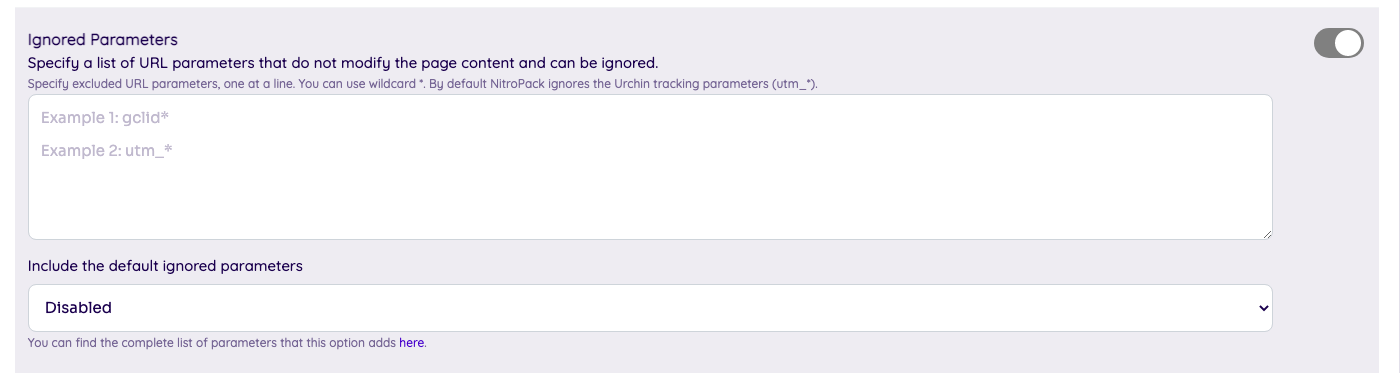
I've NitroPack plugin
1) Ignored parameters
Make sure "Include the default ignored parameters" is disabled.
2) Excluded Cookies (Now Obsolete, see Variation Cookies below instead)
Add the following cookies and all the custom parameters you created in "Excluded Cookies" section.

utm_campaign, utm_source, utm_term, utm_medium, utm_content, gclid, first_utm_campaign, first_utm_source, first_utm_term, first_utm_medium, first_utm_content, handl_original_ref, handl_landing_page, handl_ip, handl_ref, handl_url, organic_source, gaclientid
//and all the custom parameters created by you
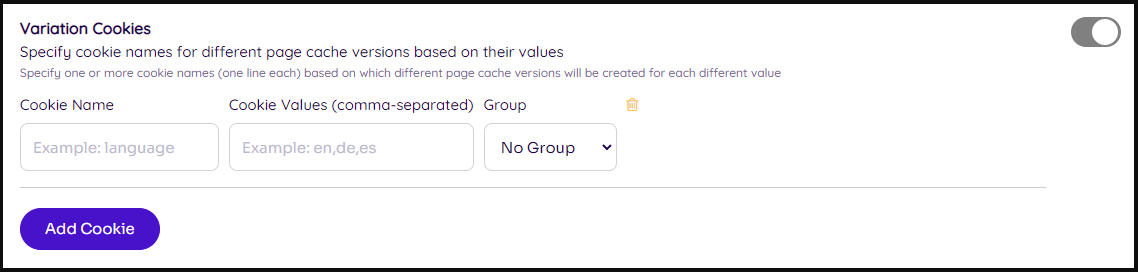
2) Variation Cookies
With Excluded ones (the method above), NitroPack wouldn't generate any cache for the pages containing your cookies.
While with Variation cookie, a new optimization would be created based on the different cookie values.
Still having problems? Let us know, clicking the chat bubble at the bottom right of the page.
I'm hosted on CloudWays
You should exclude cookies from varnish cache via the Cloudways platform.
Add the following cookies in there
utm_campaign
utm_source
utm_term
utm_medium
utm_content
gclid
first_utm_campaign
first_utm_source
first_utm_term
first_utm_medium
first_utm_content
handl_original_ref
handl_landing_page
handl_ip
handl_ref
handl_url
organic_source
gaclientid
//and all the custom parameters created by you
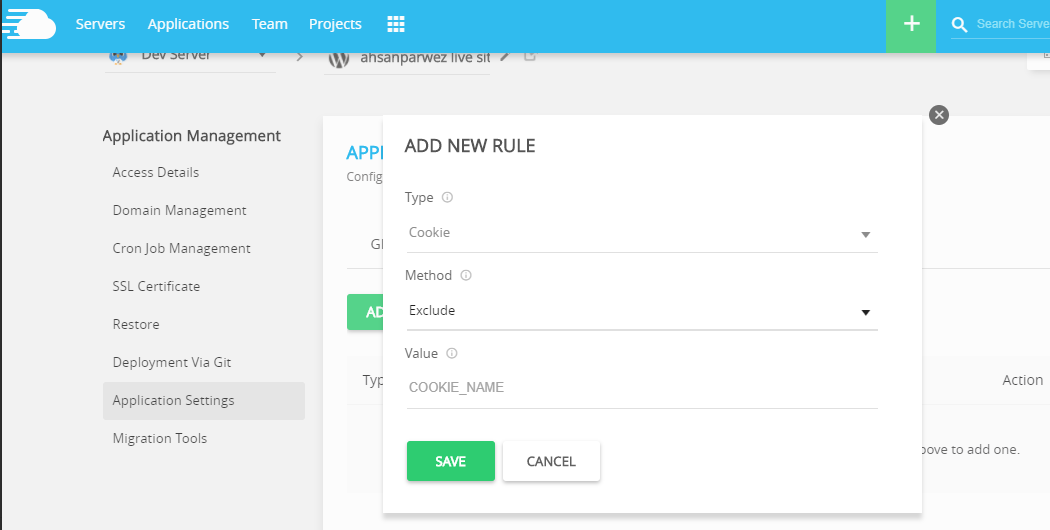
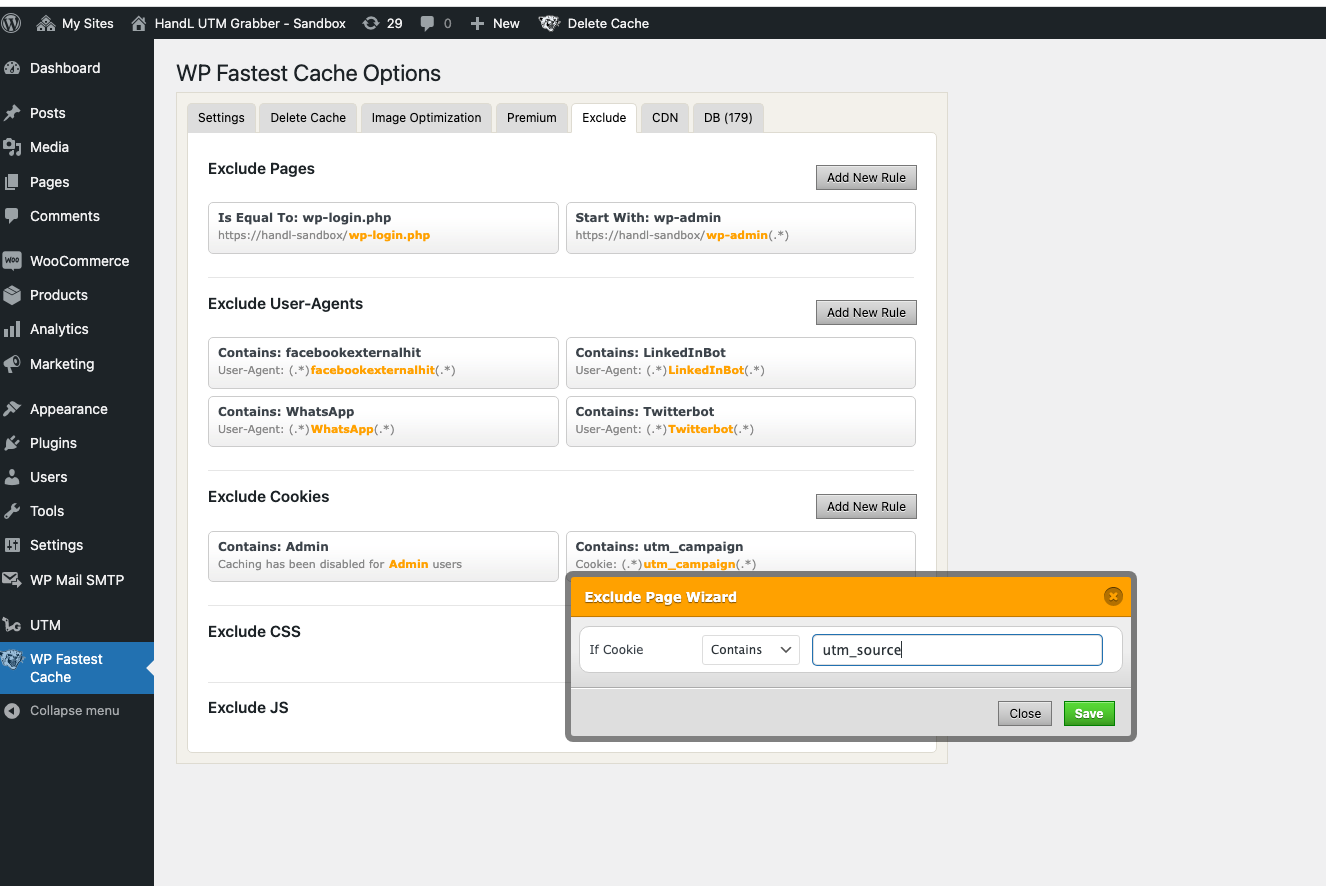
I'm using WP Fastest Cache
Exclude COOKIES
In order for HandL UTM Grabber to work more efficiently, you may want to whitelist some of the COOKIES our plugin uses so they are not cached.
You can do so very easily following the steps
- Go to the settings for the WP Fastest Cache plugin
- Click on the “Exclude” tab.
- Click the "Add New Rule" button associated with "Exclude Cookies"
- Type the cookie name you use from Native WP Shortcodes in the text box.
- Click "Save".
I'm using Wordfence
Wordfence has a feature called Live Traffic that serves an extra blank pageview to every new(?) visitor to check if they are a bot or real traffic.It is reported by our clients that HandL UTM Grabber must have been picking up the wordfence pageview as the first pageview as handl_url.
Proposed Solution: Turn off Live Traffic (switched from ALL to Security Only)
https://www.wordfence.com/help/tools/live-traffic/#traffic-logging-mode
I've WP Optimize
Add these thhree lines of code under Cookies which, if present, will prevent caching (one per line)
utm_* handl_* HandLtestDomainName

How to track Paid Ads?
Facebook Ads Tracking
In order to track your ads on Facebook Ads, make sure you included UTMs to your final destination URL (landing URLs) as shown below

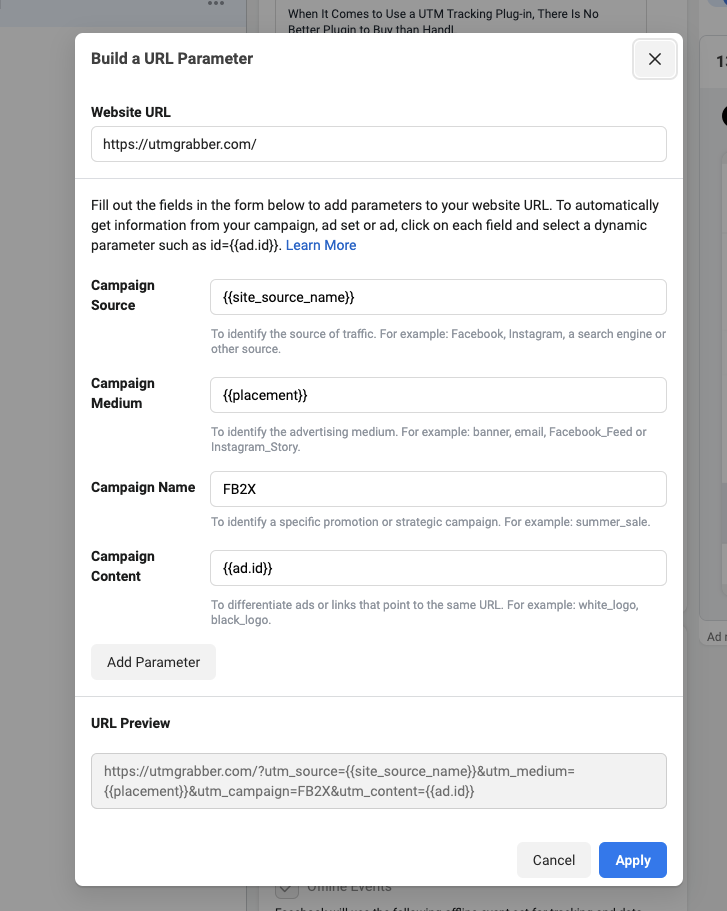
if you happen to append any other parameters (other than UTMs) to your final URL, make sure you also add them into custom parameters section in the plugin settings in WordPress dashboard so you can track them just like any other UTM parameters.
Facebook Ads Related Parameters Facebook Ads Dynamic Parameters
[ad_id] - Facebook Ad Id
[adset_id] - Facebook Ads Id
[ad_name] - Facebook Ads Name
[adset_name] - Facebook Adset Name
[placement] - Facebook Placement
//you can add many more using custom paramaters.
Google Ads Tracking
In order to track UTMs from your Google Ads, make sure you created tracking templates at the campaign level and parameters of interest are added to oyur final URL (landing page URL)
See the list of the parameters you can use in Google Ads Google Ads ValueTrack Parameters
if you happen to append any other value track parameters (other than UTMs) to your final URL, make sure you also add them into custom parameters section in the plugin settings in WordPress dashboard so you can track them just like any other UTM parameters.
[campaignid] - Google Ads ValueTrack Campaign Id
[adgroupid] - Google Ads ValueTrack Ads Group Id
[keyword] - Google Ads ValueTrack Keyword
[placement] - Google Ads ValueTrack Placement
//you can add many more using custom paramaters.
Tracking Template
{lpurl}?utm_term={keyword}
Final URL Suffix:
utm_source=google&utm_medium=cpc&utm_campaign=EarlyAccessLaunchAds
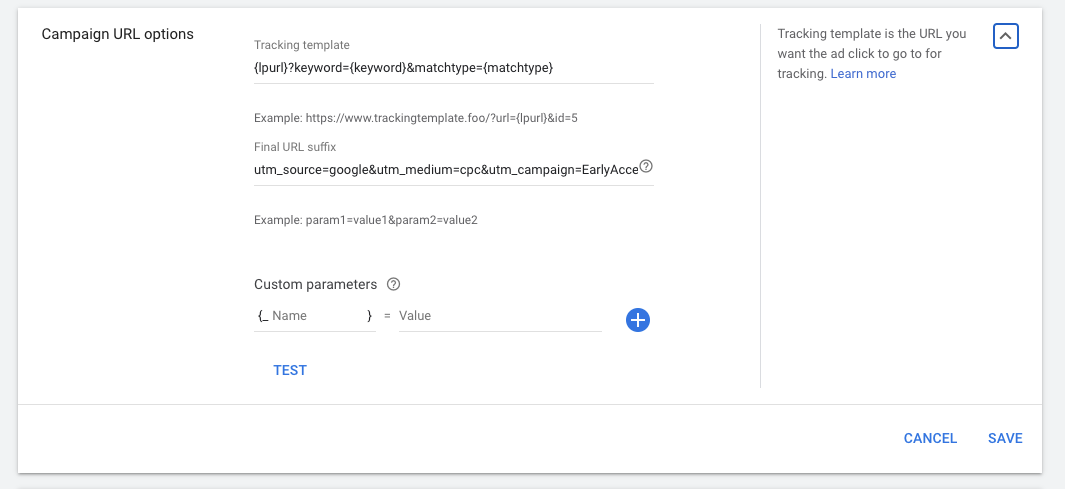
Setting up a campaign-level tracking template in Google Ads is a process that involves several steps. Here's a step-by-step guide on how to go about it:
-
Log Into Your Google Ads Account: Visit ads.google.com and sign in with your Google account.
-
Navigate to the Campaigns Tab: Once you're logged in, click on "Campaigns" on the left-hand side of the page.
-
Choose a Campaign: Look at the list of your campaigns and choose the one that you want to set up a tracking template for. Click on the name of that campaign.
-
Go to Settings: Once you're in the specific campaign, click on the "Settings" tab.
-
Scroll Down to Campaign URL Options: Scroll down until you see an option that says "Campaign URL options (advanced)". Click on it to expand the option.
-
Enter Your Tracking Template: In the field that says "Tracking template", enter your tracking template. This should be a URL that includes any tracking parameters you want to use. A common example is {lpurl}?utm_campaign={your campaign name}&utm_source=google&utm_medium=cpc.
-
Test the Tracking Template: To make sure your tracking template works properly, click on the "Test" button next to it. If it works, Google Ads will tell you "Landing page found". If there's a problem, it will give you an error message.
-
Save Your Changes: Once you're happy with your tracking template and you've tested it, click on the "Save" button at the bottom of the page to save your changes.
Remember that the tracking template you use will depend on what specific data you want to track. The example given is quite common, but it may not be exactly what you need. Always make sure to tailor your tracking templates to your specific needs.
Also, be aware that tracking templates at the campaign level will apply to all ads in that campaign. If you want to use different tracking templates for different ads, you would need to set them at the ad level instead.
LinkedIn Ads Tracking
Steps to Append UTM Parameters to LinkedIn Ads landing page
Identify the base URL of the landing page you want to track.
Decide on the parameters that you want to track. The possible parameters include:
utm_source: Identify the source such as LinkedIn
utm_medium: Highlight the type of linkedin ad, like a paid ad.
utm_campaign: Specify the name of your LinkedIn ad campaign.
utm_content: Differentiate ads that share the same utm_campaign and utm_term.
utm_term: Identify keywords for this specific ad (optional).
Let us assume you would like to track UTM parameters for your "summer sale campaign", using the medium "sponsored_ad" on the platform "linkedin".
The URL with parameters will look like:
https://www.yourwebsite.com/?utm_source=linkedin&utm_medium=sponsored_ad&utm_campaign=summer_sale_campaign
N.B: Don't forget to use '%20' instead of 'space' if you have multi words for UTM parameters.
Use this formed URL with attached UTM parameters as your landing page in the LinkedIn ad creation process.
By appending UTMs to your LinkedIn Ad landing pages, you will have a valuable insight into which ads drive more traffic and generate leads or conversions, allowing you to refine your marketing strategy more efficiently.
Remember, consistency is key when creating UTM parameters. Establish a naming convention for your UTMs to ensure reliable data. Don’t worry about the extra steps involved in this process; the valuable data you gather will significantly increase your Return On Advertising Spend (ROAS) and overall marketing insights.
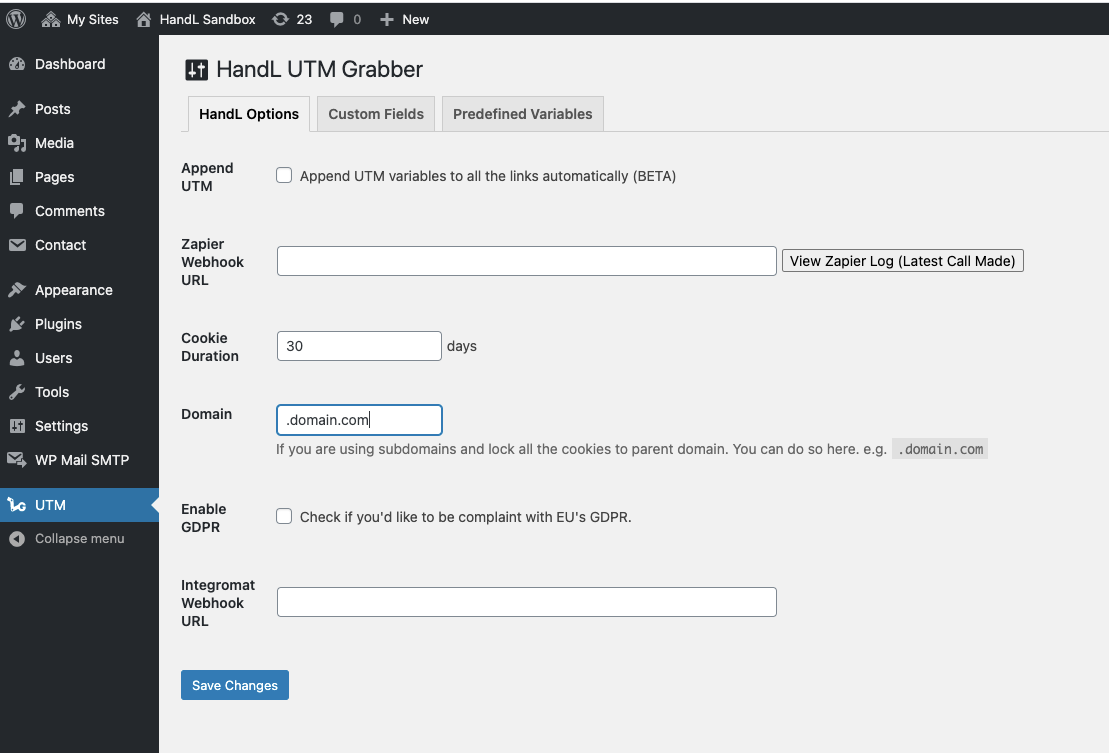
Setting domain name
For registering the cookies, we use the main domain for better accessbility. In some servers, the logic to get the main domain might fail. We highly recommend that you put the domain name in UTM Grabber Setting page as shown below.
What does new IOS 14 release (privacy) change in terms of tracking?
What is the new privacy change?
Starting from IOS 14, Apple asks users for their permission to allow/disallow to track their activity. This change means a lot especially for advertesing platforms (such as Google, Facebook) or similar others who does third-party trakcing.
What is third-party tracking?
Third-party web tracking refers to the practice by which the tracker, other than the website directly visited by the user, tracks or assists in tracking the user’s visit to the site. Tracking is performed using domains other than the website domain (e.g. fb.com, doubleclick.net etc), hence the name third-party.
I'm advertising on Facebook, do I need to do anything?
Yes, Facebook has a very good support page explaining what you need to do as an advertiser. It is mainly, instead of using their domain for tracking data about your user, they let you verify your domain in Facebook and use your domain, avoiding the third-party tracking limitation by IOS 14.
My ads reporting is changed
If you notice that some of the KPIs in your reporting in Google and Facebook have changed, this does not necessarily imply that you are losing conversions. It is most likely due to the manner in which Facebook and Google report statistics. Both platforms announced that they are estimating conversions based on a model of similarly behaving users. You can read more here for Google about modeled online onversions and for Facebook about estimated reporting.
My tracking is impacted
If you think your tracking is impacted. Please see some of the major troubleshooting guides compiled here There is no UTM collected.
Has HandL UTM Grabber effected by this change?
No, HandL UTM Grabber never uses third-party tracking. All the assets come within the plugin file and there is no external script/cookies run on your server. All the tracking parameters are recorded on your domain and no where else!
Predefined parameters
Sometimes, you don't use the regular utm parameters as is (e.g. utm_campaign), and you need to use some other parameters instead to pass the data 3rd party site or forms.
Sometimes the form embed you created (iframe) expects parameter different than utm to prefill hidden fields.
In order to accomplish this:
First create the new parameter matching the name (in predefined variables)
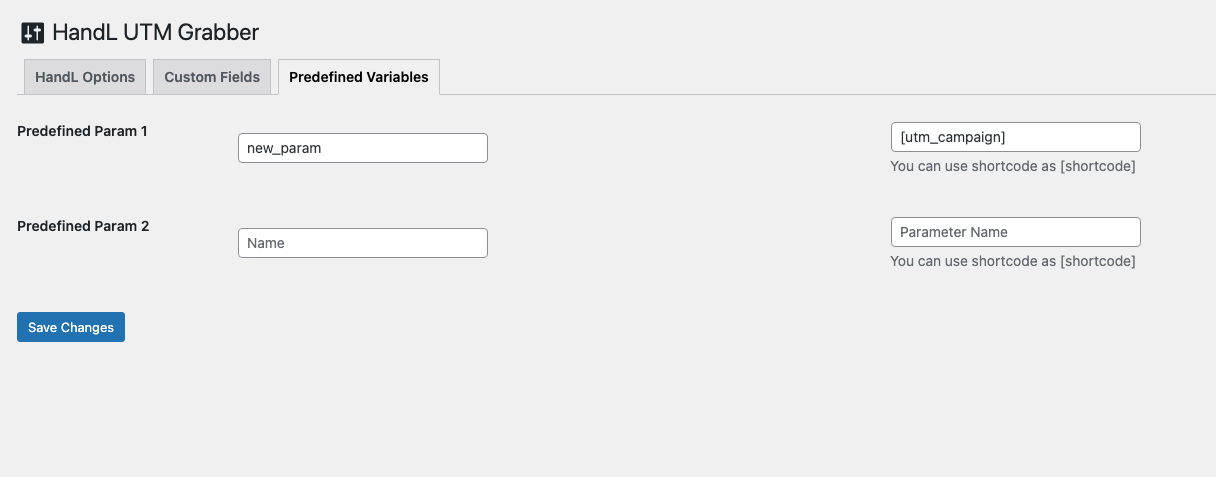
So, here we are creating new_param and assigning the value of utm_campaign parameter.
Add the same parameter as custom parameter so it will be recognized as shortcode and included in utm-out and utm-src

You can use "Predefined value" for assigning default value for UTM parameters as well. For example. If you would like to assign a default value for utm_source. Simply type utm_source as key and 'Direct' as value. This value will be used when there is no utm_source present.
After completing the two steps above
You can use the new_param just like any other parameters in your site
[new_param] -> will pring the value of utm_campaign
Or you can append the new_param to your anchor link
<a class="utm-out" href="https://www.outlink.com/"> Test Link </a>
will append all the UTMs including the new_param like this
<a class="utm-out" href="https://www.outlink.com/?utm_campaign=campaign1234&new_param=campaign1234"> Test Link </a>
Or you can append the new_param to your iframe source
<iframe class="utm-src" src="https://www.outlink.com/" />
will append all the UTMs including the new_param like this
<iframe class="utm-src" src="https://www.outlink.com/?utm_campaign=campaign1234&new_param=campaign1234" />
UTMs disappear in URL, does the plugin still track?
Short answer is "absolutely yes"...
HandL UTM Grabber is a cookie based tracker. As soon as prospects hit your site with UTM data, they will be recorded in the COOKIES (client-side). And when ever they are needed (for conversion), they will be accessed from COOKIES. Hence, you don't need UTMs appended to every single URL in your website at all. You only want to append UTMs to the landing page URL to get recorded.
Having said that, if you are sending traffic outside of your site and want to pass UTMs to external domain. You can do so in two ways...
-
You can append UTMs globally to all the URLs in your site. See this article for more information Appending UTM Globally
-
You can append all the UTM parameters to a specific outbound link. Please see the article here Appending UTMs to the buttons using class name attributes (Selectively).
Generating dynamic content based on UTM parameters
There are three different ways of accmomplishing this...
- Using shortcode method. You can place any shortcodes in your site and it will print the value of the parmeter directly. See here for the list of the parameters Native WP Shortcodes.
- Add these two lines into
wp-content/plugins/handl-utm-grabber-v3/js/handl-utm-grabber.jsAfter line 76
jQuery("[class*="+v+"_out]").html(curval)
jQuery("[id*="+v+"_out]").html(curval)
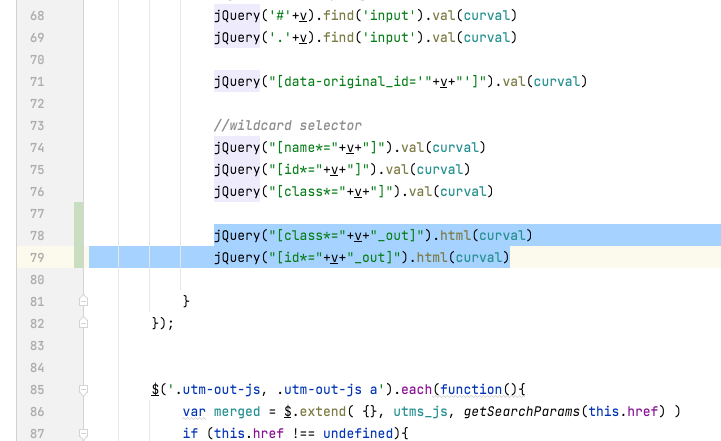
And then you can add HTML templates like this in your page
<div class="utm_campaign_out"></div>
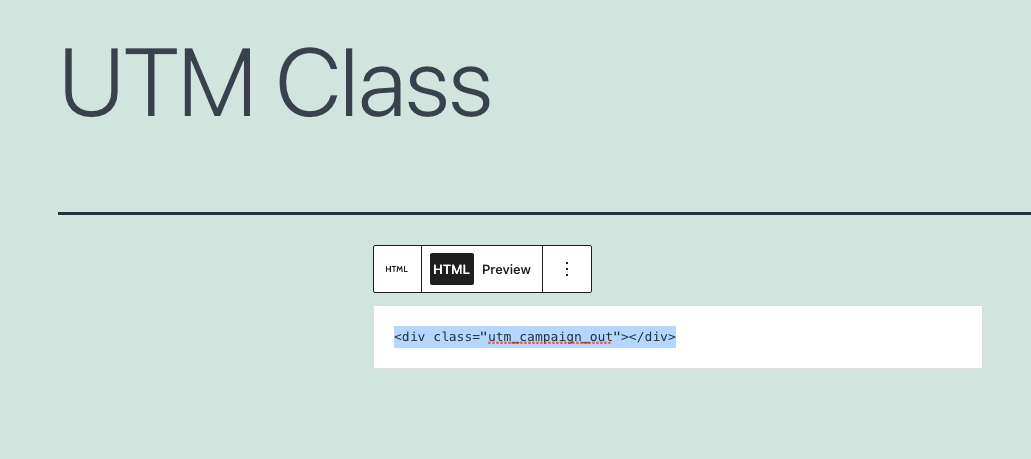
When there is utm_campaign present in the Cookies, the value will be printend between the div tag you created.

3) Client side integration
You can check whether certain cookies present by using Cookies function that comes with our plugin and then integrate your own logic around that.
For example: Let's print some dynamic content if utm_campaign is present.
var cmp_value = Cookies.get('utm_campaign')
if ( cmp_value != undefined ){
var my_html = `<p>This is the value of utm_campaign: ${cmp_value}</p>`
jQuery('.dynamic_content_class').html(my_html)
}
Differentiate whether Paid / Organic / Direct / Referral
As of v3.0.36, there is a new cookie named traffic_source.
Even if you do not use any query arguments (e.g., utm_ params) in your link, we can accurately identify the traffic source based on various signals.
- Paid: Traffic originating from Google or Facebook ads.
- Social: Traffic originating from social platforms such as Facebook, Twitter, Instagram, Snapchat, YouTube, Pinterest, LinkedIn, and Tumblr organically.
- Organic: Traffic originating from a search using Google or Bing.
- Direct: Traffic coming directly from a bookmark or the address bar.
- Referral: All other referrals not captured above.
- Other: Any other traffic not categorized by the rules above.
In order to capture traffic_source information in your forms, you may have to add traffic_source as custom parameters in UTM. See How to add custom parameters?
traffic_source is a last-touch attribute. If you want the first-touch version of this parameter, use first_traffic_source.
What is the difference between all the handl params?
[handl_original_ref] - original referral - first touch!
[handl_landing_page] - landing page - first touch!
[handl_ref] - last touch referral
[handl_url] - last touch url
Let's say you have a link to your website from google.com to domain.com/page1 And user click from Google, he/she lands on page1 and after that they go to page2 to convert
So it is like Google -> Page1 -> Page2 (Conversion)
The params will populate the following data:
handl_original_ref = Google.com handl_landing_page = domain.com/page1
handl_ref = domain.com/page1 handl_url = domain.com/page2
Can't activate the license - Not Found
If you encounter an error like this:

And have WPCodeBox 2 installed, please try disabling that plugin and then reactivate the license.

Facebook Conversion API (FB CAPI)
As of HandL UTM Grabber v3.1, we have started supporting the Facebook Conversion API on the following plugins. Please bookmark this page as we add new support every day.
Send Events from WooCommerce to Facebook Ads
We currently send AddToCart, InitiateCheckout, AddPaymentInfo, and Purchase events. Please refer to these instructions for setup details.
Send Lead Events from Gravity Forms to Facebook Ads
Send Lead Events from Contact Form 7 to Facebook Ads
Send Lead Events from Ninja Forms to Facebook Ads
Tracking conversion start time, end time, and duration
Using our custom version, you can track the start time, end time, and duration of your conversions.
Please request the custom version via chat, and we'll provide it to you.
After you activate the custom version, you will have three additional cookies (parameters) added:
- Tracking conversion start time, end time, and duration:
- handl_journey_start: This is an epoch timestamp in milliseconds indicating when the user started the journey for the first time.
- handl_journey_end: This is an epoch timestamp in milliseconds indicating when the user ended the journey for the first time.
- handl_journey_duration_hrs: This is the duration of the conversion in hours (rounded).
Please let us know if you have any further questions.
No License Key Field Appears in WP Admin > Plugins
When you click "License" and no license field appears, or if you see the console log print a "javascript:void()" error message, follow these steps in your browser to make the field visible:

Define Your Own Custom Logic
Introduction
The "Define Your Own" feature in HandL UTM Grabber v3 allows you to create custom logic for tracking and manipulating UTM parameters and other tracked fields. This powerful tool enables you to define conditional rules that create new parameters based on existing ones, giving you more control over your tracking and marketing efforts.
When to Use This Feature
Use the "Define Your Own" feature when you need to:
- Create new parameters based on existing UTM parameters or tracked fields.
- Implement complex tracking logic specific to your marketing campaigns.
- Customize parameter values based on certain conditions.
- Enhance your analytics by creating more detailed or specific tracking parameters.
How to Access the Feature
- Log in to your WordPress admin panel.
- Navigate to the HandL UTM Grabber settings.
- Click on the "Define Your Own" tab in the settings menu.
Features and Functionality
Creating Custom Logic
The "Define Your Own" tab allows you to create multiple custom logic rules. Each rule consists of:
- A condition based on an existing parameter
- A new parameter to be created when the condition is met
Available Fields
The feature uses all fields generated by HandL UTM Grabber
These fields include standard UTM parameters and additional tracked fields provided by the HandL UTM Grabber plugin.
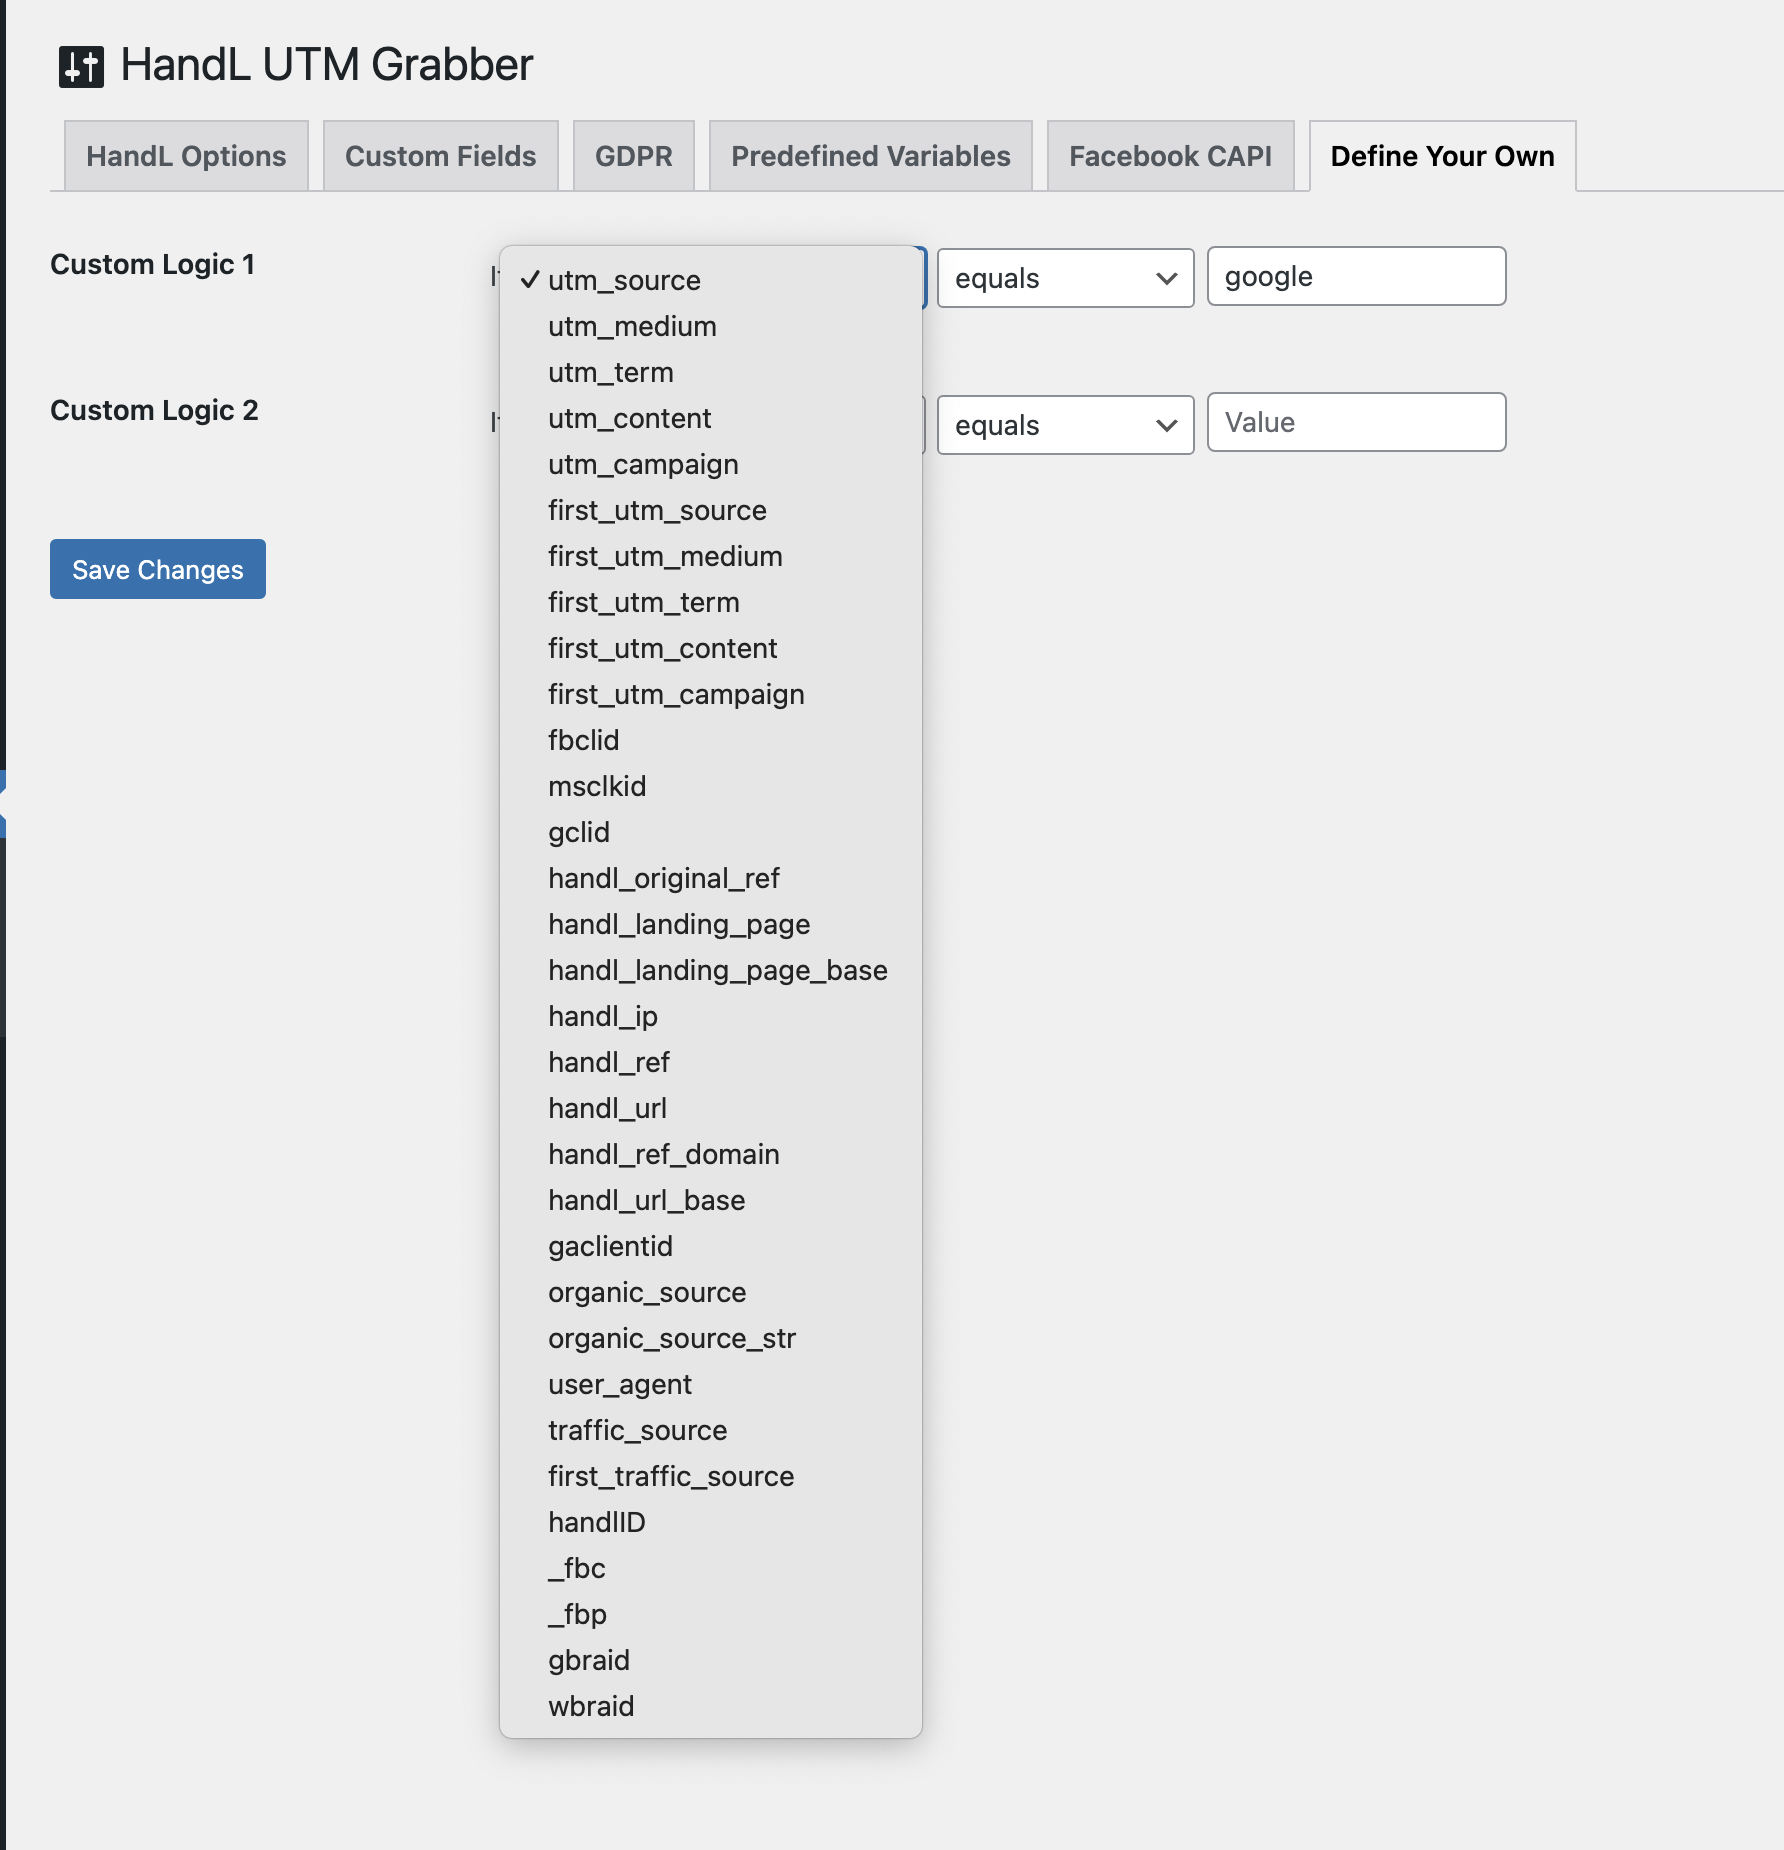
Operators
You can use various operators to define your conditions:
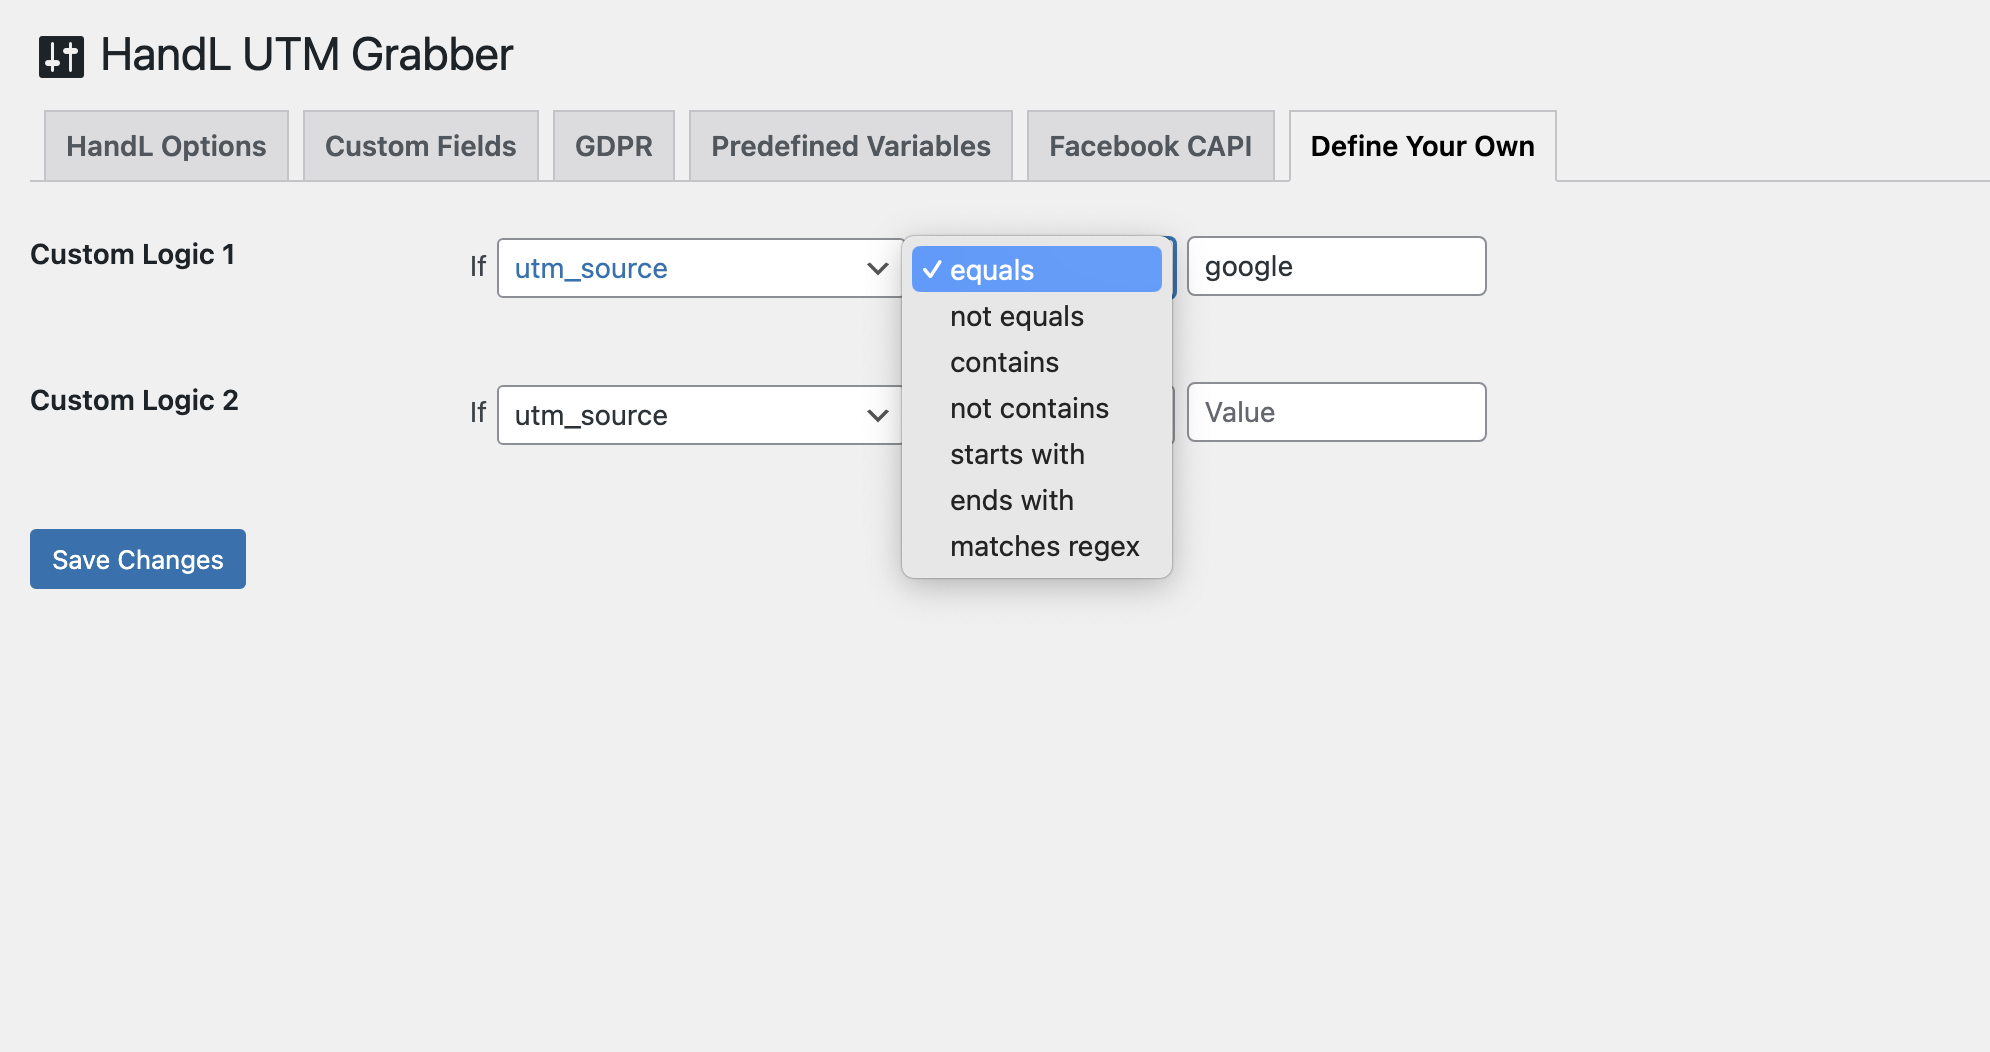
These operators allow for precise control over when your custom logic should be applied.
How to Use the Feature
- In the "Define Your Own" tab, you'll see a table where you can add custom logic rules.
-
For each rule, follow these steps:
a. Select the parameter you want to base your condition on from the first dropdown.
b. Choose an operator from the second dropdown to define how you want to compare the parameter's value.
c. Enter the value you want to compare against in the text field.
d. In the "Then set" section, enter a name for your new parameter.
e. Enter the value you want to assign to this new parameter when the condition is met.
- You can add multiple rules by filling out additional rows in the table.
- Click the "Save Changes" button to apply your custom logic rules.

Examples
-
Campaign Source Tracking:
- If
utm_sourceequals "facebook" - Then set "social_campaign" = "fb_promo" or
- If
utm_sourceequals "facebook" - Then set "phone_number" = "999-99-99"
- If
-
Content Type Flagging:
- If
utm_contentcontains "video" - Then set "content_type" = "video_ad"
- If
-
Specific Campaign Tracking:
- If
utm_campaignstarts_with "summer2023" - Then set "seasonal_campaign" = "summer_promo"
- If
-
Excluding Certain Traffic:
- If
referrernot_contains "ourpartner.com" - Then set "non_partner_traffic" = "true"
- If
-
Advanced Regex Matching:
- If
utm_termmatches regex "^(red|blue|green)product$" - Then set "color_category" = "primary_colors"
- If
How It Works
When a visitor comes to your site, the HandL UTM Grabber plugin checks these custom logic rules. If a condition is met, it creates a new cookie with the specified parameter name and value. This information is then available for your analytics tools and can be used in your marketing workflows.
Best Practices
- Use meaningful names for your new parameters to ensure they're easily understood in your analytics.
- Be cautious with regex operations, as they can be more resource-intensive.
- Regularly review your custom logic to ensure it's still relevant to your current marketing strategies.
- Test your logic thoroughly to make sure it's working as expected.
Limitations
- The custom logic is evaluated when the page loads, so it won't react to changes in UTM parameters without a page refresh.
- Be mindful of creating too many custom parameters, as this can lead to cookie bloat and potentially impact site performance.
Troubleshooting
If your custom logic isn't working as expected:
- Check that the parameter you're basing your condition on is being correctly set.
- Verify that your condition values are correct and watch for typos.
- Use your browser's developer tools to check if the new cookies are being set correctly.
- Ensure that your site visitors have consented to cookies if you're using GDPR compliance features.
By leveraging the "Define Your Own" feature, you can create a more tailored and powerful tracking solution that meets your specific marketing and analytics needs. This flexibility allows you to extract more value from your UTM parameters and other tracked fields, leading to more insightful data for your marketing decisions.
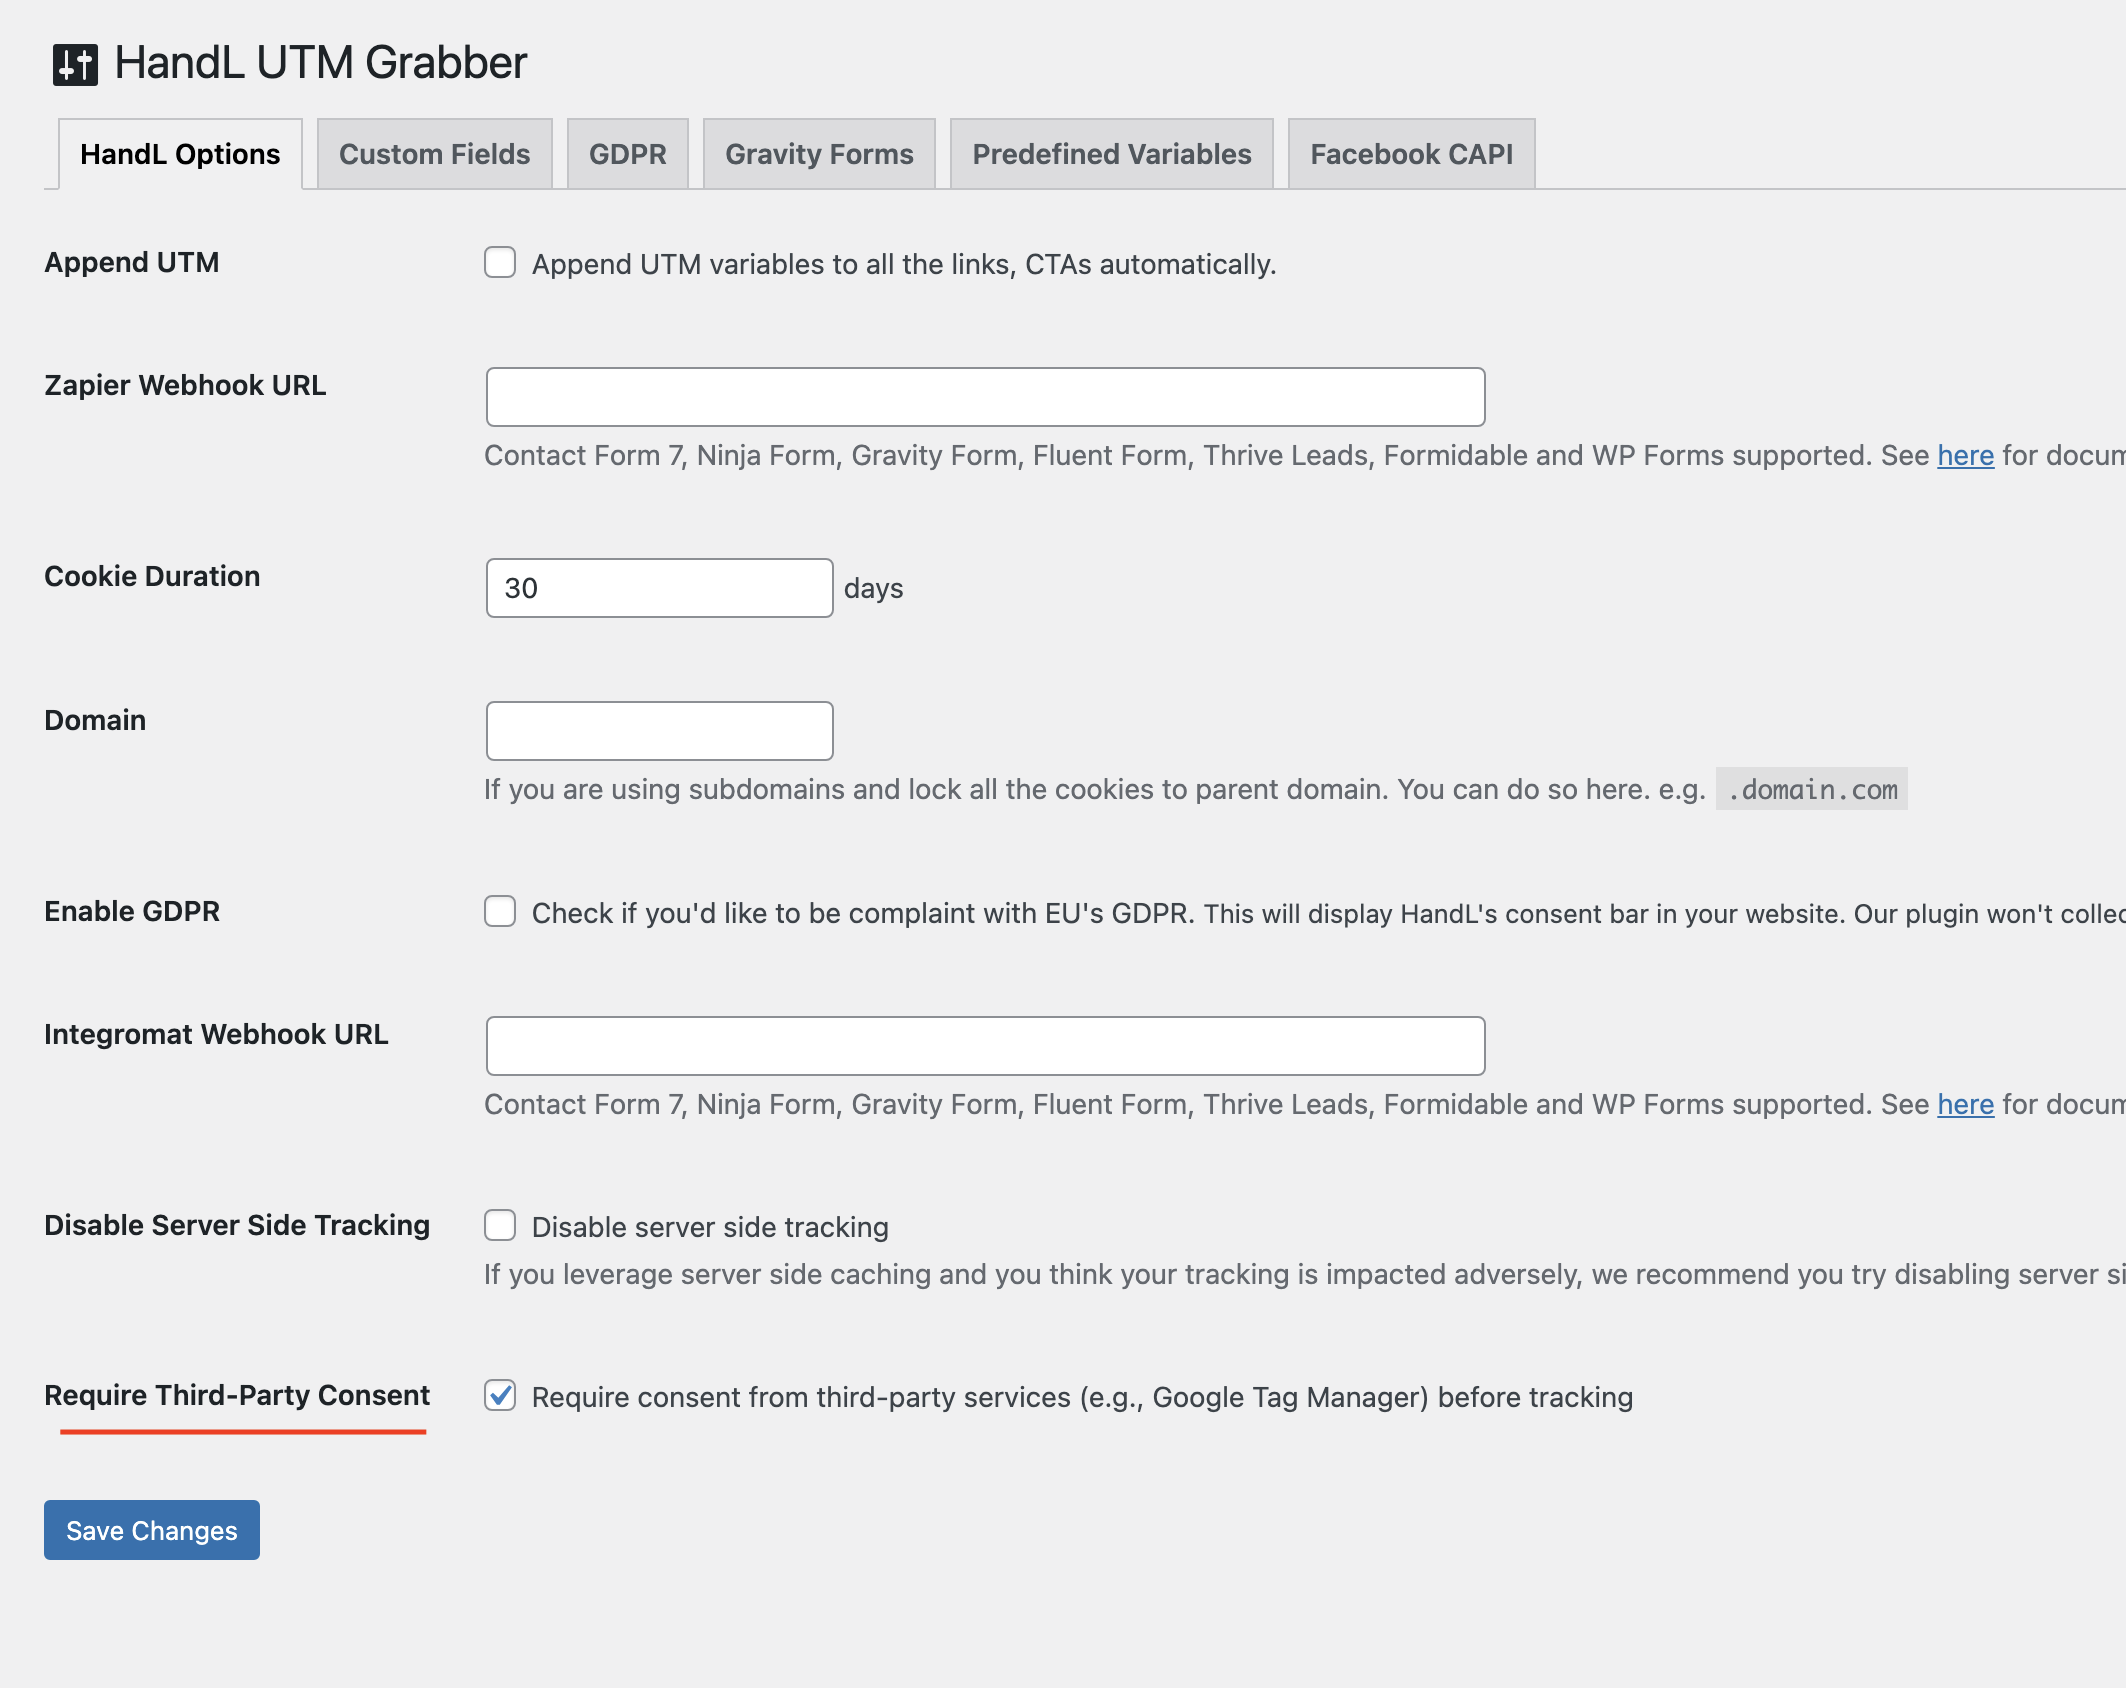
Enforce Consent From 3rd Party (e.g. GTM)
Overview
The "Enforce Consent From 3rd Party" feature allows HandL UTM Grabber to respect consent decisions made through third-party consent management platforms, such as Google Tag Manager (GTM). When enabled, this feature ensures that HandL UTM Grabber only collects and stores data after receiving proper consent from the user, as determined by the third-party consent management system.
Enabling the Feature
To enable this feature:
The relevant setting can be found here:
How It Works
Once enabled, HandL UTM Grabber will:
- Monitor the dataLayer for consent update events.
- Check the consent status before running its tracking functions.
- Remove HandL cookies if consent is denied.
The main logic for this feature is implemented in the following JavaScript functions:
isConsentDenied();
removeHandLCookies();
You may use these functions as you see fit in your project. The isConsentDenied() function returns a Boolean value indicating whether consent is denied. The removeHandLCookies() function removes all HandL-related cookies (e.g., when consent is denied).
Consent Status Check
The plugin checks for consent using the getConsentStatus() and isConsentDenied() functions. These functions look for consent information in the dataLayer object, which is commonly used by consent management platforms.
Handling Consent Changes
When a consent update is detected, the handleConsentStatus() function is called. This function either runs HandL UTM Grabber's tracking (if consent is granted) or removes HandL cookies (if consent is denied).
Integration with Google Tag Manager (GTM)
To use this feature with Google Tag Manager:
- Set up your consent management platform in GTM. You can use any 3rd party tool (CookieHub, Cookiebot etc)
- Ensure that your consent management platform is updating the dataLayer with consent information. (According to GTM's best practises)
- HandL UTM Grabber will automatically detect these updates and act accordingly.
Compatibility
This feature is designed to work with various consent management platforms that use the dataLayer to communicate consent status. It has been tested with Google Tag Manager but should be compatible with other similar systems.
Troubleshooting
If you're experiencing issues with this feature:
- Ensure that your consent management platform is correctly updating the dataLayer.
- Check your browser's console for any error messages related to HandL UTM Grabber.
- Verify that the "Require Third-Party Consent" option is enabled in the HandL UTM Grabber settings.
Important Notes
- This feature relies on the presence and proper configuration of a third-party consent management system.
- If no consent information is found in the dataLayer, HandL UTM Grabber will default to its standard behavior.
- Enabling this feature may impact data collection if users do not provide consent.
By implementing this feature, you're taking an important step towards respecting user privacy and complying with data protection regulations.
Full Tracking Mode
Overview
The Full Tracking Mode is a powerful feature of the HandL UTM Grabber plugin that allows you to track detailed user journeys across your website. When enabled, it captures data on every page visit for each session, providing insights similar to Google Analytics 4 (GA4).
Enabling Full Tracking Mode
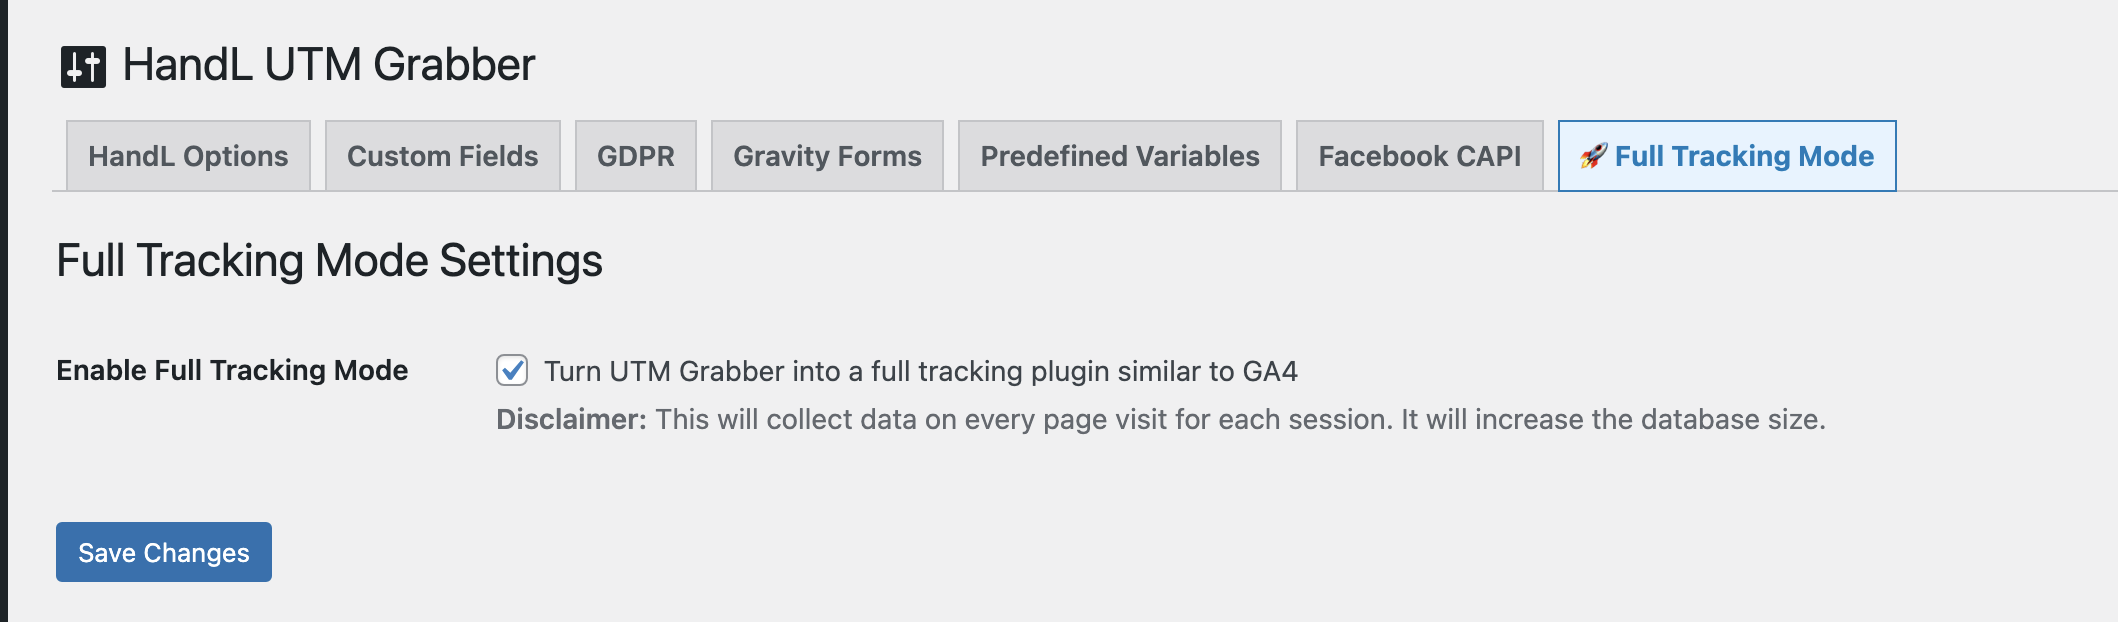
What Data is Collected
When Full Tracking Mode is enabled, the plugin collects the following data for each page visit:
- Session ID
- Timestamp
- Page URL
- Referrer URL
- UTM parameters (source, medium, campaign, content, term)
This data is stored in three main tables in your WordPress database:
handl_sessions: Stores unique session informationhandl_utm_sets: Stores unique combinations of UTM parametershandl_page_views: Stores individual page view data
Viewing Reports
To access the Full Tracking Mode reports:
- Go to the HandL UTM Grabber menu in your WordPress admin panel.
- Click on the "Full Tracking Report" tab.
The report page offers several features:
Filters
You can filter the data by:
- Date range
- Page URL
- Session ID

Session Counts by Page
This section shows:
- Page URL
- Number of unique sessions
- Total visits
You can drill down into each page to see a breakdown of UTM parameters and referrers.
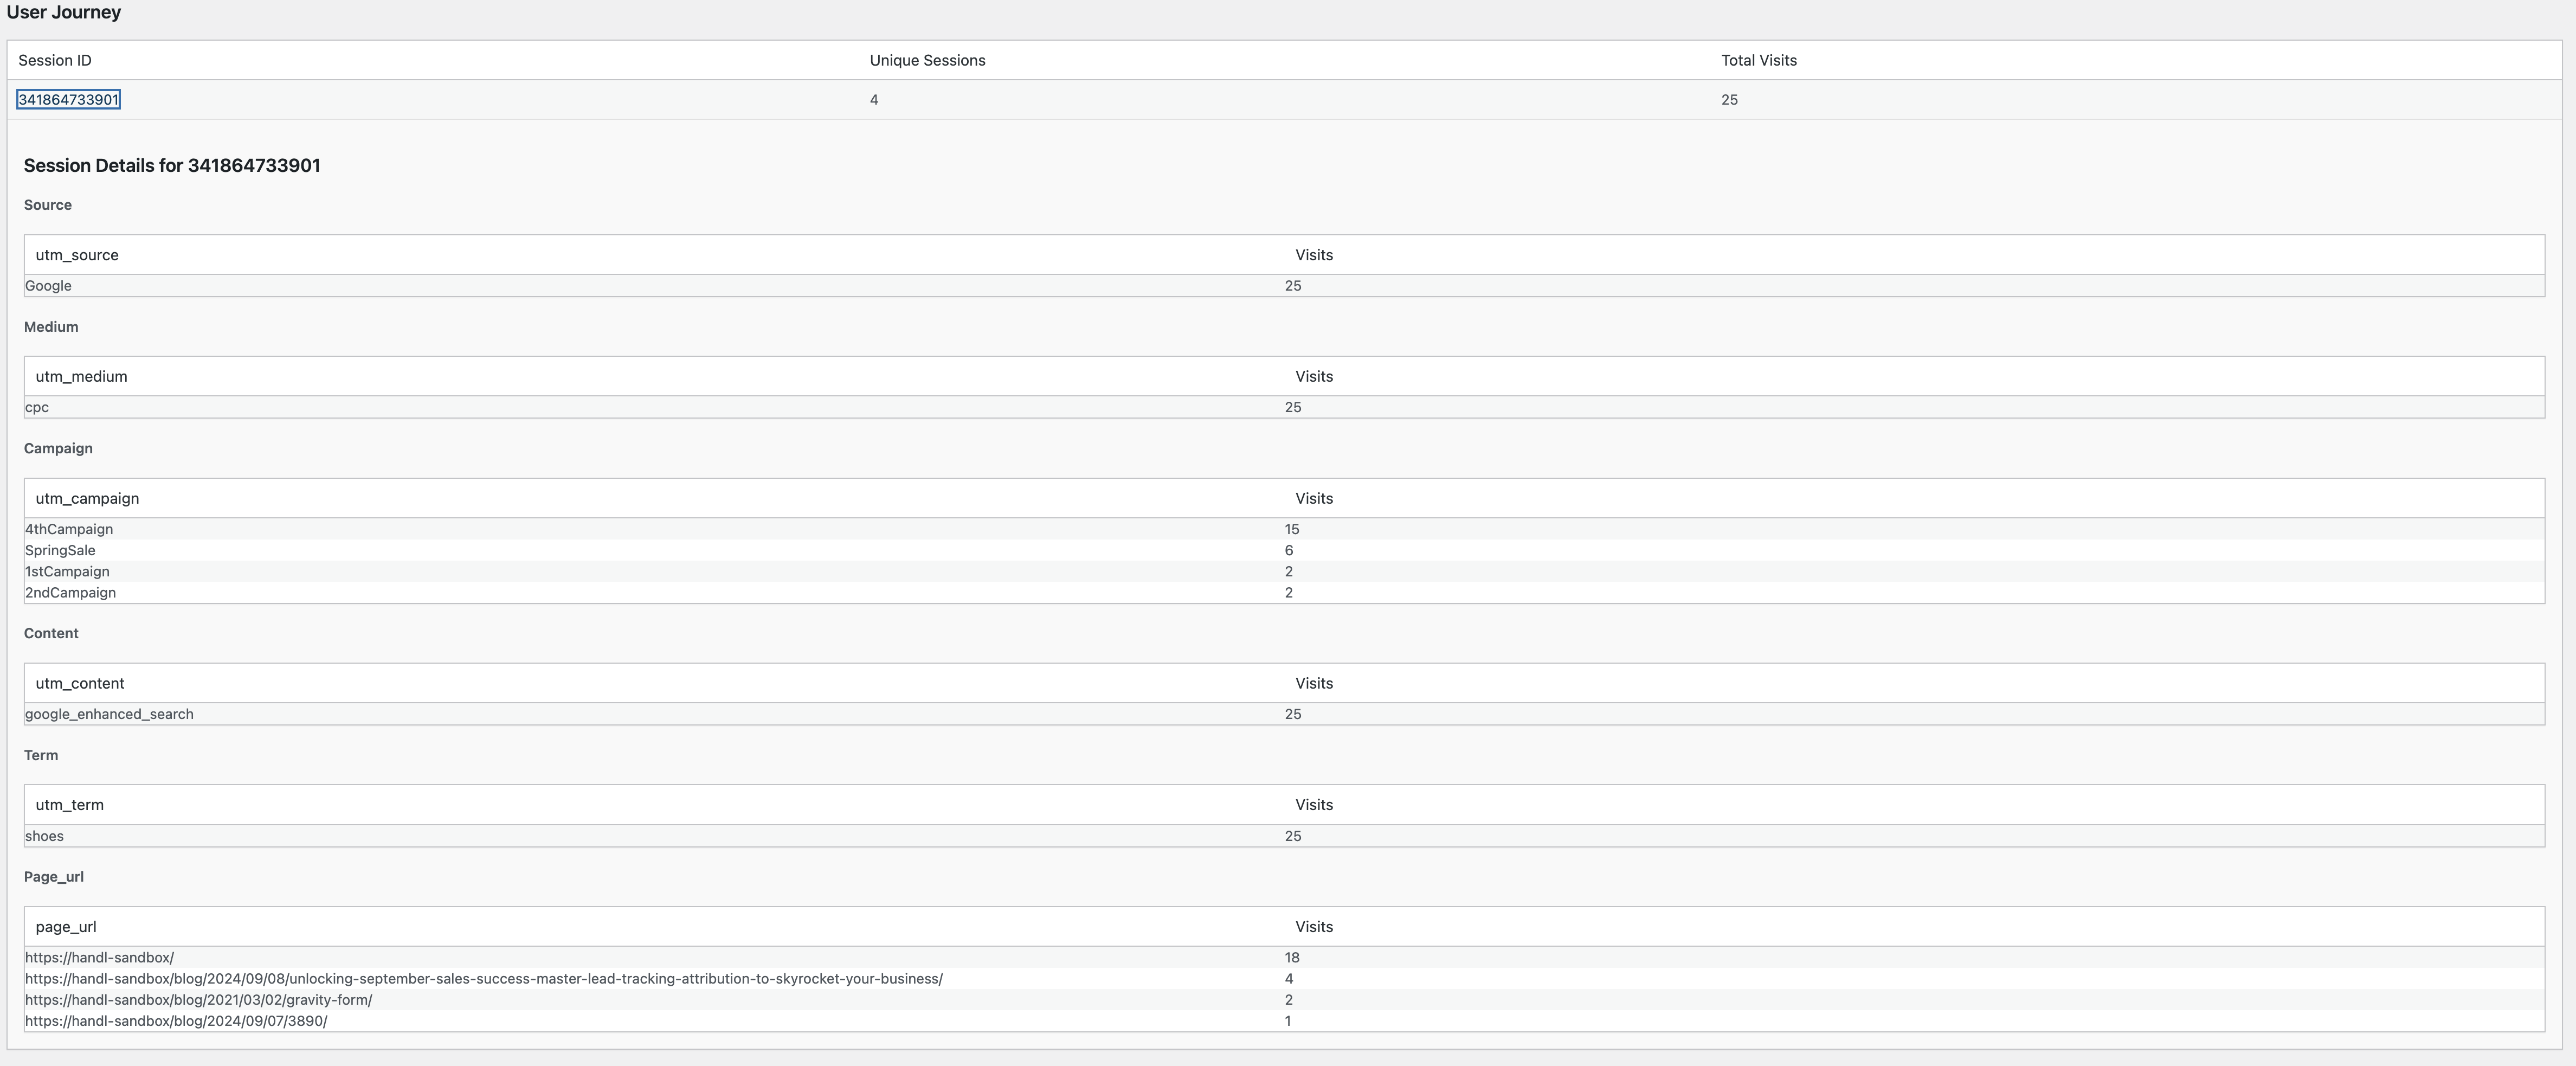
User Journey
This section displays:
- Session ID
- Number of unique sessions
- Total visits
You can drill down into each session to see detailed information about the pages visited and UTM parameters used.
Exporting Data
You can export the collected data to a CSV file for further analysis:
- Apply any desired filters.
- Click the "Export to CSV" button.
Database Management
As Full Tracking Mode collects a significant amount of data, it's important to manage your database effectively:
Viewing Database Statistics
The "Danger Zone" section of the report page shows the current number of rows in each tracking table.
Resetting Tracking Data
If the database becomes overwhelming or you need to start fresh:
- Scroll to the "Danger Zone" section at the bottom of the report page.
- Click the "Remove Tracking Tables" button.
- Confirm your action in the popup dialog.
This action will delete all collected tracking data and cannot be undone.

Important Considerations
- Database Size: Full Tracking Mode will increase your database size. Monitor your database usage regularly.
- Performance: While designed to be efficient, tracking every page visit may have a slight impact on site performance. Monitor your site's performance after enabling this feature.
- Privacy: Ensure that your privacy policy reflects the additional data being collected when Full Tracking Mode is enabled.
- Compliance: Make sure you're compliant with relevant data protection regulations (e.g., GDPR, CCPA) when using this feature.
Conclusion
Full Tracking Mode transforms HandL UTM Grabber into a powerful analytics tool, providing detailed insights into user behavior on your website. Use this data to optimize your marketing strategies, improve user experience, and drive conversions.
Auto-Populate Source/Medium Documentation
Overview
The Auto-Populate Source/Medium feature automatically sets utm_source and utm_medium parameters based on the detected traffic source and organic source string. This is particularly useful for tracking organic and referral traffic without manually setting UTM parameters.
How It Works
Server-Side Tracking
When enabled, the plugin will:
Set utm_source to the value of organic_source_str cookie
Set utm_medium to the value of traffic_source cookie
Client-Side Tracking
The traffic source is determined as follows:
Paid: When fbclid, gclid, or msclkid parameters are present
Organic: Traffic from search engines (Google, Bing, Yahoo, DuckDuckGo)
Direct: When no referrer is present or internal traffic
Referral: All other external traffic sources
Configuration
Admin Settings
The feature can be enabled/disabled through the HandL UTM Grabber settings page under the "Options" tab.

Value Mapping
Traffic sources are mapped as follows:
utm_medium will be set to one of:
Paid
Organic
Direct
Referral
Other
utm_source will be set to the specific source:
Bing
Yahoo
Direct
Internal
etc.
Usage Examples
Tracking Organic Search Traffic
When a visitor comes from Google search:
utm_medium = "Organic"
utm_source = "Google"
Tracking Social Media Traffic
When a visitor comes from Facebook:
utm_source = "Facebook"
Tracking Referral Traffic
When a visitor comes from a blog that linked to your site:
utm_medium = "Referral"
utm_source = [referring domain]
Important Notes
The feature only sets UTM parameters if they're not already present
Values are stored in cookies for consistent tracking across sessions
Respects GDPR settings and cookie consent
Works with both server-side and client-side tracking
Compatible with the plugin's custom parameter feature
Troubleshooting
If UTM parameters are not being set:
Verify the feature is enabled in settings
Verify no conflicting UTM parameters are present in URLs
Implementing Custom Consent Management with HandL UTM Grabber Plugin
To integrate your custom consent management system with the HandL UTM Grabber plugin, follow these steps:
- Check for Consent Status: Determine if the user has given consent.
- Run HandL UTM Grabber: If consent is given, call the RunHandL() function.
- Remove Cookies: If consent is not given, call the removeAllHandLCookies() function.
Here is an example implementation using JavaScript:
window.addEventListener('ConsentUpdated', function() {
if (typeof ConsentTool !== 'undefined') {
const consentString = Cookies.get('CookiesForConsentData');
// Assuming consent data is available in cookies or as an event
const consentData = parseConsentString(consentString);
if (consentData.good2go === 1) {
RunHandL();
} else {
removeAllHandLCookies();
}
}
});
function parseConsentString(consentString) {
// Parse the consent string to extract consent data
// This is a placeholder function, implement the actual parsing logic as needed
return {
good2go: consentString.includes('good2go=1') ? 1 : 0
};
}
Explanation
- Event Listener: The window.addEventListener listens for a custom event CustomConsentUpdated which is triggered by your consent management system.
- Check Consent Management System: Ensure that the custom consent management system is available.
- Get Consent Status: Retrieve the consent status from event or cookies.
- Run or Remove Cookies: Depending on the consent status, either run the RunHandL() function or call removeAllHandLCookies() to remove all cookies
Enable Session Cookies
Overview
The Enable Session Cookies feature allows you to control how long cookies persist in users' browsers. When enabled, cookies will expire when the browser session ends instead of after a set number of days.
Location
This setting can be found in the HandL UTM Grabber settings page under the "HandL Options" tab.
Options
-
Enable Session Cookies: When checked, all cookies will be set as session cookies
-
Cookie Duration: This field becomes disabled when session cookies are enabled
Behavior
When Disabled (Default)
When Enabled
Use Cases
-
Compliance Requirements
-
Some privacy regulations require session-only cookies
-
Useful for sites needing stricter cookie policies
-
Testing and Development
-
Helps debug tracking issues by clearing cookies on browser close
-
Useful for testing first-visit vs returning visitor scenarios
-
User Privacy
-
Provides users with enhanced privacy by not storing long-term cookies
-
Cookies are automatically cleared when browser closes
Compatibility
-
UTM parameter tracking
-
Form field population
-
GDPR compliance features
-
Integration with other tracking systems
Notes
-
This setting affects all cookies set by the plugin
-
The setting can be changed at any time without affecting existing cookies
-
Existing cookies will retain their original expiration until they are updated
-
Works in conjunction with GDPR compliance features if enabled
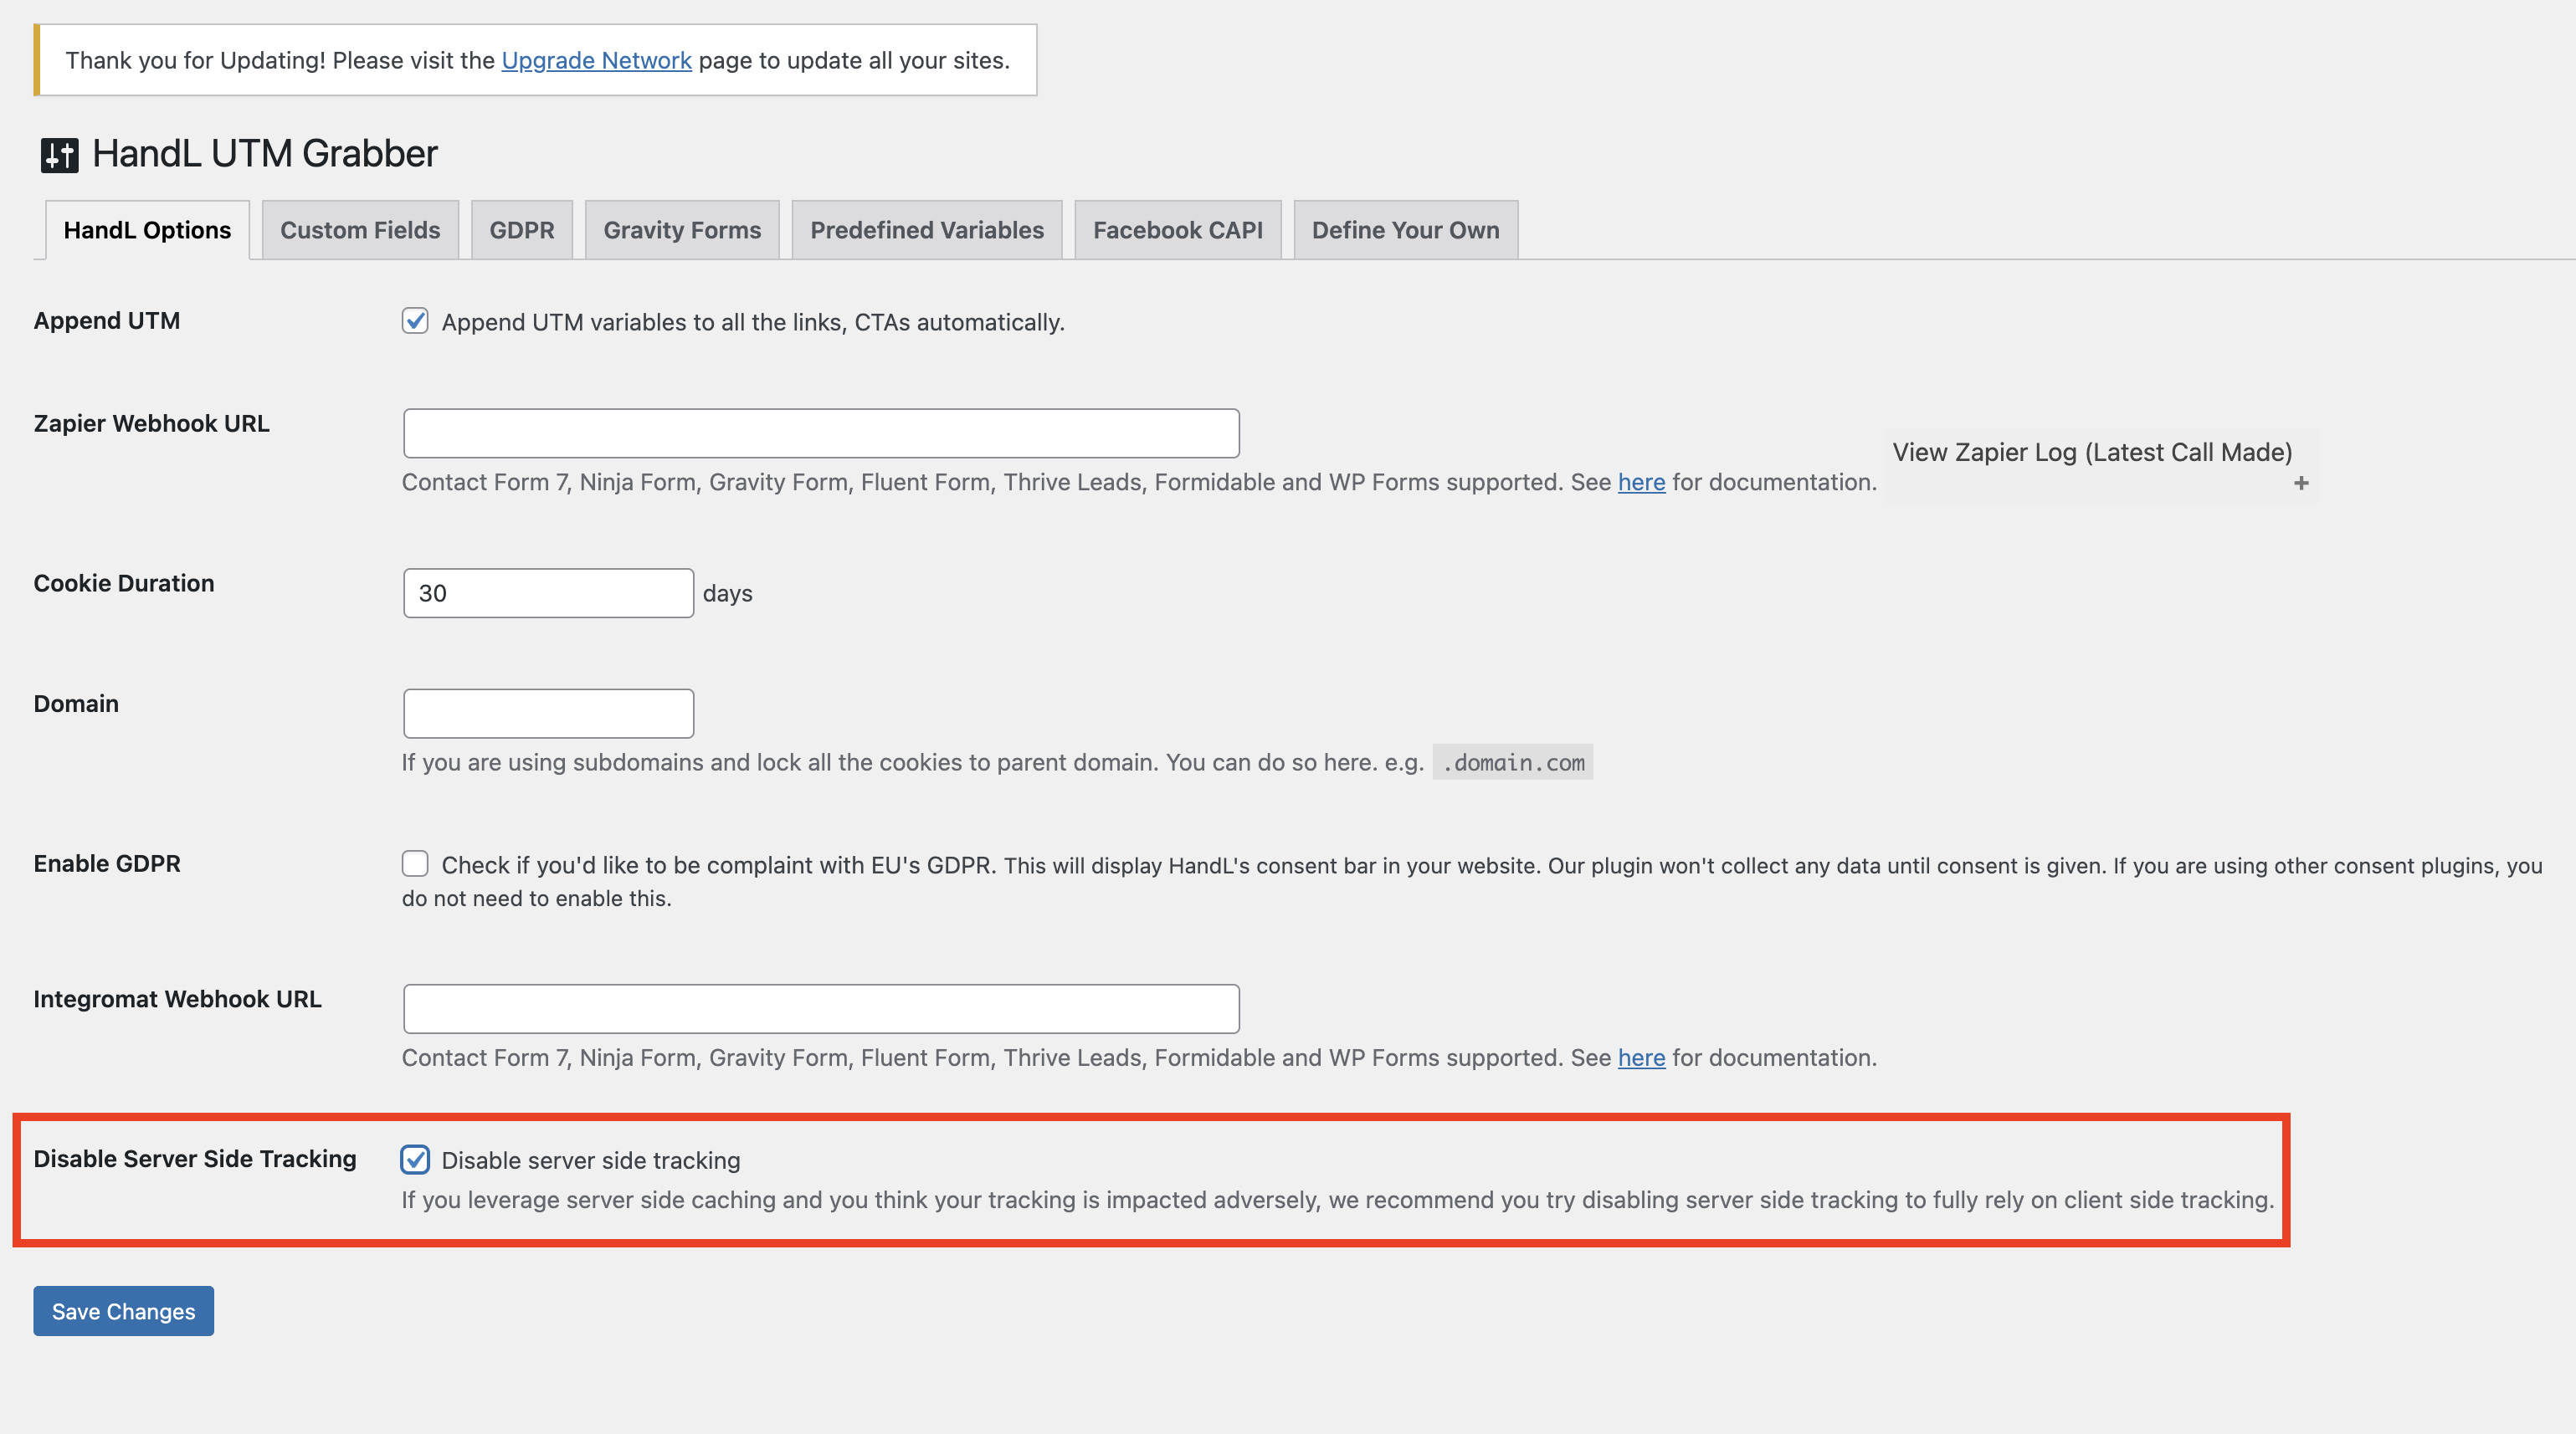
Disable Server Side Tracking
The "Disable Server Side Tracking" feature allows users to disable server-side tracking if they believe it is adversely impacting their tracking due to server-side caching. This feature ensures that tracking relies solely on client-side tracking.
Clicking the checkbox will disable the server side tracking
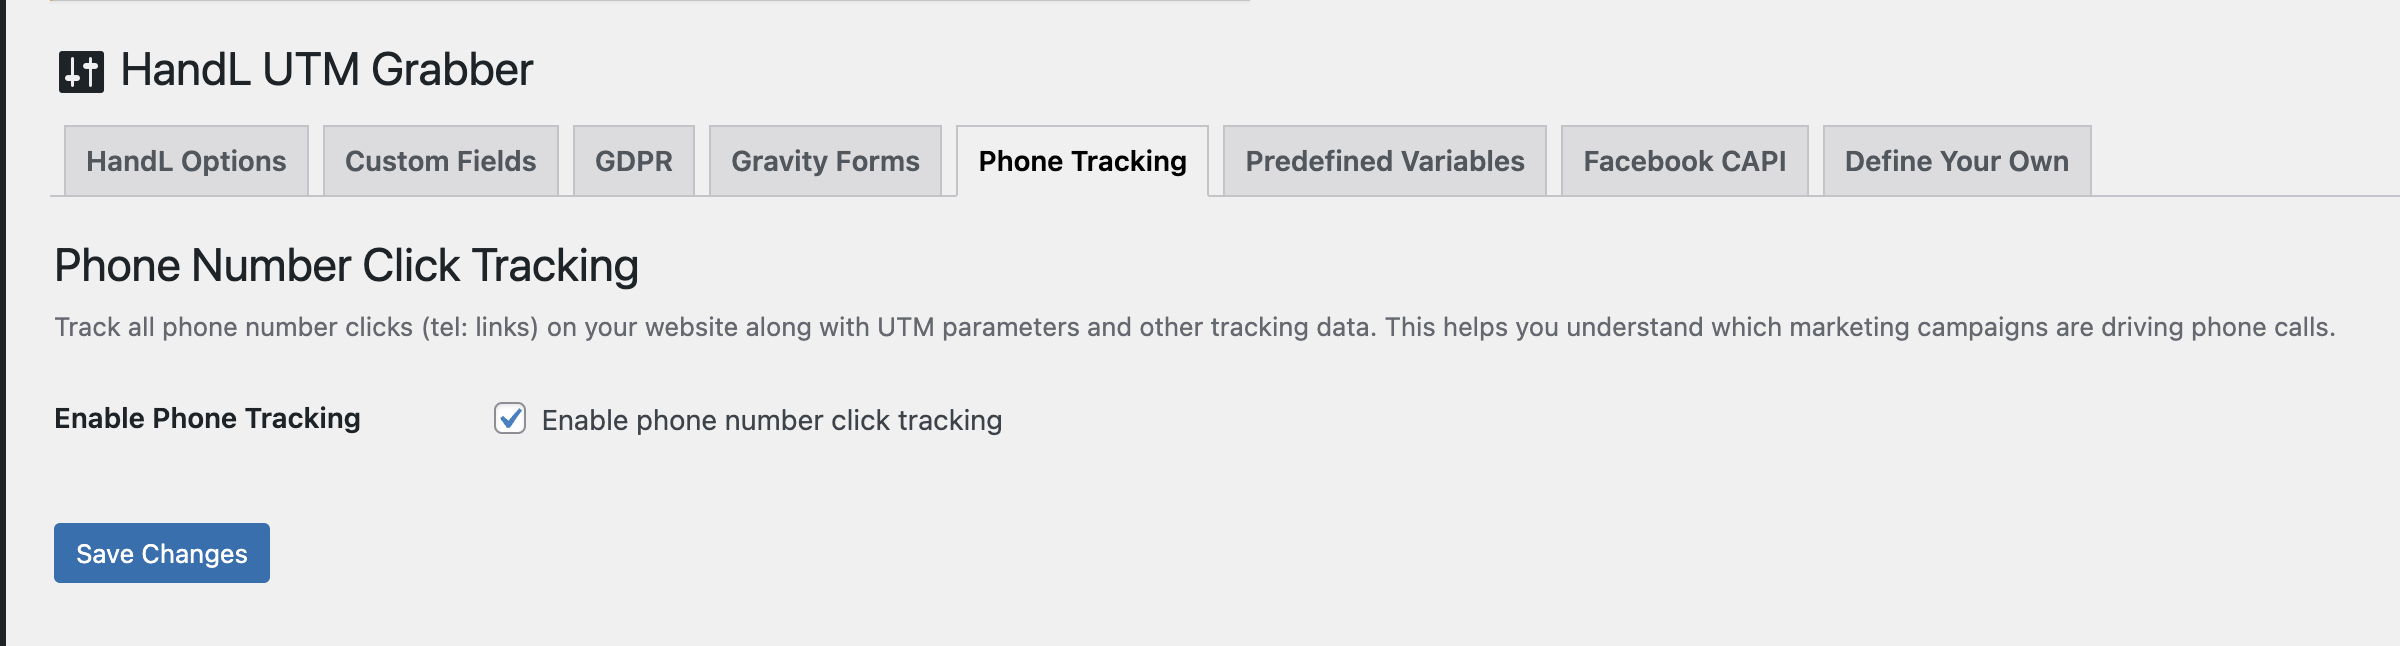
Phone Tracking (to boost Call Rail etc)
Overview
The Phone Tracking feature allows you to track all phone number clicks (tel: links) on your website along with UTM parameters and other tracking data. This helps you understand which marketing campaigns are driving phone calls to your business.
Installation
The feature is automatically installed as part of the HandL UTM Grabber premium version. The necessary database table is created automatically when the plugin is activated.
Configuration
2. Check the "Enable Phone Tracking" checkbox
- Click "Save Changes"
Features
Phone Click Tracking
-
Automatically tracks clicks on any phone number link (tel:) across your website
-
Captures all UTM parameters and tracking data at the time of click
-
Records timestamp and phone number for each click
-
Works with any phone number format using tel: protocol
Reporting Interface
-
View all phone clicks in a tabulated format
-
See key UTM parameters (source, medium, campaign)
-
View original referrer information
-
Access detailed tracking data for each click
Search and Filter
-
Search by phone number
-
Filter by date range
-
Results update in real-time
-
Pagination for large datasets
Data Export
-
Export all tracking data to CSV
-
Includes timestamp, phone number, and all tracking parameters
-
Compatible with spreadsheet software
Data Management
-
Clear all tracking data with one click
-
Confirmation prompt before deletion
-
Maintains data integrity with proper database operations
Technical Details
Tracked Parameters
-
UTM Source
-
UTM Medium
-
UTM Campaign
-
Original Referrer
-
Landing Page
-
All other UTM parameters
-
Custom tracking parameters
Usage Tips
-
Enable the feature before starting any phone campaign
-
Use tel: links for all phone numbers you want to track
3. Export data regularly for backup and analysis
-
Clear old data periodically to maintain performance
-
Use date filters for campaign-specific analysis
Troubleshooting
If phone clicks aren't being tracked:
-
Verify the feature is enabled
-
Ensure phone numbers use tel: protocol
-
Check browser console for JavaScript errors
-
Verify WordPress AJAX URL is accessible
-
Confirm user permissions are correct
Best Practices
-
Use consistent phone number formats
-
Implement regular data exports
-
Clean up old data periodically
-
Monitor tracking data size
-
Use UTM parameters consistently for better analysis
Support
For additional support or feature requests, contact HandL UTM Grabber support team through the official channels.
GDPR Implementation Guide for HandL UTM Grabber Plugin
This documentation provides developers with the necessary information to implement GDPR compliance for the HandL UTM Grabber plugin.
Overview
The HandL UTM Grabber plugin provides two main functions for GDPR compliance:
RunHandL()- Starts tracking when consent is givenRemoveHandLCookies()- Removes tracking cookies when consent is denied
Core Functions
RunHandL()
Initiates UTM tracking and cookie setting when user consent is obtained.
function RunHandL() {
// Sets up UTM tracking, cookies, and form field population
// Only call this when user has given consent
}
RemoveHandLCookies()
Removes all HandL tracking cookies when consent is denied.
function RemoveHandLCookies() {
console.log('Removing HandL cookies');
handl_utm_all_params.forEach(param => {
Cookies.remove(param, { path: '/', domain: getDomainName() });
});
}
Consent Detection Methods
The plugin supports multiple consent management platforms and methods:
1. Google Tag Manager (GTM) Consent Mode
function getConsentStatus() {
if (!window.dataLayer) {
console.warn('dataLayer is not defined.');
return null;
}
let consent = null;
// Iterate through dataLayer in reverse to find the latest consent event
for (let i = window.dataLayer.length - 1; i >= 0; i--) {
if (window.dataLayer[i][0] === 'consent' && window.dataLayer[i][1] === 'update') {
consent = window.dataLayer[i][2];
break;
} else if (typeof window.dataLayer[i] === 'object' && window.dataLayer[i].value && window.dataLayer[i].value.event && window.dataLayer[i].value.event.includes('consent')) {
consent = window.dataLayer[i].value;
break;
}
}
return consent;
}
function isConsentDenied() {
const consentStatus = getConsentStatus();
return consentStatus && (consentStatus.ad_user_data === 'denied' && (consentStatus.analytics_storage === 'denied' || !consentStatus.analytics_storage));
}
function handleConsentStatus() {
if (isConsentDenied()) {
RemoveHandLCookies();
} else {
RunHandL();
}
}
2. Borlabs Cookie
// Check Borlabs cookie on page load
const borlabsCookie = Cookies.get('borlabs-cookie');
if (borlabsCookie) {
try {
const cookieData = JSON.parse(borlabsCookie);
if (cookieData.consents.marketing.includes('handl-utm-grabber')) {
console.log("handl-utm-grabber checked by Borlabs.. RunHandL...");
RunHandL();
} else {
console.log("handl-utm-grabber not checked by Borlabs");
}
} catch (e) {
console.error('Error parsing JSON:', e);
}
}
// Listen for Borlabs consent changes
window.addEventListener('borlabs-cookie-consent-saved', () => {
if (window.BorlabsCookie.Consents.hasConsent('handl-utm-grabber')) {
RunHandL();
}
});
3. Cookiebot
window.addEventListener('CookiebotOnAccept', function (e) {
if (Cookiebot.consent.marketing) {
RunHandL();
}
}, false);
4. Complianz
document.addEventListener("cmplz_enable_category", function(consentData) {
var category = consentData.detail.category;
if (category === 'marketing') {
RunHandL();
}
});
5. Custom GDPR Implementation
For custom consent implementations, you can use the built-in GDPR notice:
// Set consent cookie
Cookies.set("gdprConsent", 1); // 1 for accept, 0 for deny
// The plugin will automatically check this cookie and call appropriate functions
Implementation Examples
Basic Implementation
// Check if consent is required
if (typeof handl_ajax.require_third_party_consent !== 'undefined' && handl_ajax.require_third_party_consent) {
// Monitor dataLayer for consent changes
if (!window.dataLayer) {
window.dataLayer = [];
}
const originalPush = window.dataLayer.push;
window.dataLayer.push = function(...args) {
args.forEach(entry => {
if (
(Array.isArray(entry) && entry[0] === 'consent' && entry[1] === 'update')
|| (entry.event && entry.event.includes('consent'))
|| (entry.value && entry.value.event && entry.value.event.includes('consent'))
) {
handleConsentStatus();
}
});
return originalPush.apply(this, args);
};
}
Custom Consent Manager Integration
// Example for a custom consent manager
function checkCustomConsent() {
// Your consent checking logic here
const hasConsent = yourConsentManager.hasMarketingConsent();
if (hasConsent) {
RunHandL();
} else {
RemoveHandLCookies();
}
}
// Call on page load
checkCustomConsent();
// Listen for consent changes
yourConsentManager.onConsentChange(function(consent) {
if (consent.marketing) {
RunHandL();
} else {
RemoveHandLCookies();
}
});
Server-Side PHP Integration
The plugin also provides server-side consent checking:
// Check if consent is given
function HandLCookieConsented() {
$good2go = apply_filters('is_ok_to_capture_utms', array('good2go' => 1));
return $good2go["good2go"];
}
// Use in your code
if (HandLCookieConsented()) {
// User has given consent, proceed with tracking
// Your tracking code here
}
Configuration Options
WordPress Admin Settings
- Enable GDPR: Shows HandL's built-in consent notice
- Require Third-Party Consent: Requires consent from third-party services (e.g., GTM) before tracking
JavaScript Variables
handl_ajax.require_third_party_consent: Boolean indicating if third-party consent is requiredhandl_utm_all_params: Array of all UTM parameters that will be trackedhandl_utm_cookie_duration: Cookie expiration settings
Best Practices
- Always check consent before calling
RunHandL() - Call
RemoveHandLCookies()when consent is denied - Listen for consent changes and update accordingly
- Test with different consent management platforms
- Ensure your implementation works with the plugin's built-in GDPR features
Testing
To test your GDPR implementation:
Troubleshooting
Common Issues
- Consent not detected: Ensure your consent manager is properly integrated and firing the correct events
- Cookies not removed: Check that
getDomainName()returns the correct domain - Multiple consent managers: Ensure only one consent manager is active to avoid conflicts
Debug Mode
Enable console logging to debug consent issues:
console.log('Consent status:', getConsentStatus());
console.log('Is consent denied:', isConsentDenied());
console.log('HandL cookies:', handl_utm_all_params);
Support
For additional support or questions about GDPR implementation, refer to the plugin documentation or contact the development team.
MCP (Model Context Protocol) for UTMGrabber Reports
Overview
The MCP feature allows you to connect your WordPress site to AI assistants like Claude Desktop, Cursor, and Codex using the Model Context Protocol. Once connected, you can query your UTMGrabber reports using natural language directly from any MCP-compatible client.
Disclaimer: AI-generated results may be inaccurate or incomplete. Always review before acting on them.
For example, you can ask questions like:
- "What are the top UTM sources in my submissions?"
- "How many leads came from organic traffic?"
- "Which campaigns drove the most form submissions?"
Requirements
- HandL UTM Grabber V3 (premium) with an active license key
- Starter plus or premium utmgrabber subscription
Setup
Step 1: Navigate to the MCP Tab
- Go to WordPress Admin > UTM > MCP
You will see the MCP setup screen:

Step 2: Connect to MCP
- Click the Connect to MCP button
- The plugin will automatically register your site using your license key
- Once connected, you will see your unique MCP URL
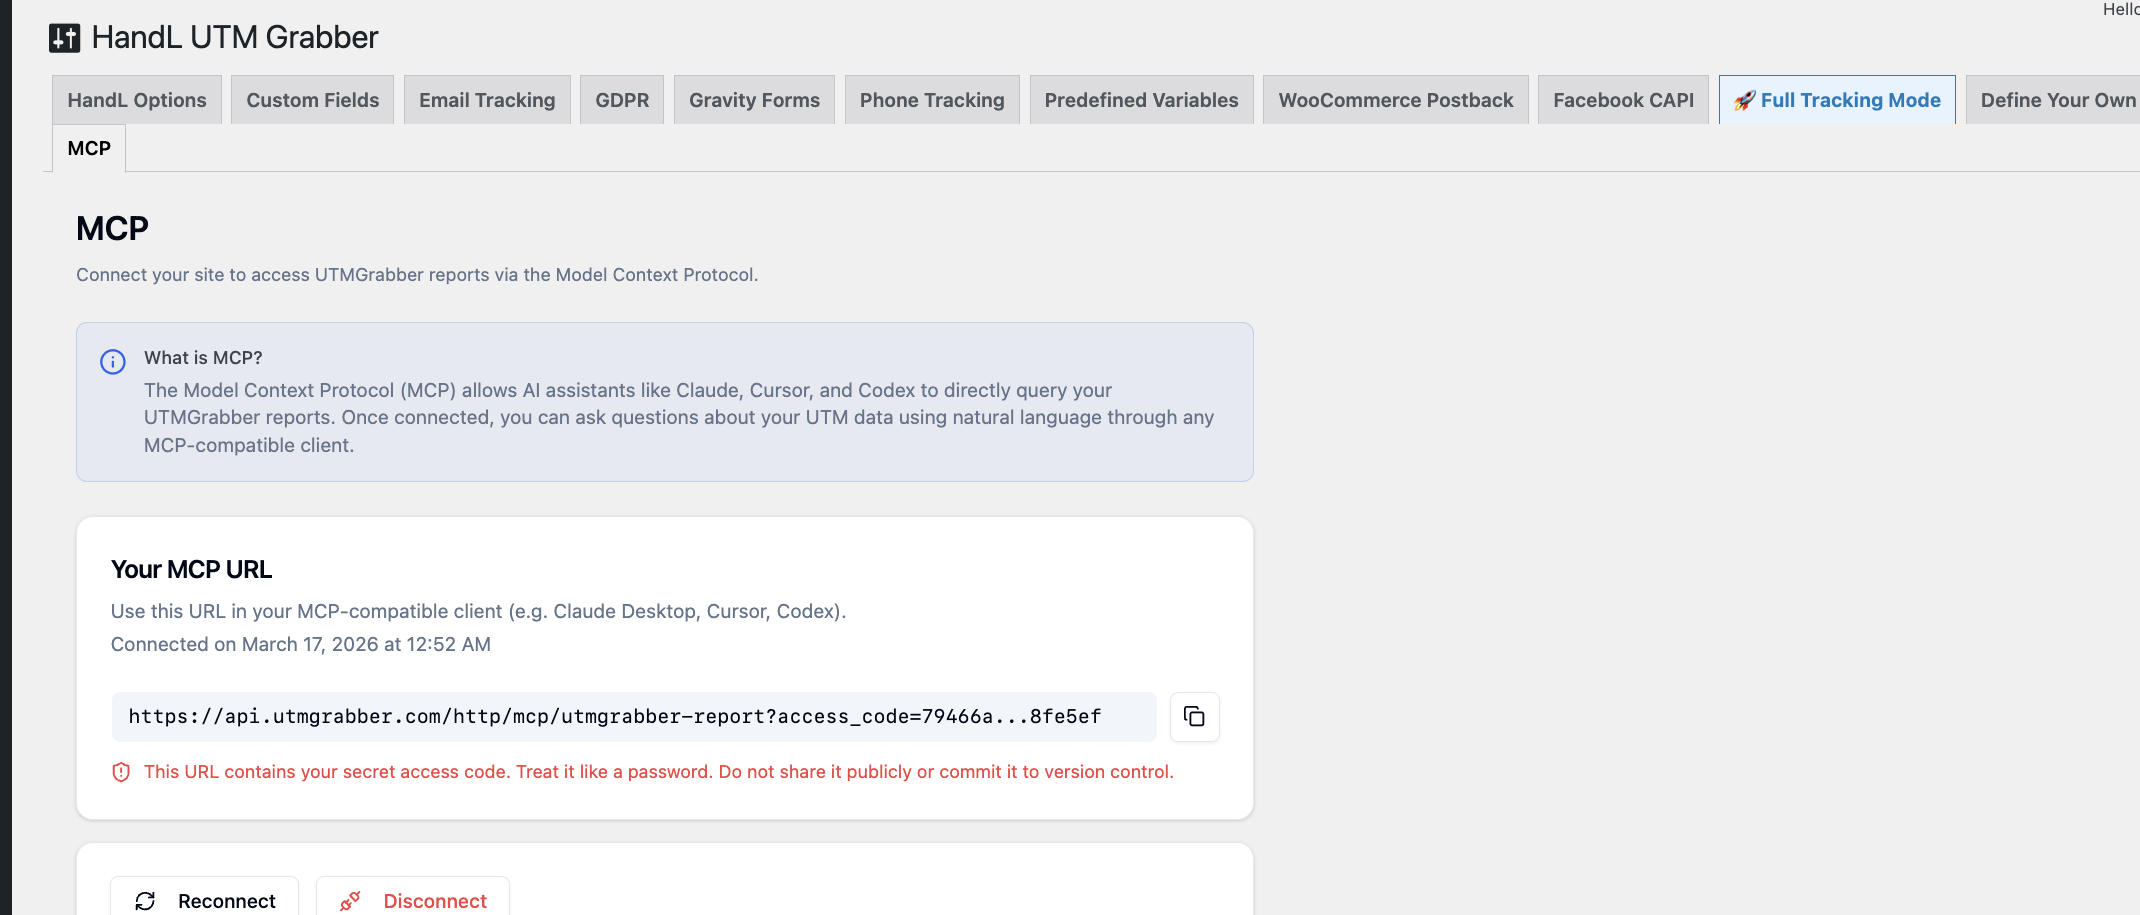
Step 3: Copy Your MCP URL
- Your unique MCP URL will be displayed on screen (partially truncated for security)
- Click the copy icon next to the URL to copy the full URL to your clipboard
- You will see a confirmation toast when the URL is copied
Important: This URL contains your secret access code. Treat it like a password. Do not share it publicly or commit it to version control.
Step 4: Add to Your MCP Client
Use the copied URL in your preferred MCP-compatible client:
Claude Desktop
Add to your Claude Desktop configuration file (claude_desktop_config.json):
{
"mcpServers": {
"utmgrabber": {
"url": "YOUR_MCP_URL_HERE"
}
}
}
Cursor
Add to your Cursor MCP settings (.cursor/mcp.json):
{
"mcpServers": {
"utmgrabber": {
"url": "YOUR_MCP_URL_HERE"
}
}
}
Features
Query UTM Reports with Natural Language
Once connected, you can ask your AI assistant questions about your UTMGrabber data. The MCP server exposes the following capabilities:
- Available form plugins - See which form plugins are detected on your site (e.g. Gravity Forms, WPForms, Fluent Forms)
- List forms - Browse all forms from a specific plugin
- Get entries - Fetch form submission entries with UTM data, filtered by date range, form, and plugin
Secure Communication
All communication between the MCP server and your WordPress site is secured using HMAC-SHA256 signed requests. Your site secret is never transmitted after the initial setup. Only the MCP server and your WordPress plugin know the shared secret.
Managing Your Connection
Reconnecting
If you need to regenerate your MCP credentials (e.g. you suspect the URL was compromised):
- Click the Reconnect button
- A confirmation dialog will appear warning that this will invalidate your current URL
- Click Reconnect to confirm
- A new MCP URL will be generated
- Update all your MCP clients with the new URL
Disconnecting
To completely revoke MCP access for your site:
- Click the Disconnect button (shown in red)
- A confirmation dialog will appear
- Click Disconnect to confirm
- Your MCP credentials will be revoked immediately
- Any MCP clients using the old URL will stop working
- You can reconnect later, but a new URL will be generated
Troubleshooting
"Failed to connect to MCP server"
- Verify your license key is active and valid
- Check that your site URL is accessible from the internet
- Ensure your WordPress site is not behind a firewall that blocks outgoing requests
MCP client can't connect after setup
- Make sure you copied the full MCP URL (click the copy button, don't copy the truncated text)
- Verify the URL is correctly pasted in your MCP client configuration
- Restart your MCP client after adding the configuration
Data is not showing in AI responses
- Ensure you have form plugins installed and active (e.g. Gravity Forms, WPForms)
- Verify that form submissions exist in the date range you're querying
- Check that the form plugin is supported by UTMGrabber
Connection was working but stopped
- Your MCP credentials may have been invalidated. Try clicking Reconnect to generate new credentials
- Check that your WordPress site is still accessible and the plugin is active
Best Practices
- Keep your MCP URL secret - treat it like a password
- Do not share the URL publicly or commit it to version control
- Reconnect if compromised - if you suspect your URL has been exposed, click Reconnect immediately to invalidate the old credentials