Elementor Form UTM Tracking Integration
Set up Elementor forms with HandL UTM Grabber to capture UTM parameters, GCLID, FBCLID, referrer, and landing page data in hidden fields for lead attribution.
- Elementor One Click Integration (Recommended)
- Native Elementor Form Support - HandL UTM Grabber Guide
- Elementor UTM Tracking Integration
- Add cookie support to Elementor Pro for UTM Tracking Consent
- ActiveCampaign hidden fields to appear in Elementor Form - HandL UTM Grabber Guide
- Appending UTM variables using Text Editor in Elementor with HandL UTM Grabber
- Appending UTMs to the selective Buttons in Elementor with HandL UTM Grabber
- Elementor UTM Tracking Integration with Mailchimp
- Syncing the form data to your CRM via Webhook - HandL UTM Grabber Guide
Elementor One Click Integration (Recommended)
Use One Click Integrations to add every HandL hidden tracking field to your Elementor forms automatically. The full guide is below.
UTM attribution overview
This guide explains One Click Integrations with HandL UTM Grabber. It helps you capture UTM source, medium, campaign, term, content, click IDs, referrer, and landing page data and keep the marketing context needed for accurate reporting across forms, bookings, signups, and sales.
1. Open the Integrations tab
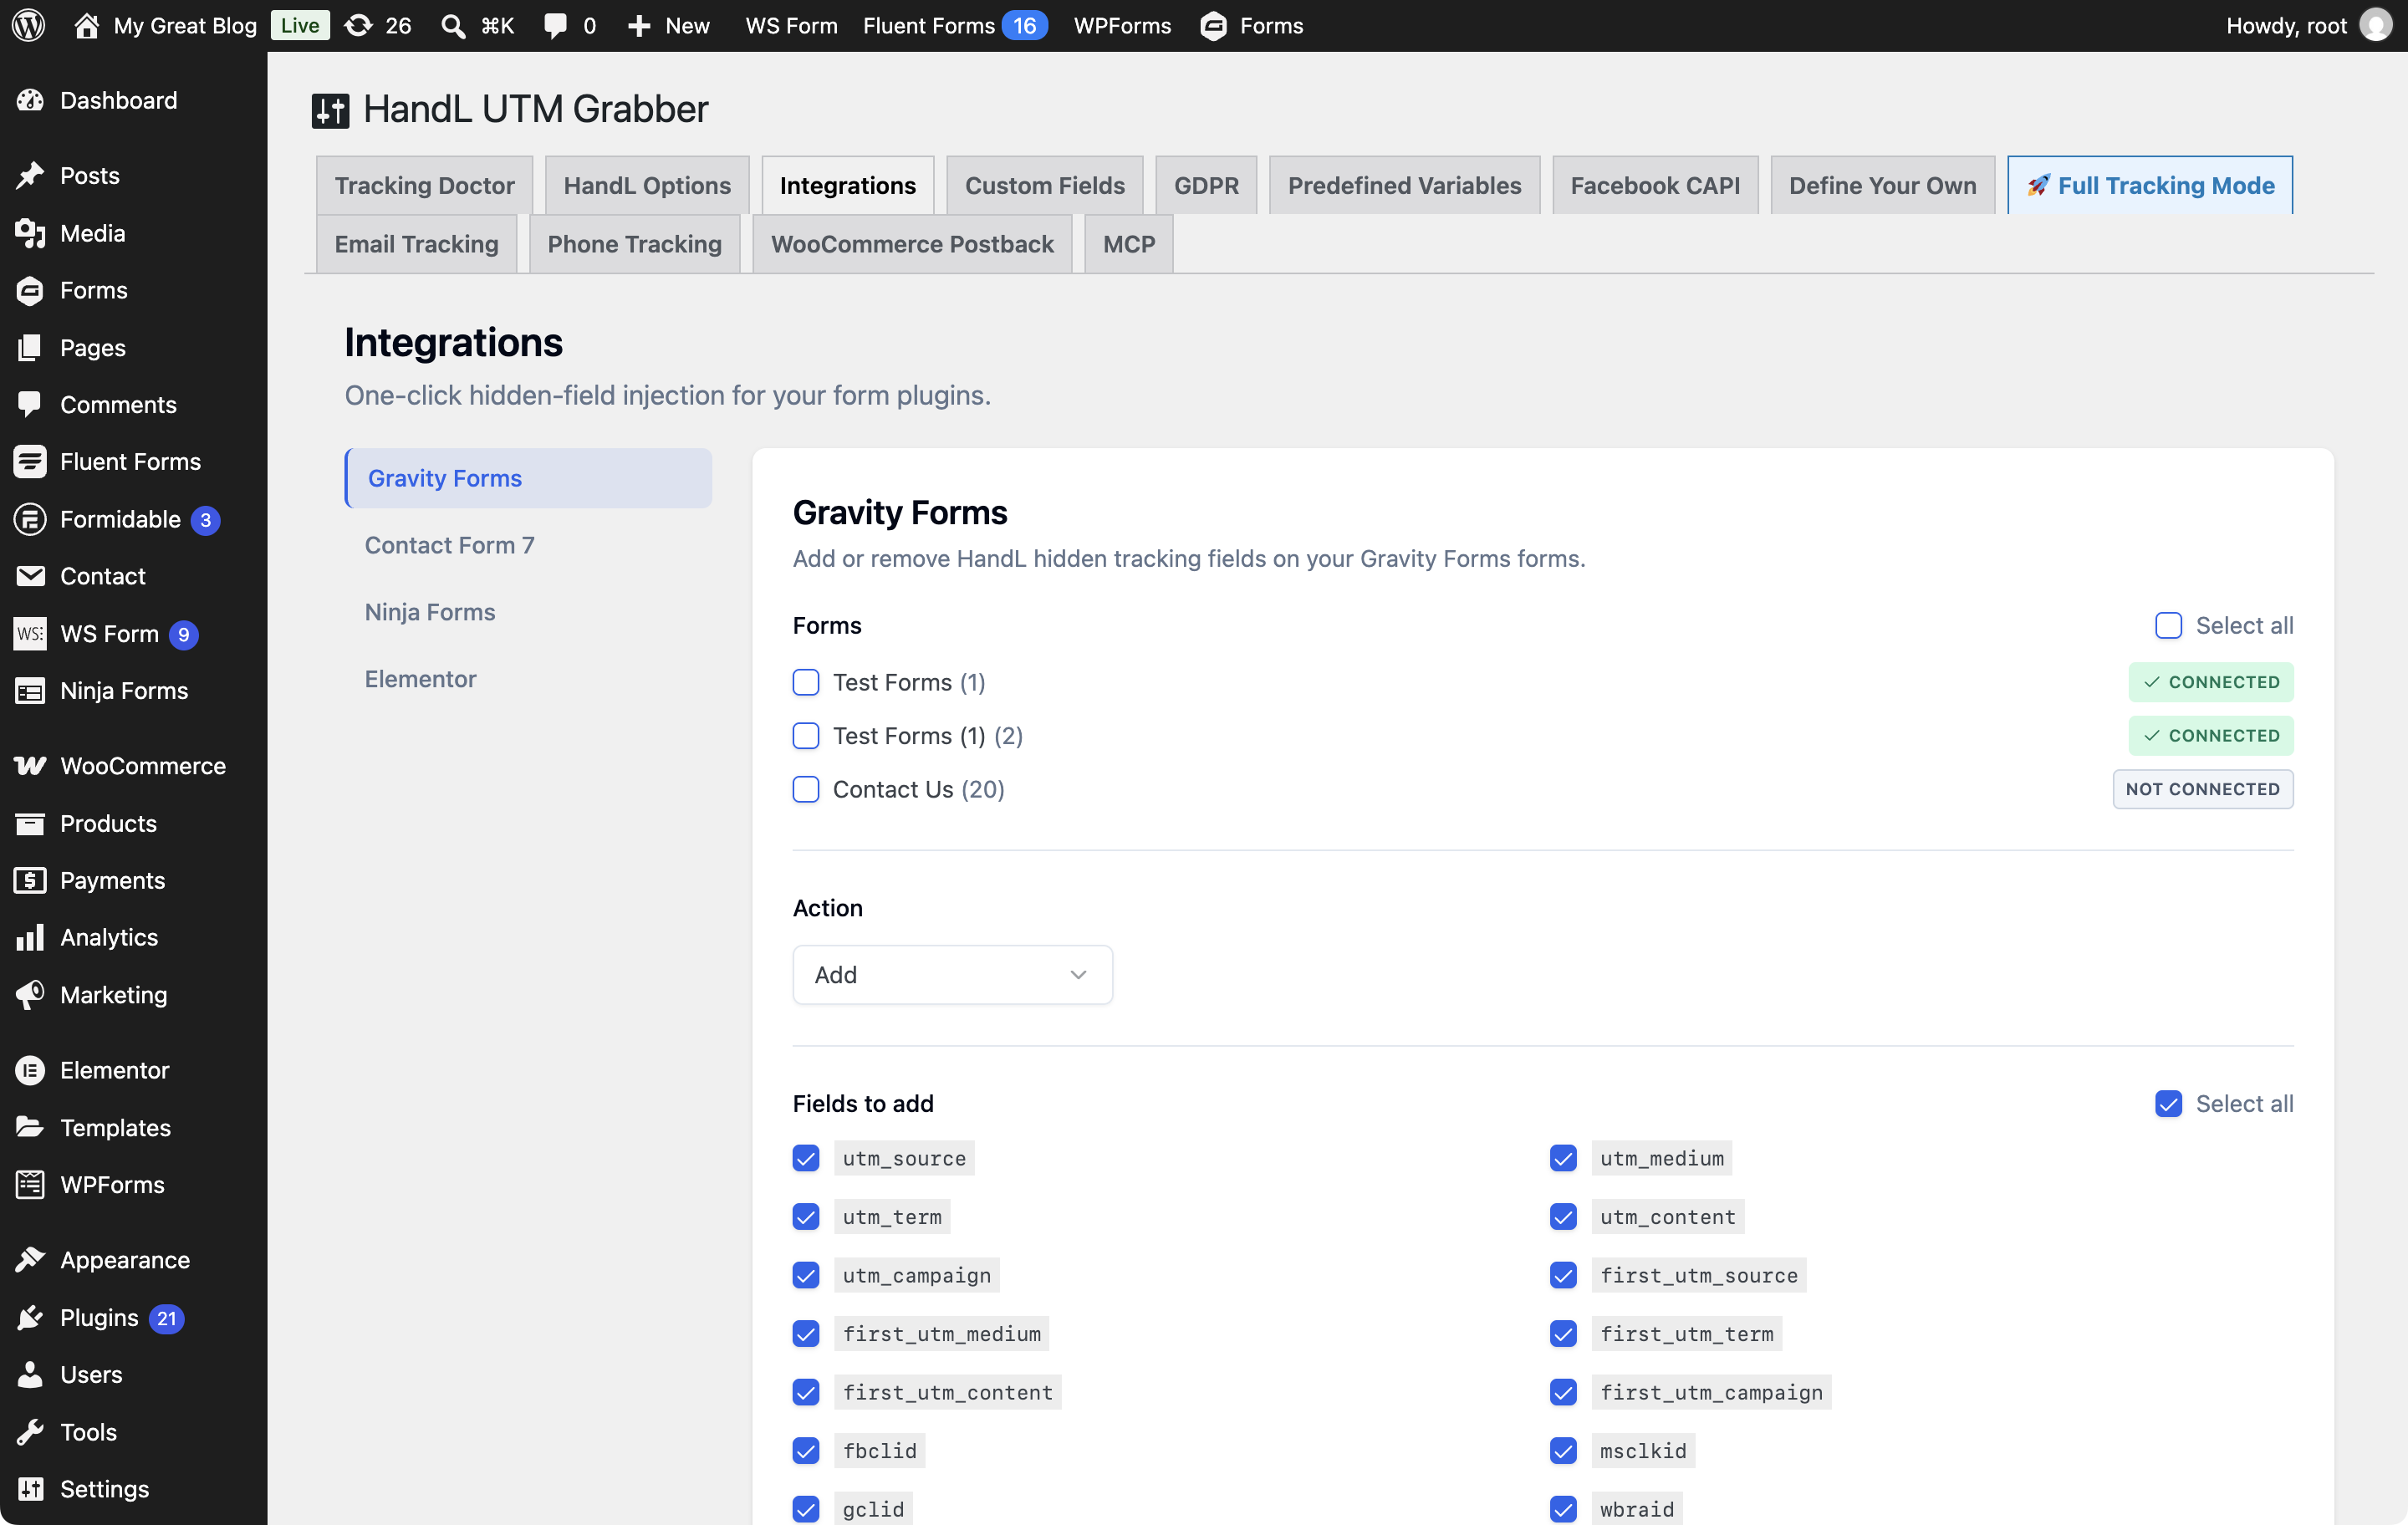
Use One Click Integrations with Gravity Forms, Contact Form 7, Ninja Forms, or Elementor. Other form plugins use the manual hidden field method in Native WP Shortcodes.
2. Find your form plugin
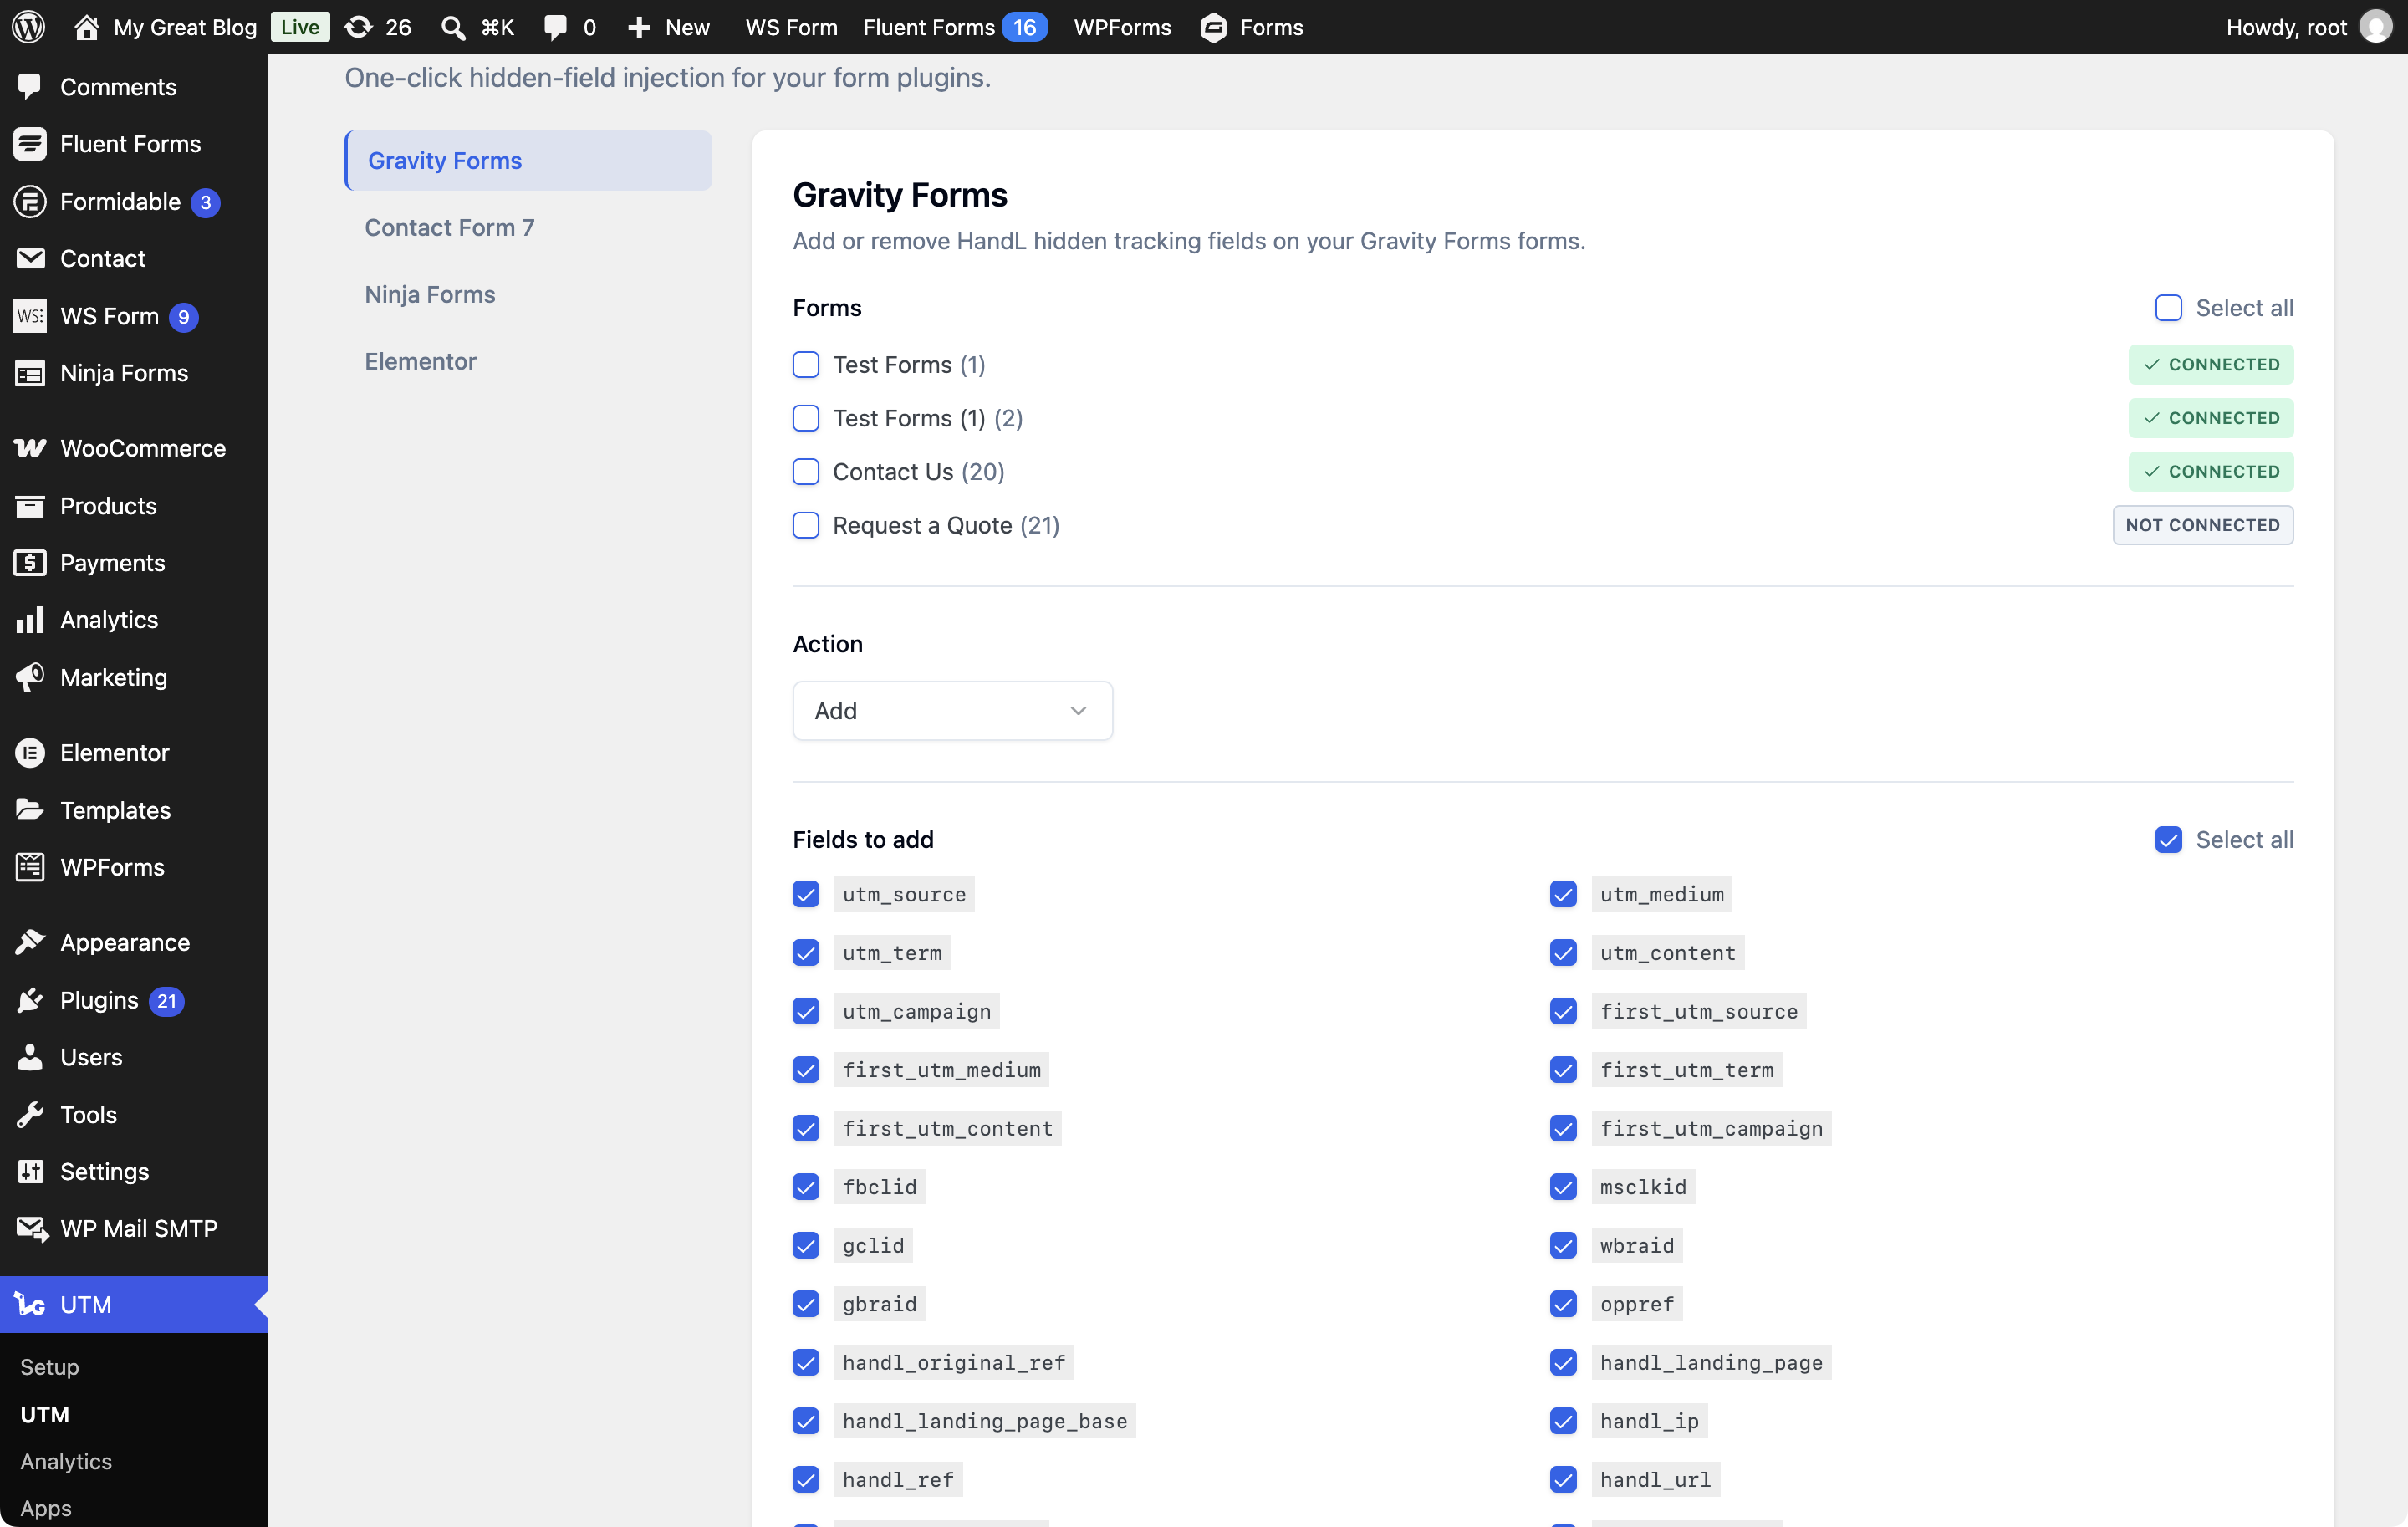
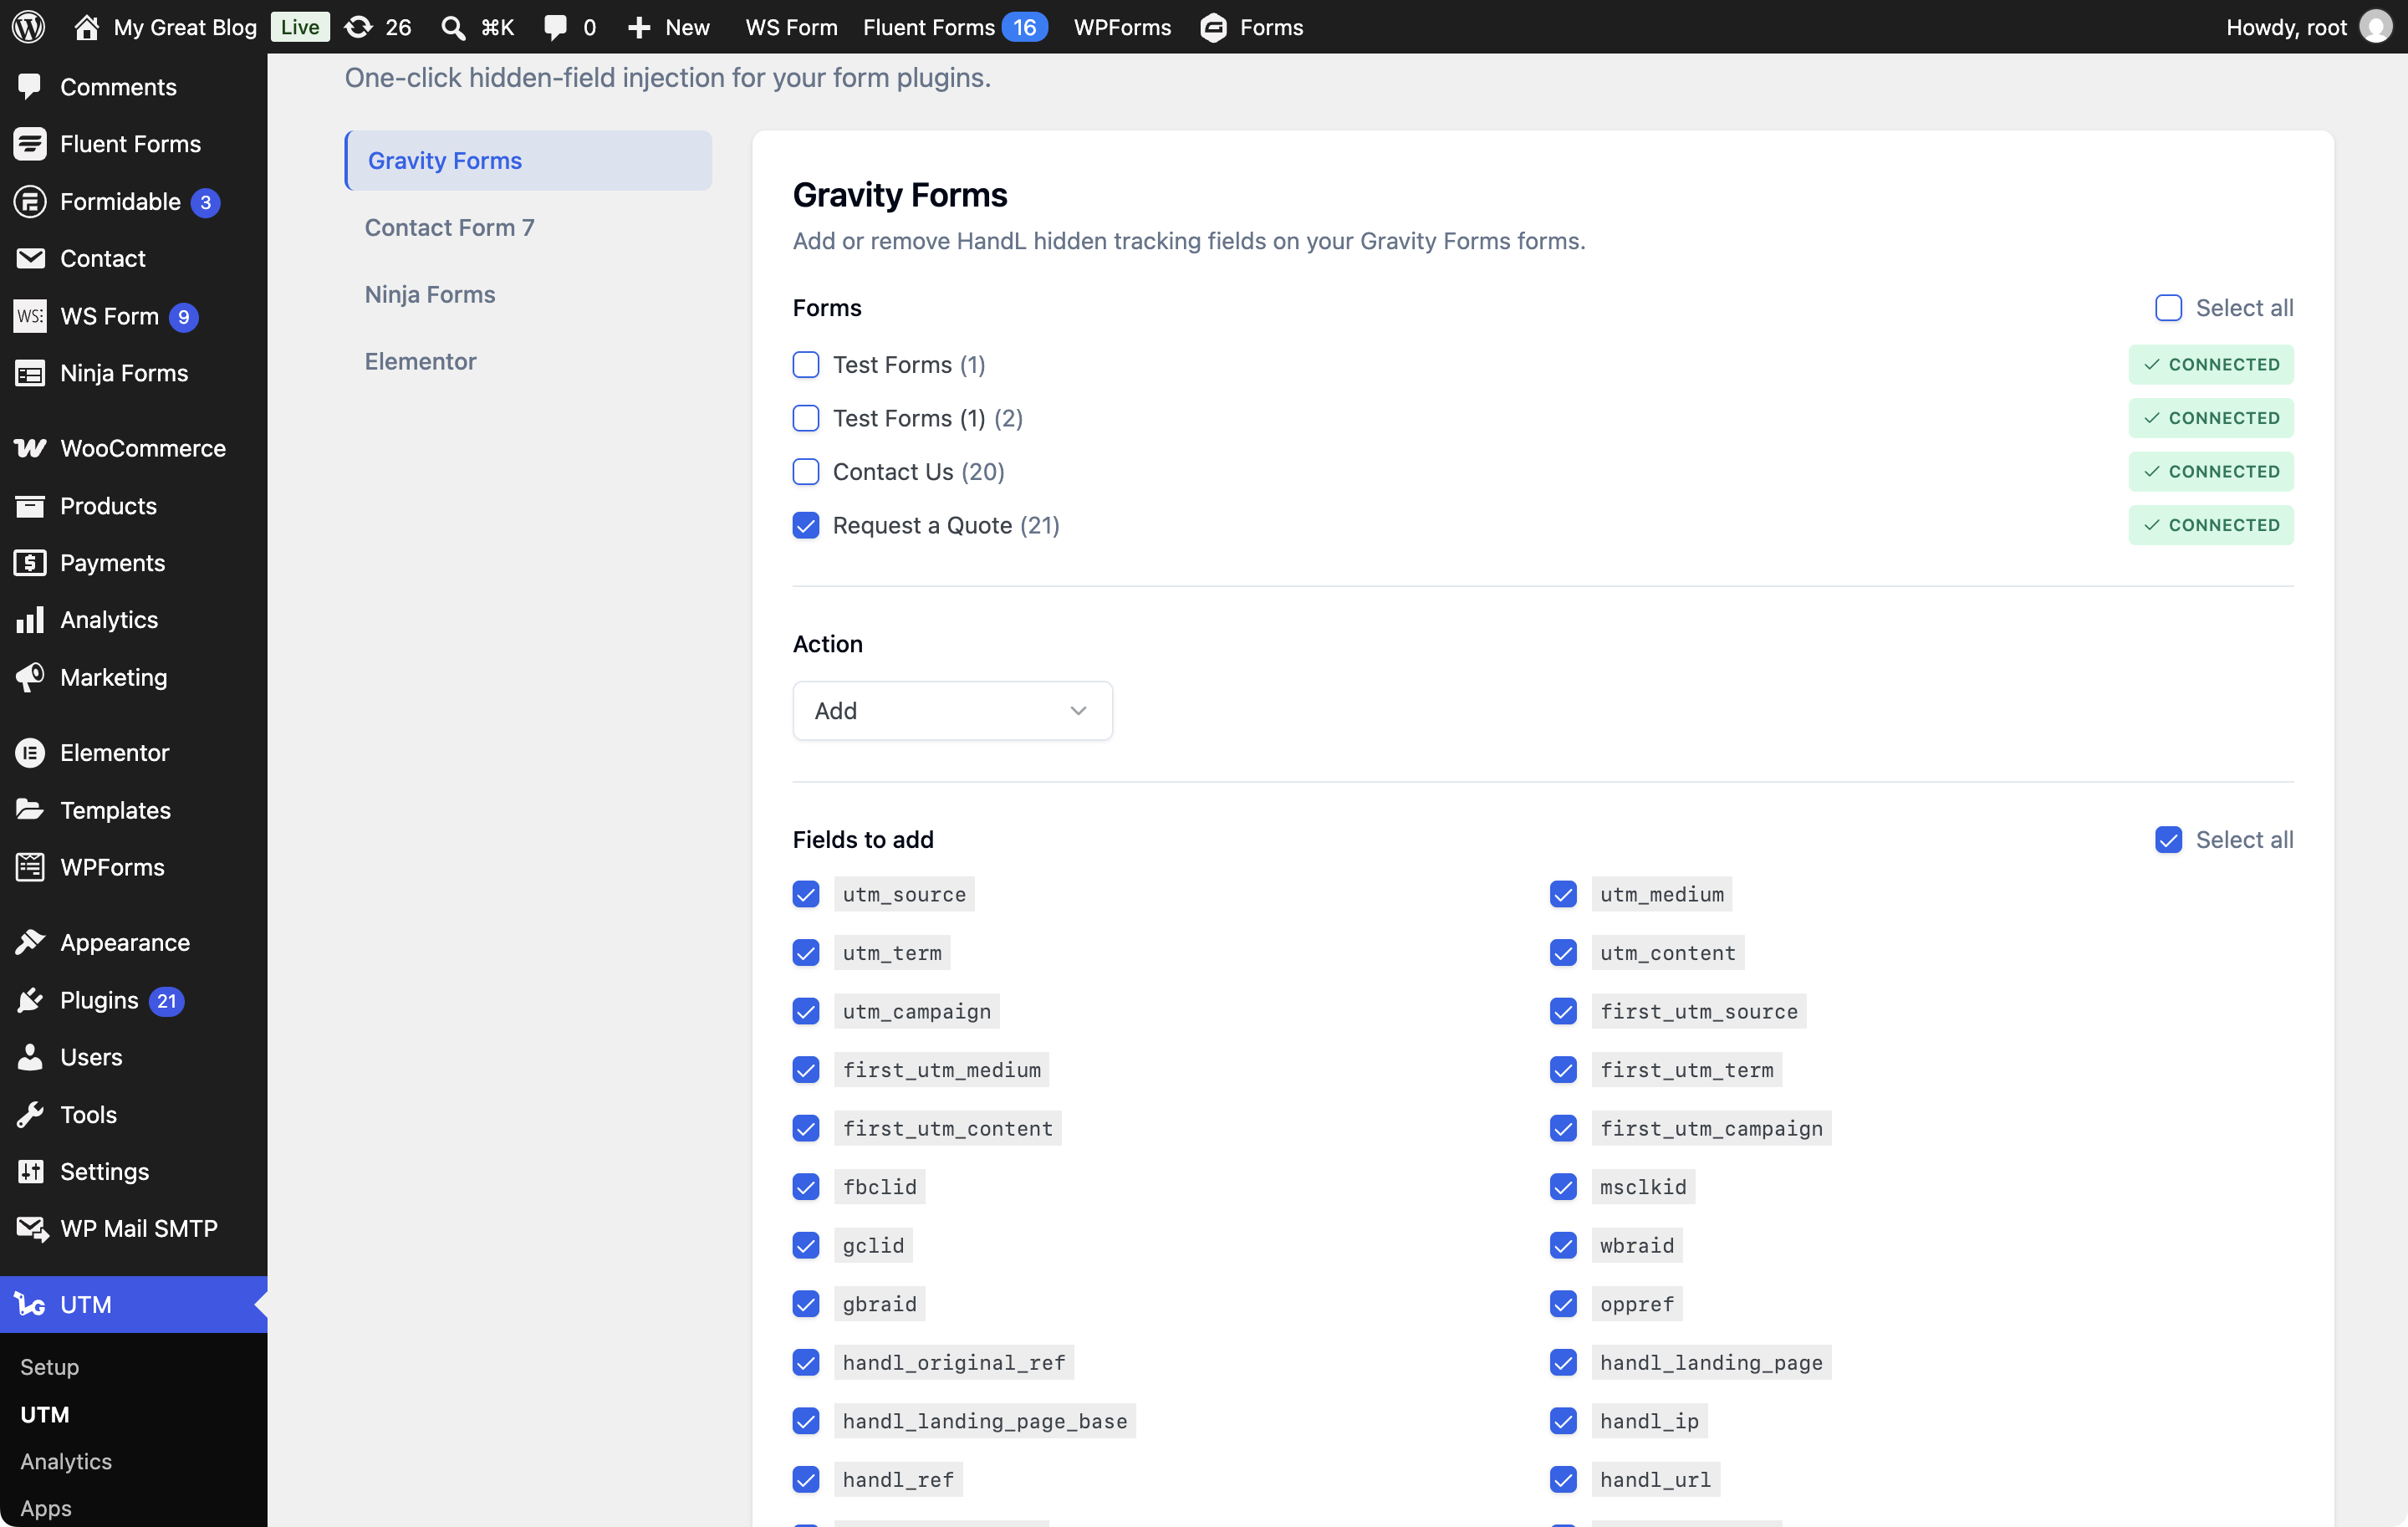
Open a plugin panel to see its forms. Each form shows Connected, Not connected, or N new field(s) available.
3. Select your forms
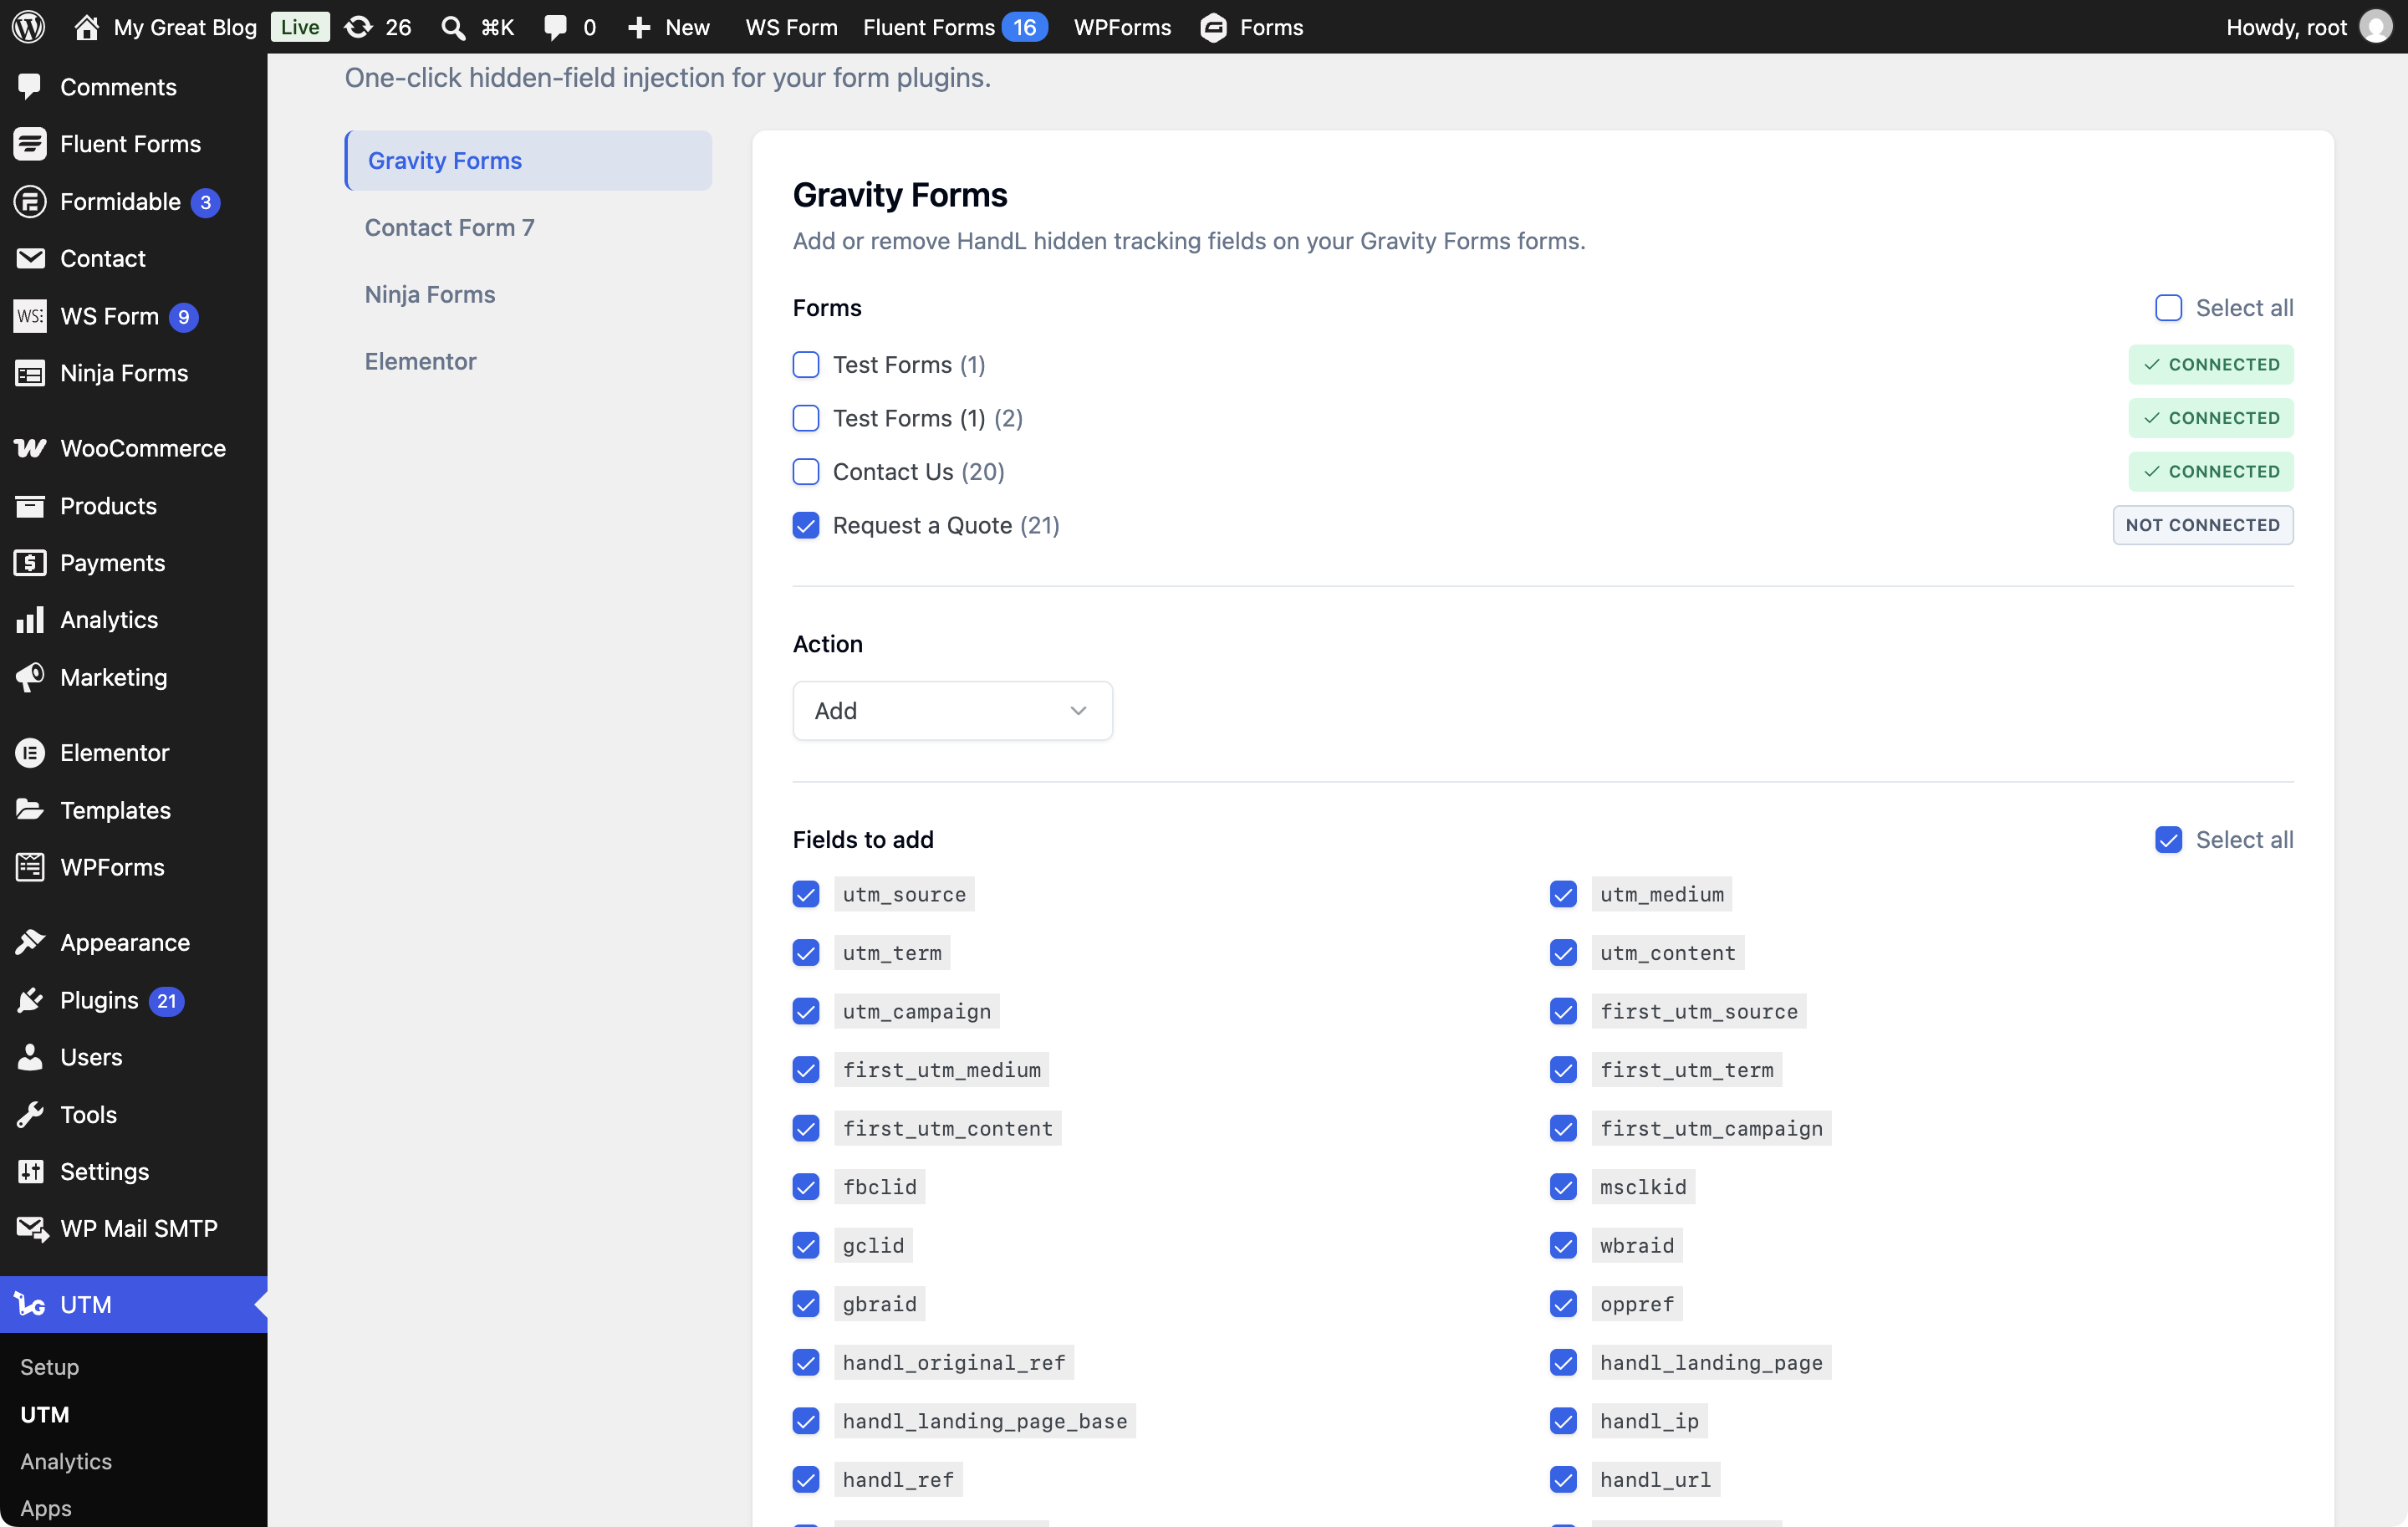
4. Click Save Changes
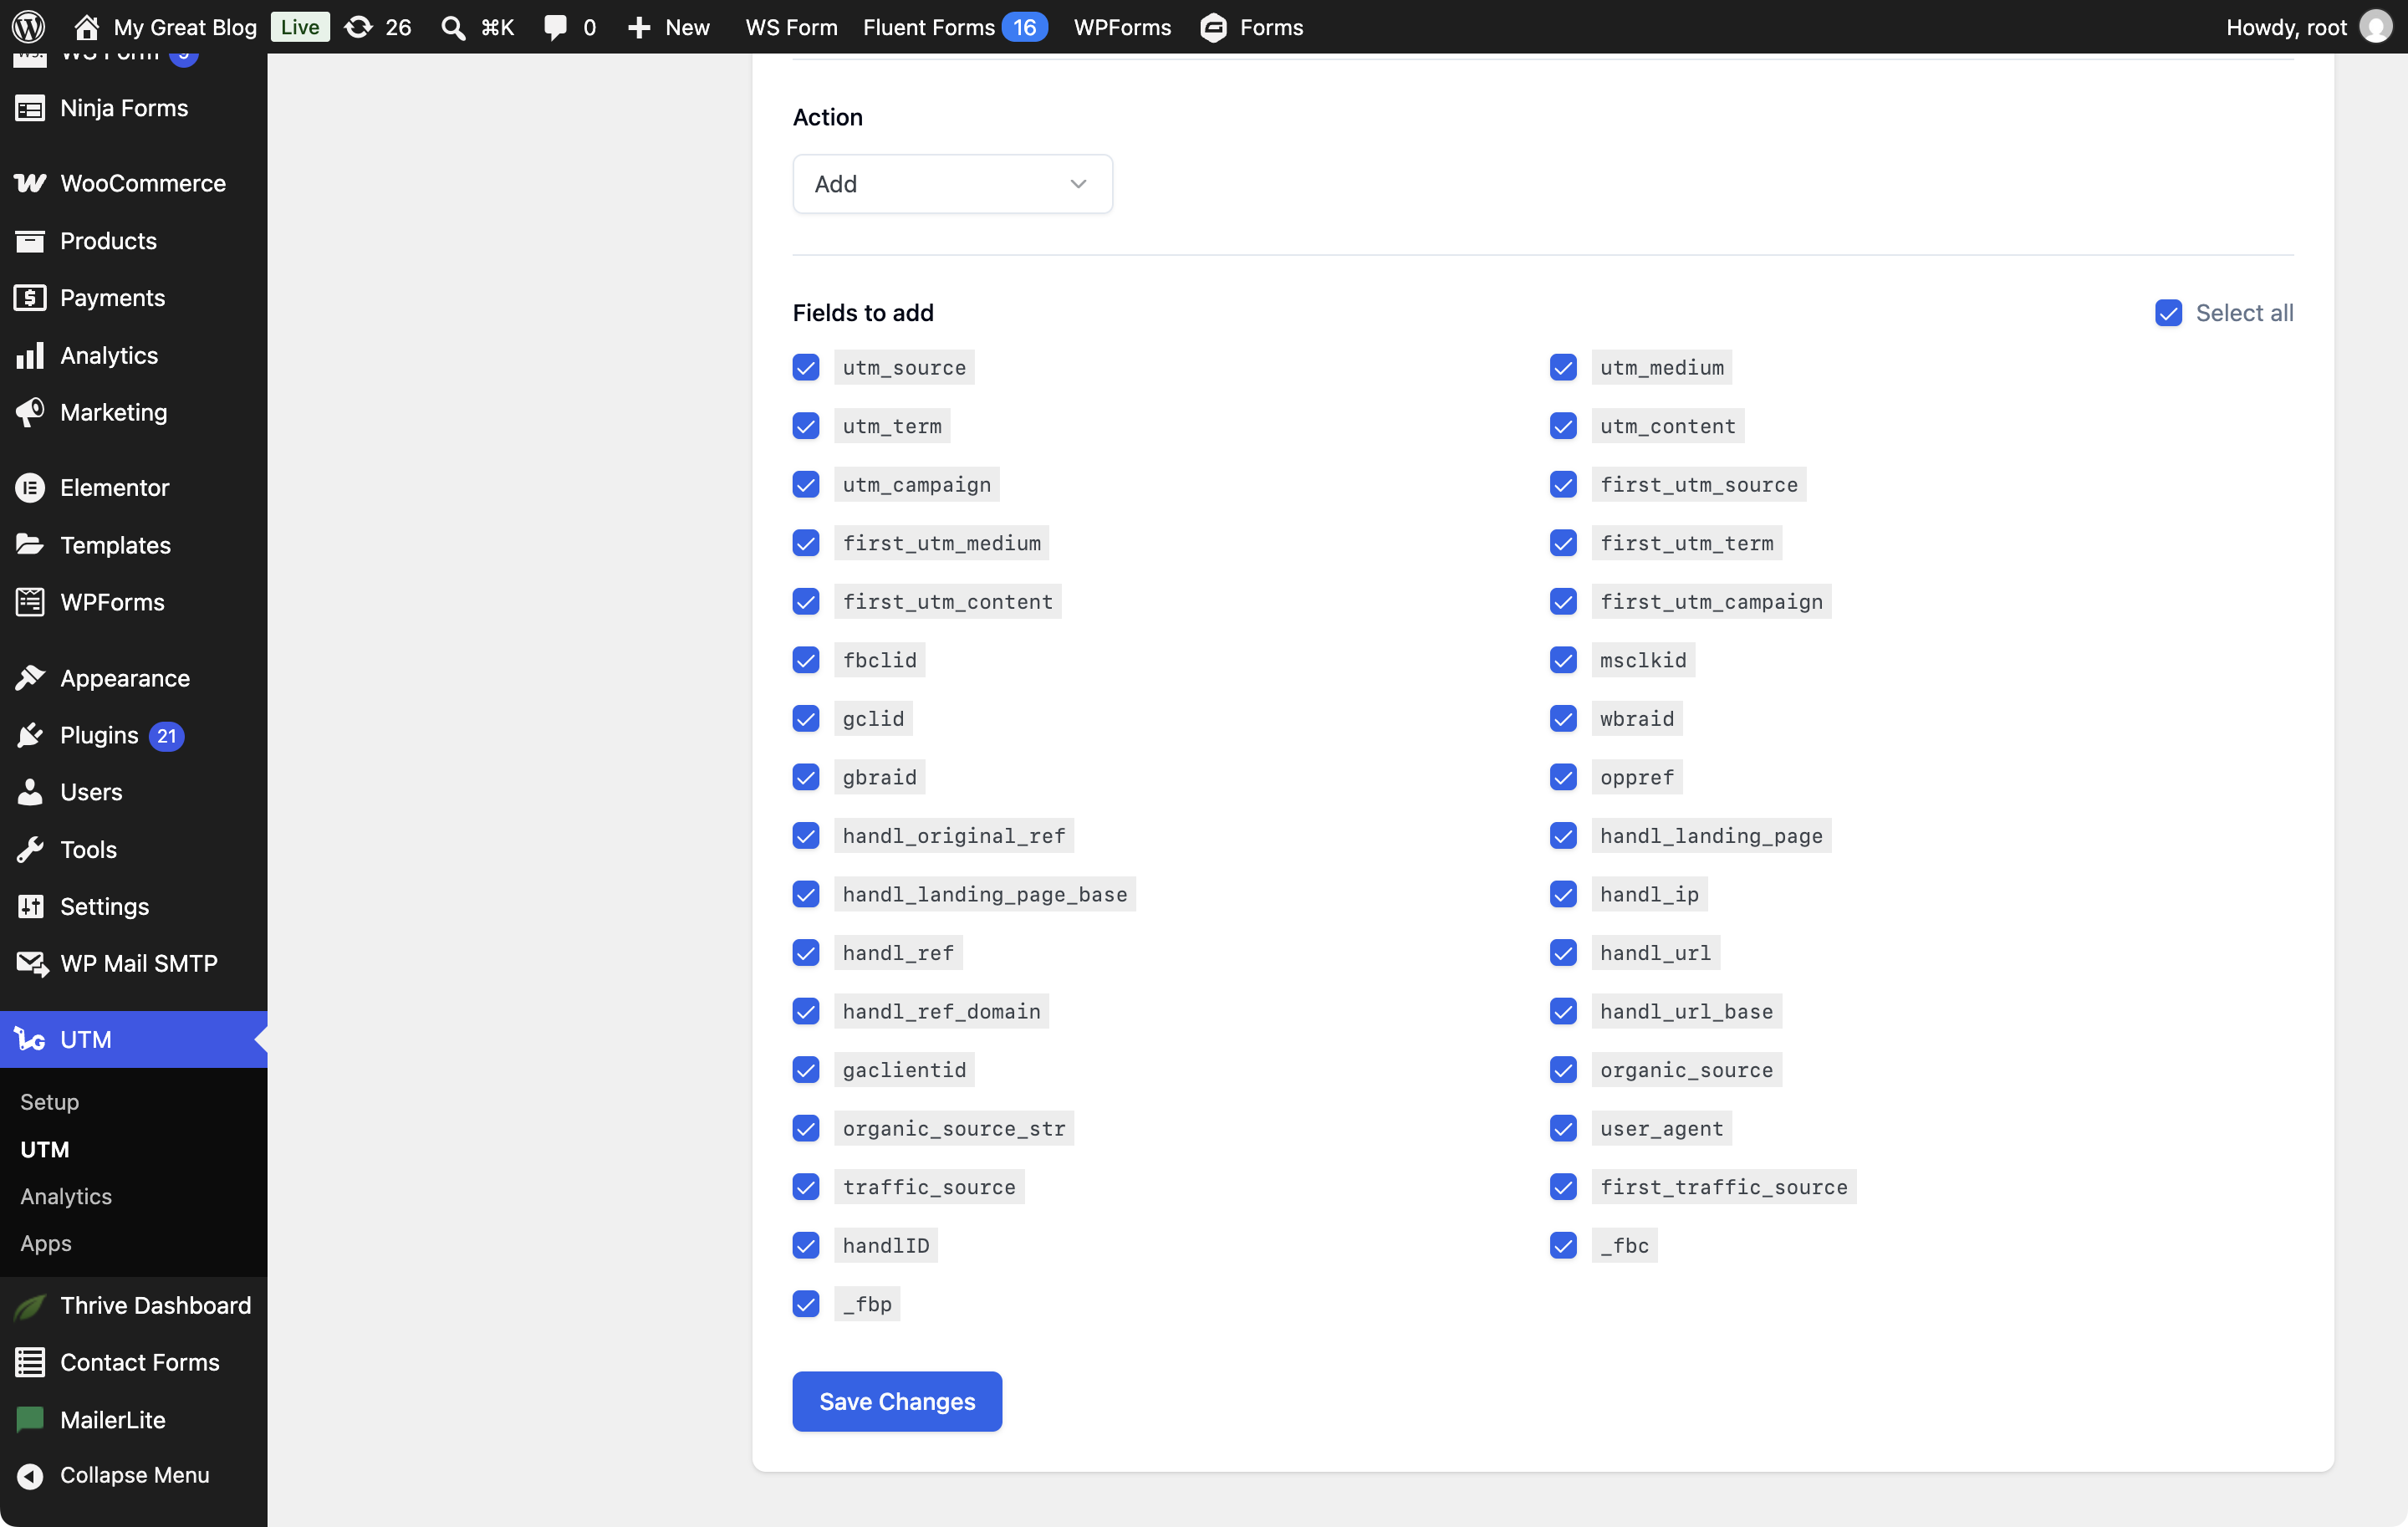
Keep Add selected, choose the tracking fields you need, and click Save Changes. The field list includes HandL tracking parameters and any fields from the Custom Fields tab. If your license is inactive, Save Changes is disabled and an alert asks you to activate it.
Choose Remove only when you intend to remove every HandL field from the selected forms, including fields you added manually. Remove hides the field list before you save.
5. Check the confirmation message
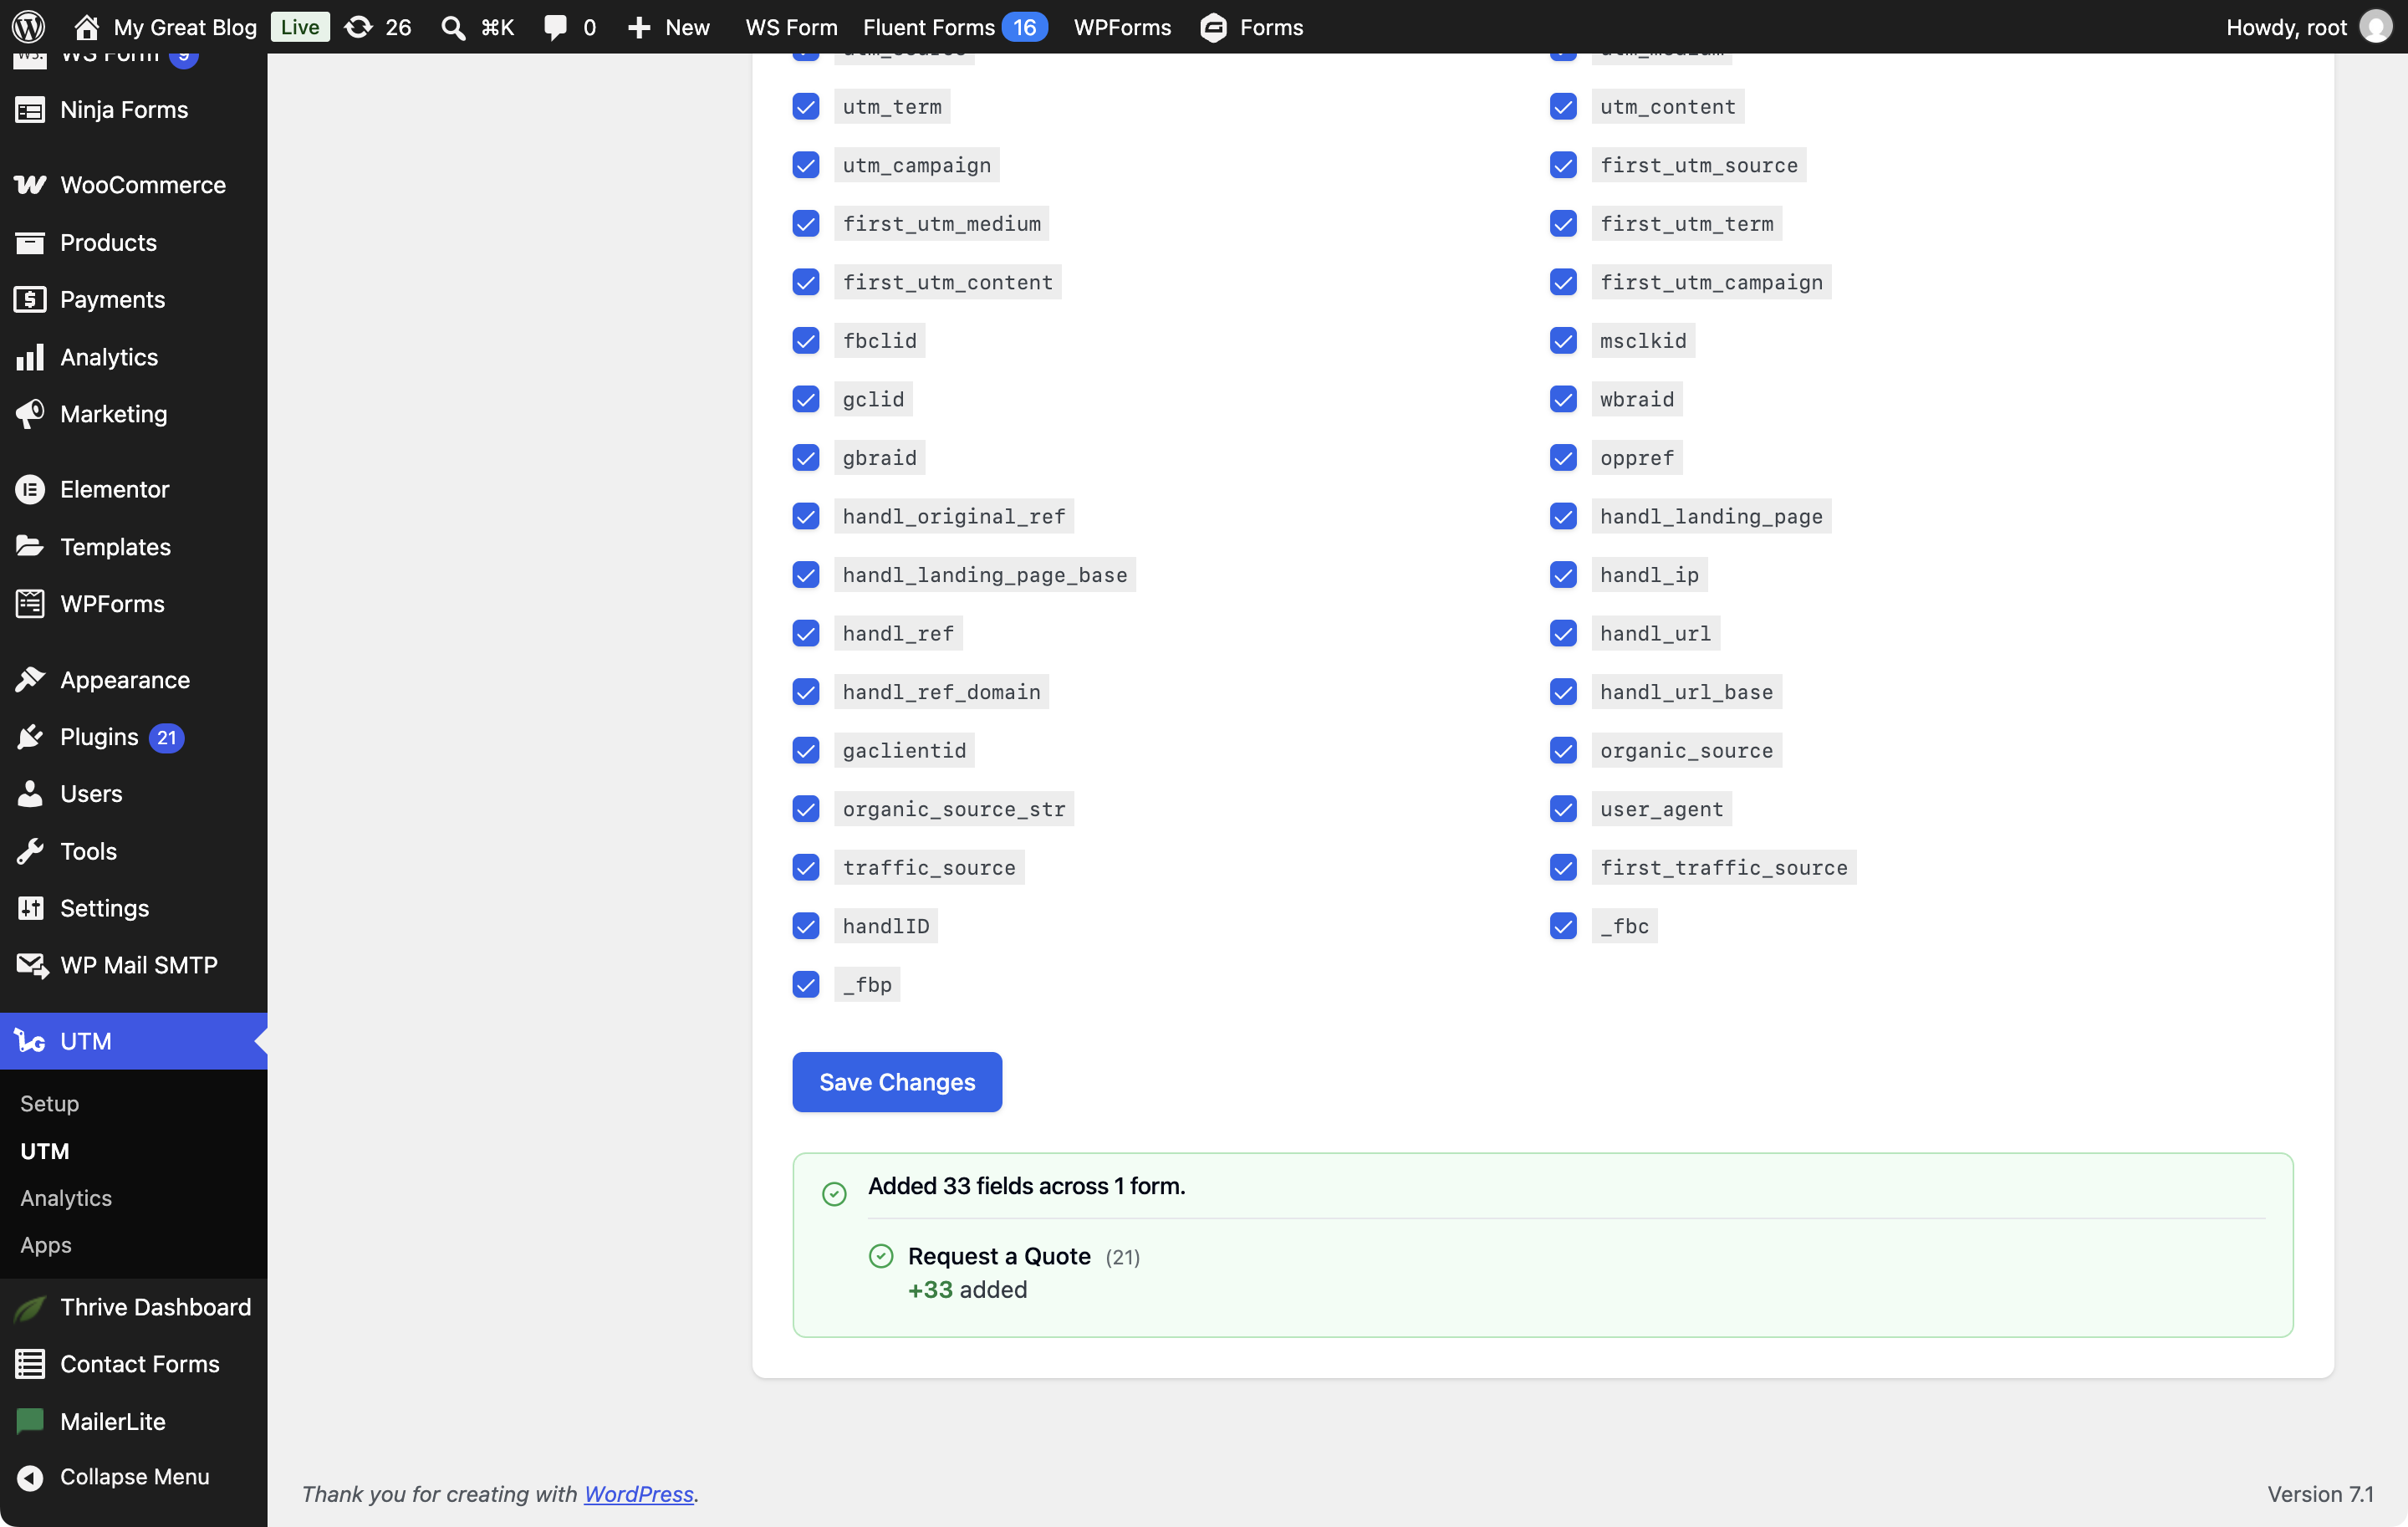
Review the green confirmation message. It summarizes added, existing, removed, unchanged, or failed fields for each form. The status badges refresh without a page reload.
6. Your forms are now connected
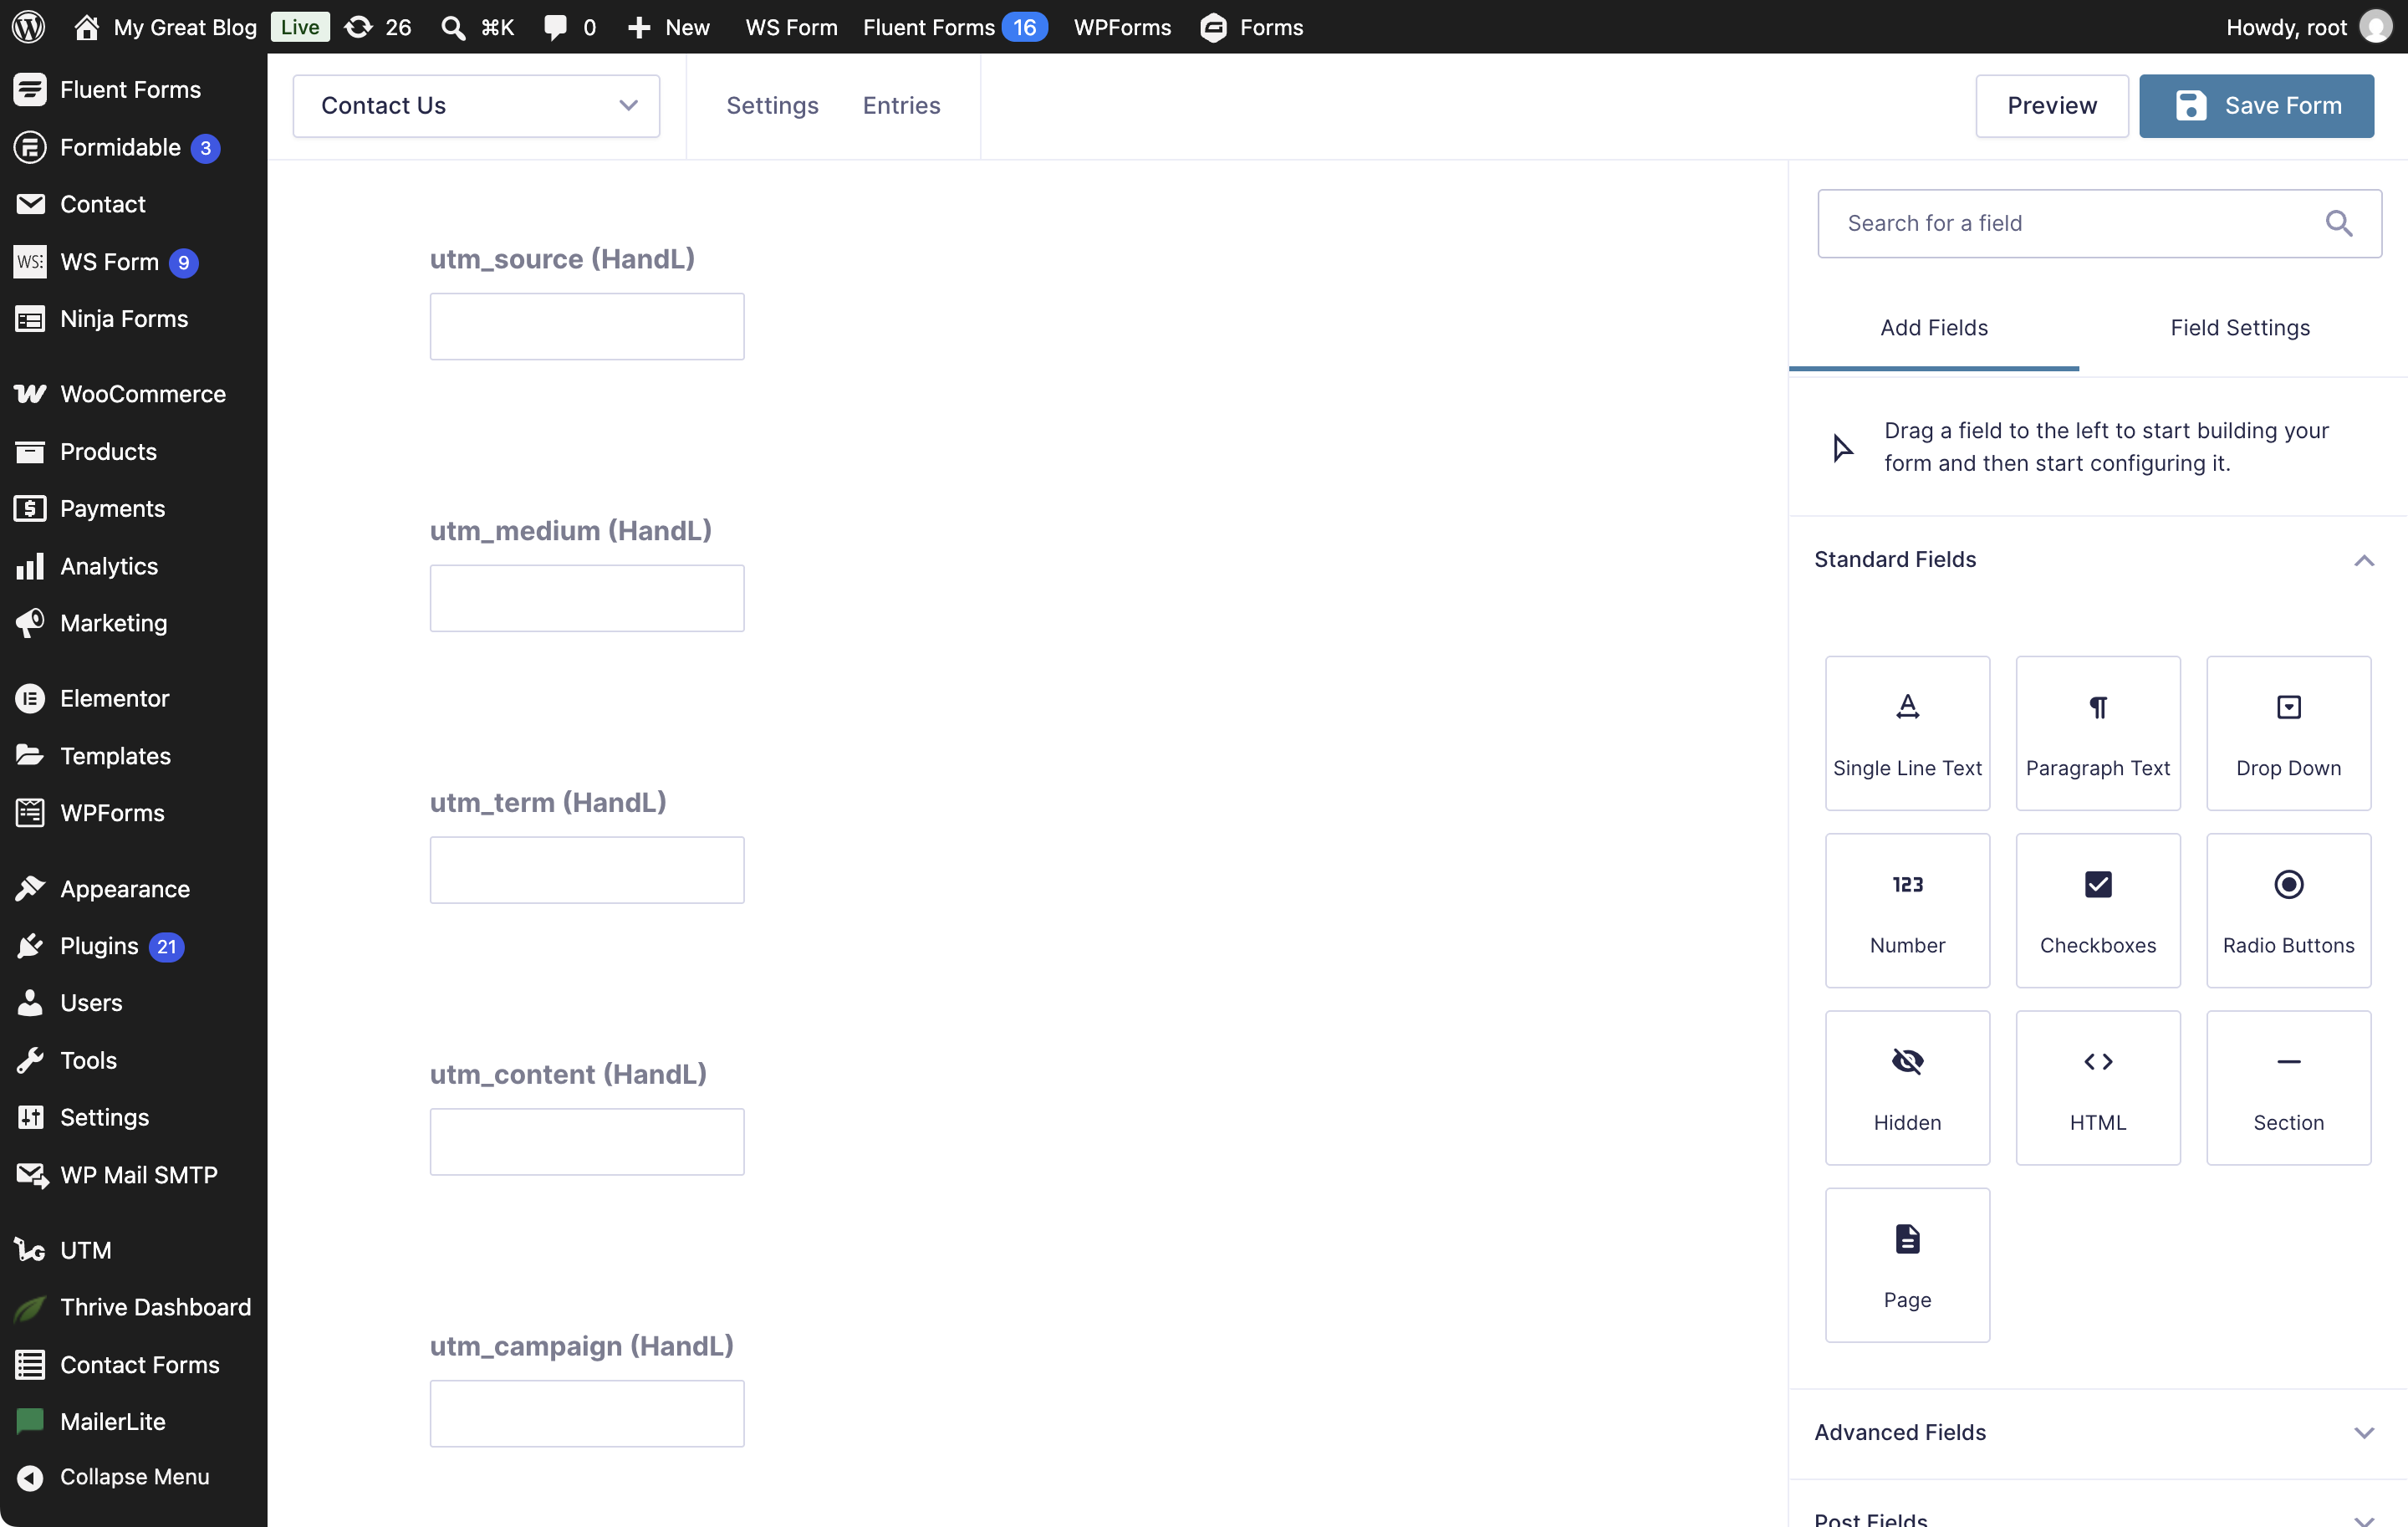
7. Tracking fields added to your form
8. Connect from the Setup wizard
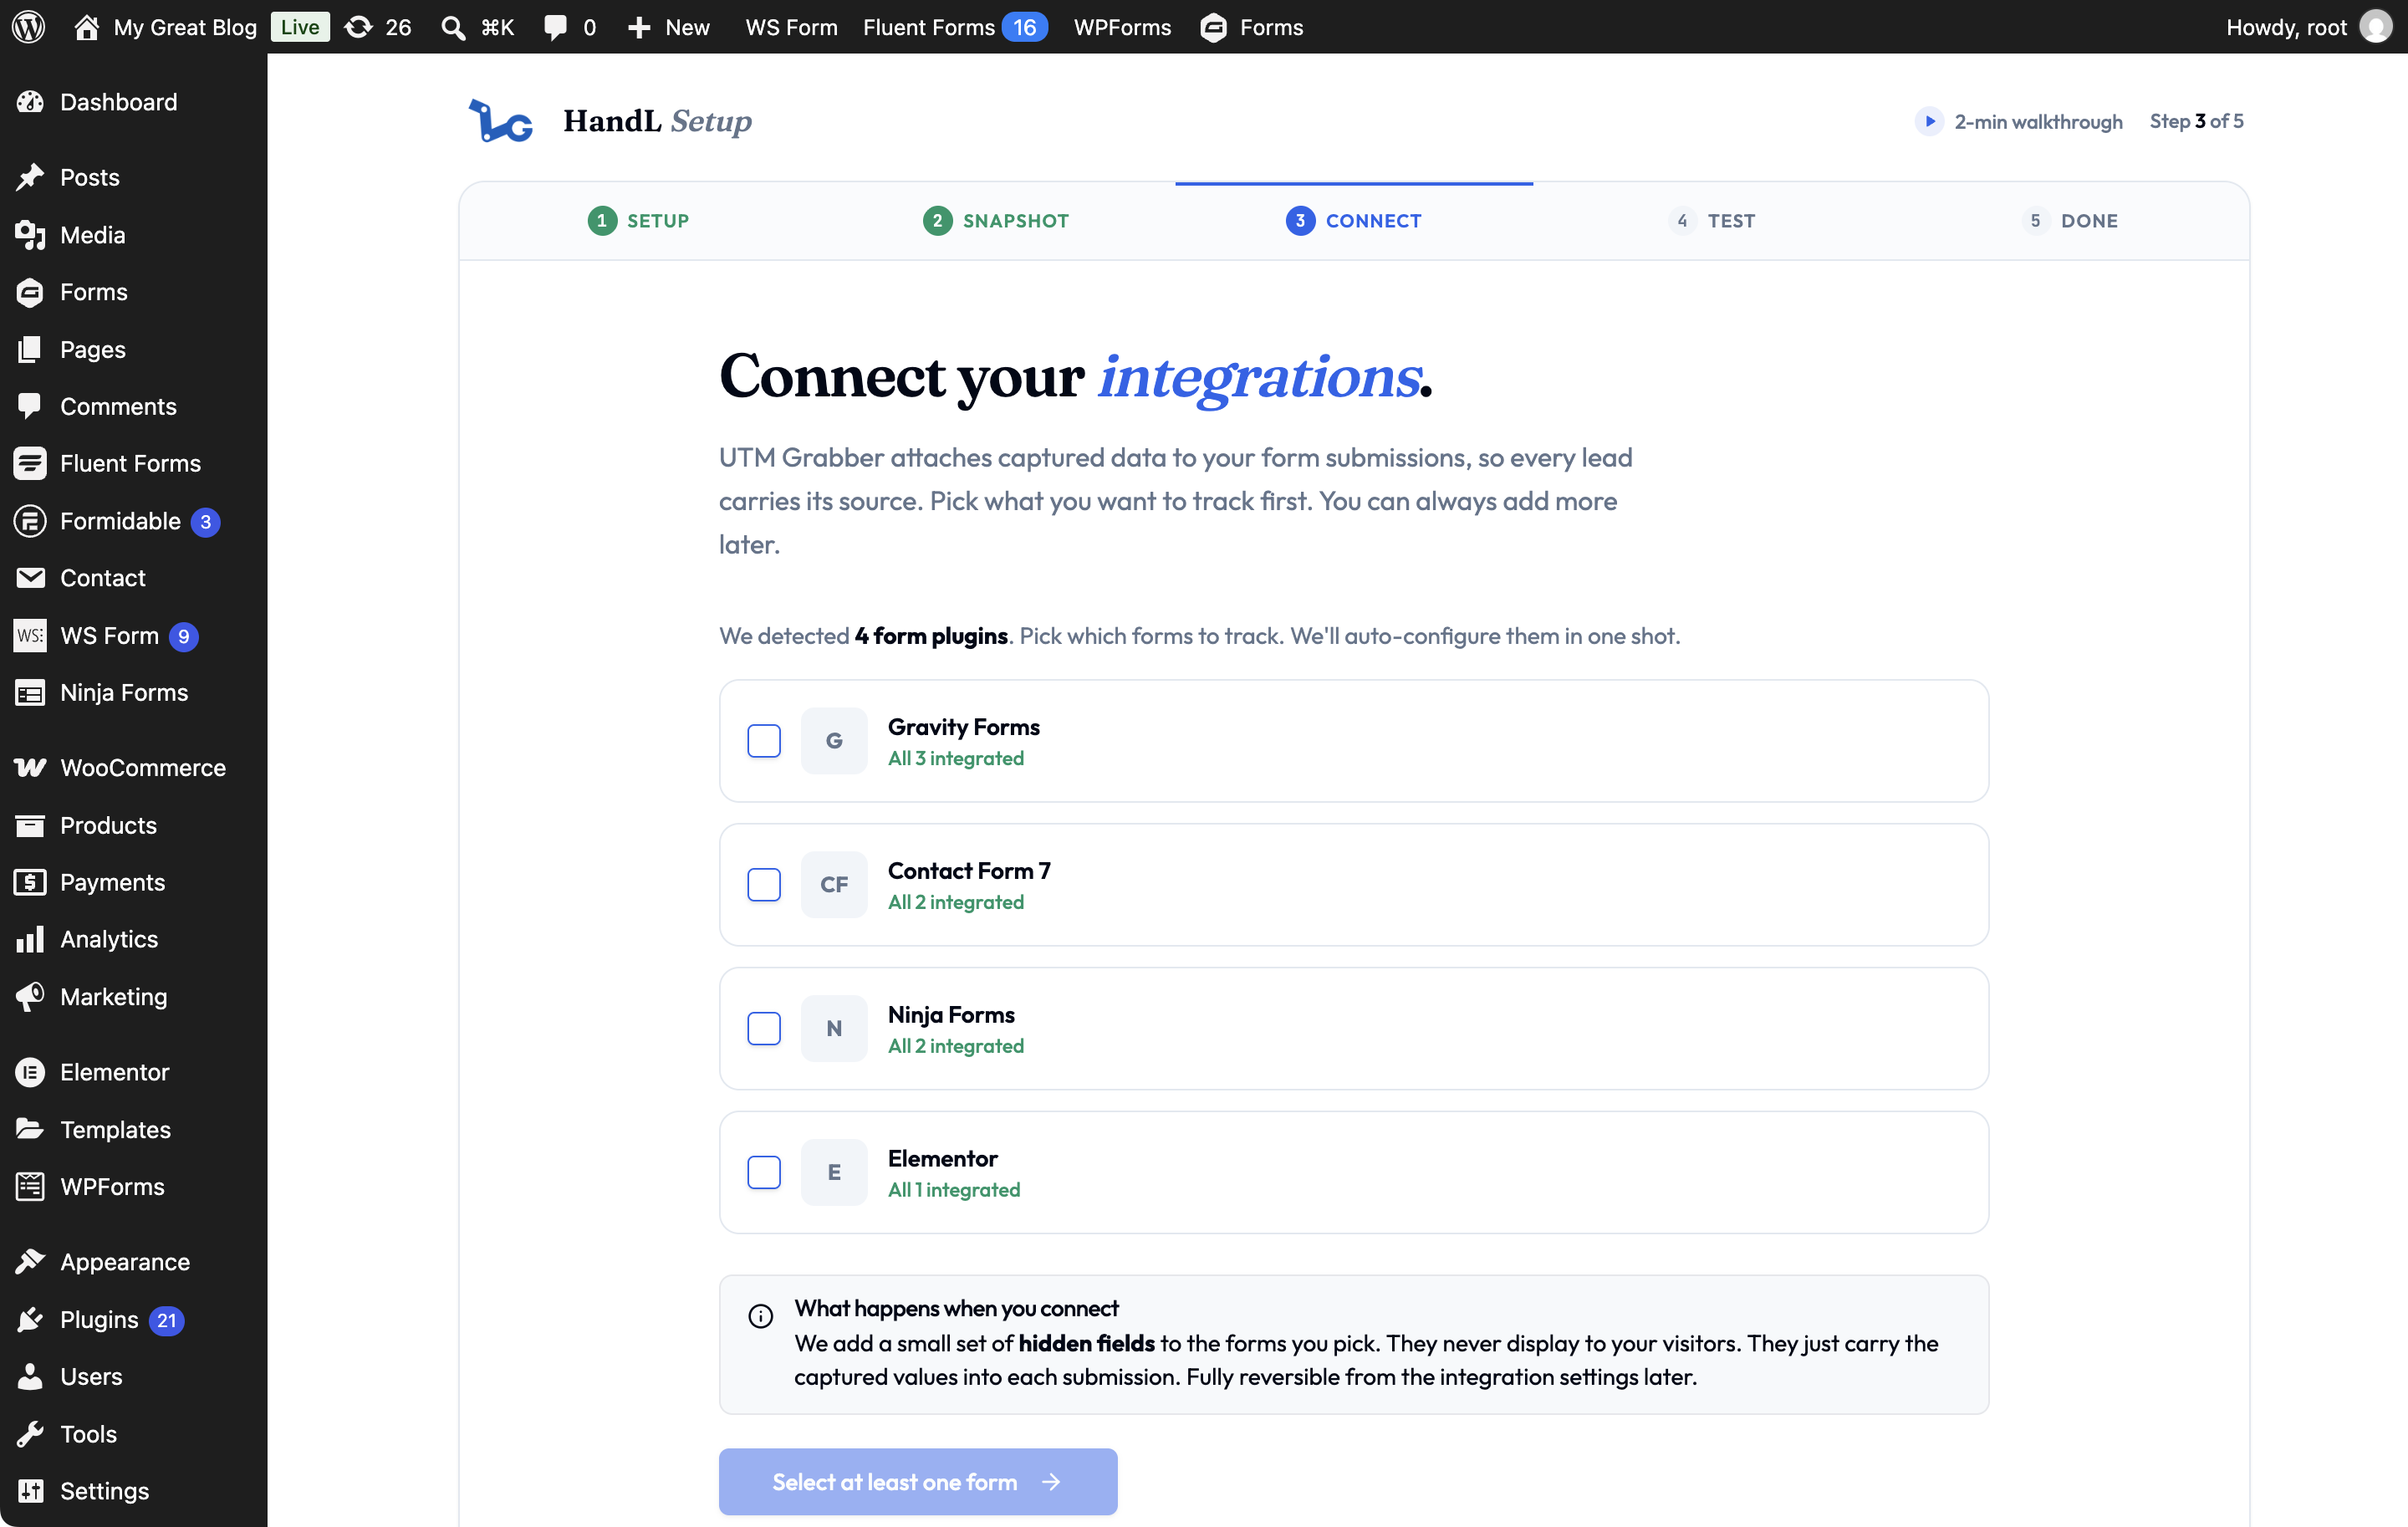
You can also select forms in the Connect your integrations step of the Setup wizard. Select at least one form to enable the next step.
Use this process for any supported form plugin shown in the Integrations tab. For other form plugins or manual setup, see Native WP Shortcodes.
Native Elementor Form Support - HandL UTM Grabber Guide
UTM attribution overview
This guide explains Native Elementor Form Support - HandL UTM Grabber Guide. It helps you capture UTM source, medium, campaign, term, content, click IDs, referrer, and landing page data and keep the marketing context needed for accurate reporting across forms, bookings, signups, and sales.
This is our preferred way of collecting UTMs into your Elementor Form. There are two ways to wire it up — the Parameters dynamic tag (Method 1) or simply naming the field ID after the parameter (Method 2). Both capture the same values on submission, but the field ID matters: when it matches the parameter name, HandL also fills the field client-side in the visitor's browser (see Method 2).
Method 1 — the Parameters dynamic tag
First add your field just like any other field to your form
Set the field Type to Hidden and give it a label (e.g. utm_campaign).
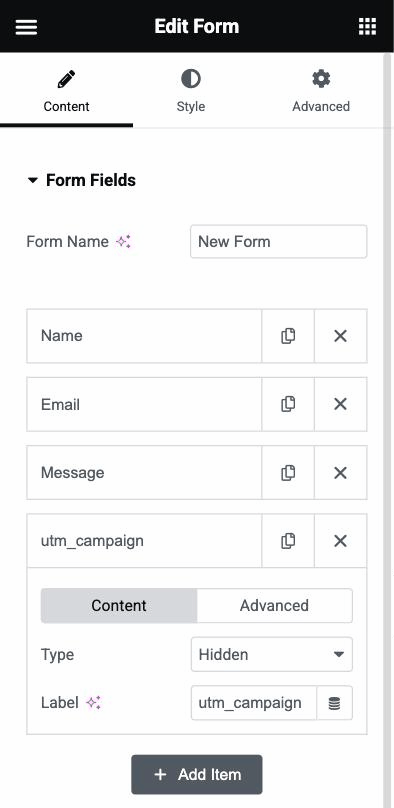
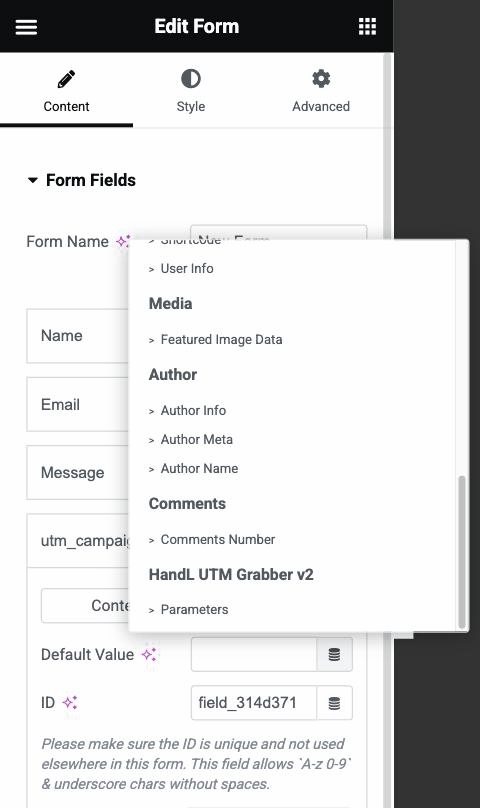
Go to the field's Advanced tab and click the Dynamic Tags icon on "Default Value"
Pick Parameters under the HandL UTM Grabber group at the bottom of the list.
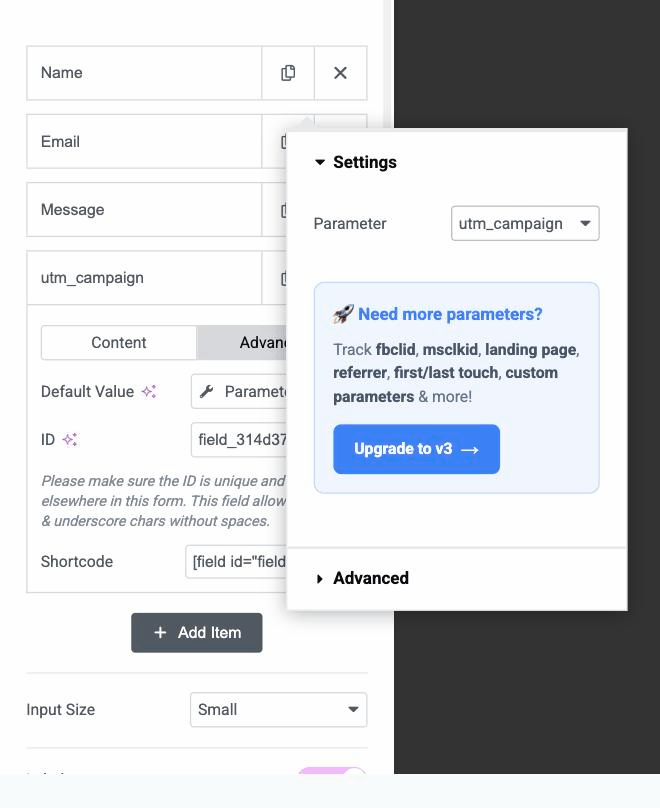
Click the Parameters tag and choose the parameter you want to capture
The Default Value now shows the Parameters tag — that's it!
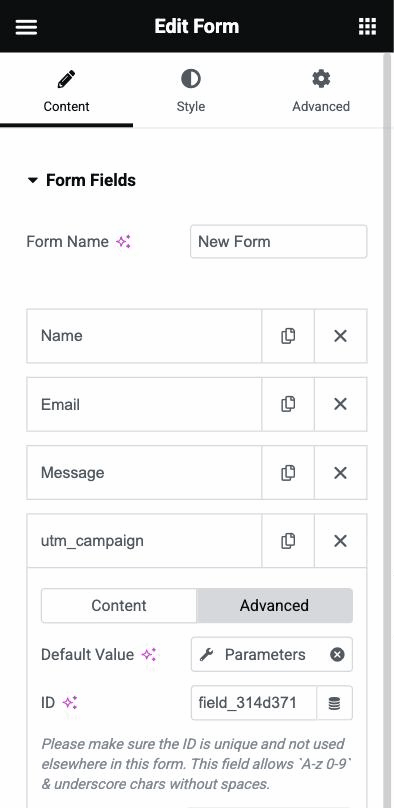
Tip: also set the field's ID (on the Advanced tab) to the parameter name, e.g. utm_campaign. A matching ID enables client-side tracking (see Method 2).
Method 2 — set the field ID to the parameter name
If you prefer to skip dynamic tags, add the same Hidden field and simply set its ID (on the field's Advanced tab) to the exact parameter name, e.g. utm_campaign. Leave Default Value empty — HandL automatically fills any hidden field whose ID matches a tracked parameter.
Setting the ID to the parameter name is what enables client-side tracking. HandL's script fills the field directly in the visitor's browser, so every visitor submits their own values even when the page is served from a full-page cache (WP Rocket and similar).
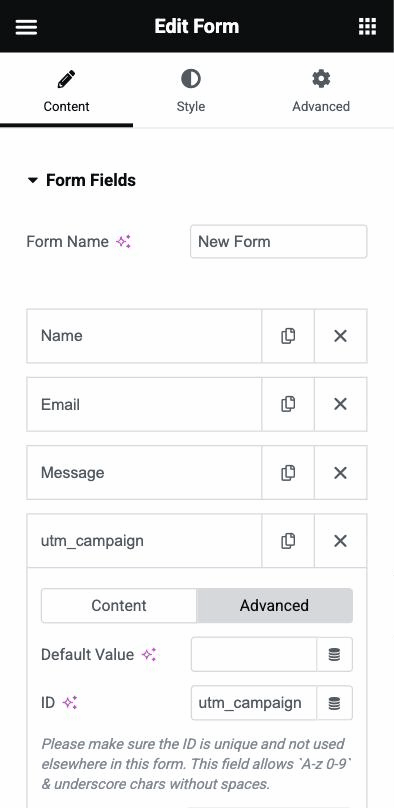
A bonus of Method 2: your Elementor submissions, email actions, and webhooks reference the field by a readable key (e.g. [field id="utm_campaign"]) instead of an auto-generated one like field_314d371.
How it works
With either method, the hidden field is pre-filled from the visitor's tracking data when the page loads, and the value is captured with every form submission, no extra configuration needed.
Elementor UTM Tracking Integration
UTM attribution overview
This guide explains Elementor UTM Tracking Integration with HandL UTM Grabber. It helps you capture UTM source, medium, campaign, term, content, click IDs, referrer, and landing page data and keep the marketing context needed for accurate reporting across forms, bookings, signups, and sales.
This documentation has been obsoluted, please use Native Elementor Form Support
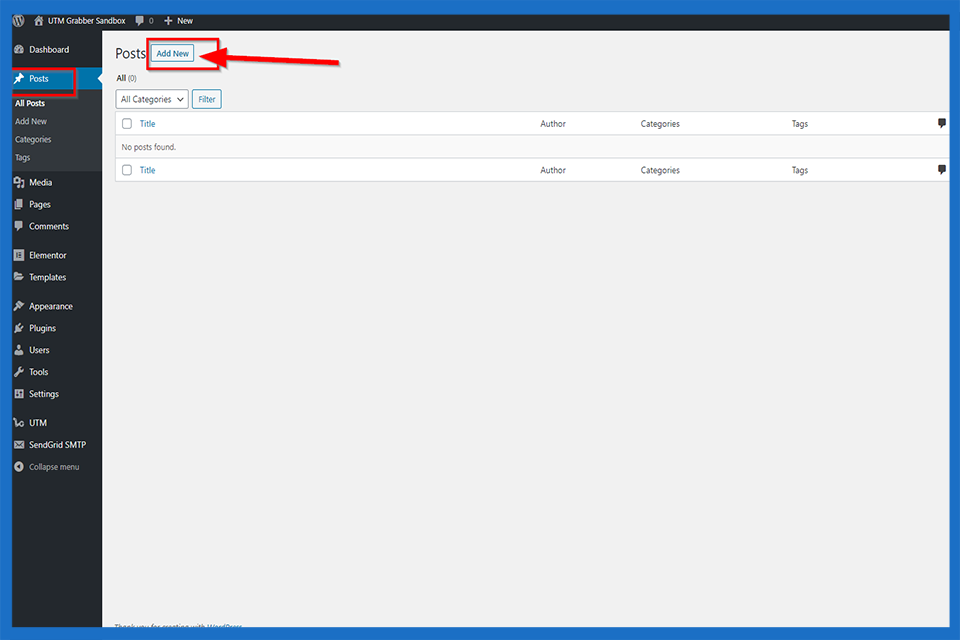
1. Click 'Post' and 'Add New'
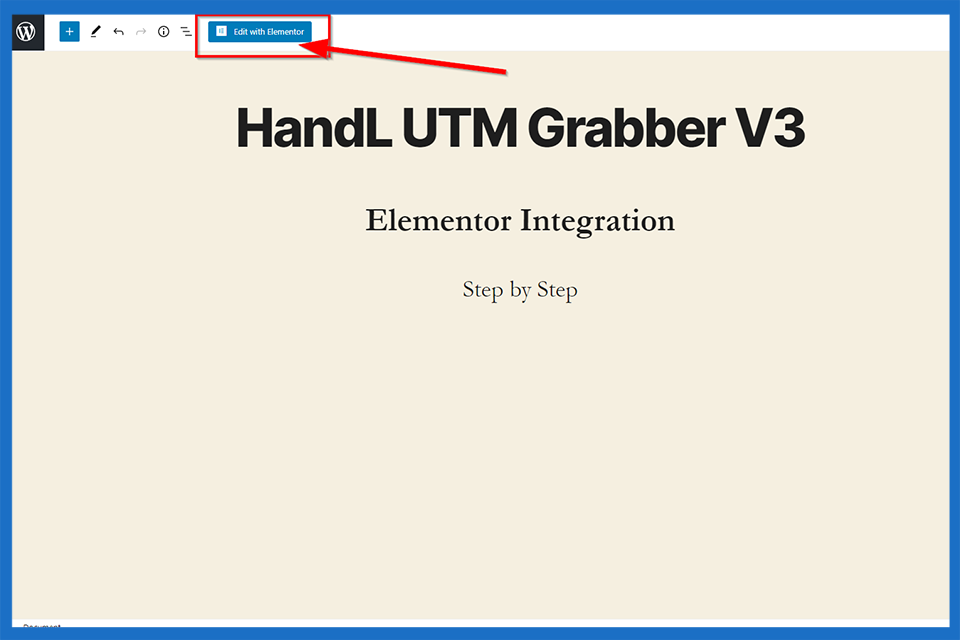
2. Click 'Edit with Elementor' Button
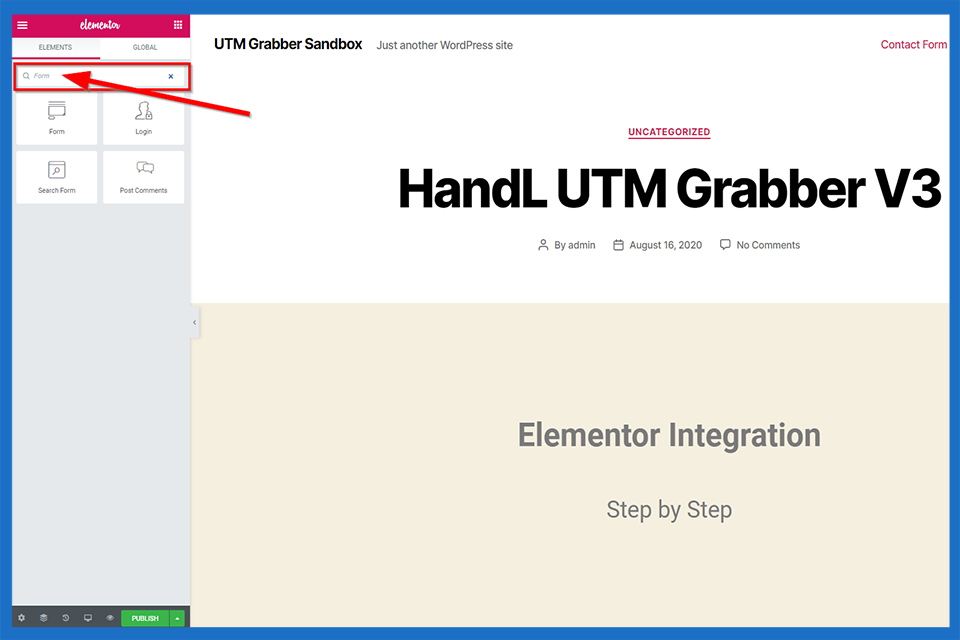
3. Search 'Form'
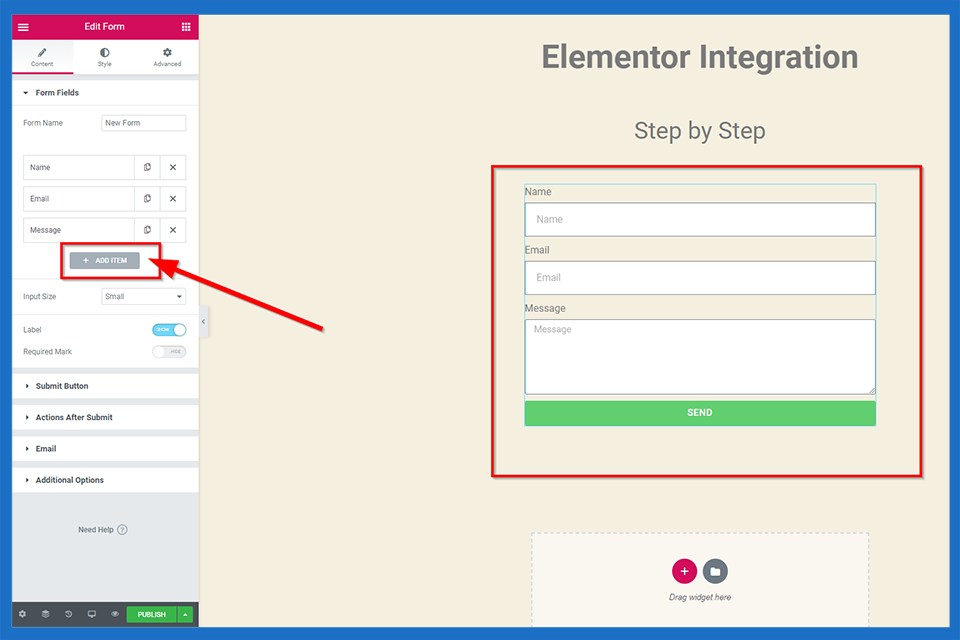
4. Click 'Add Item' Button
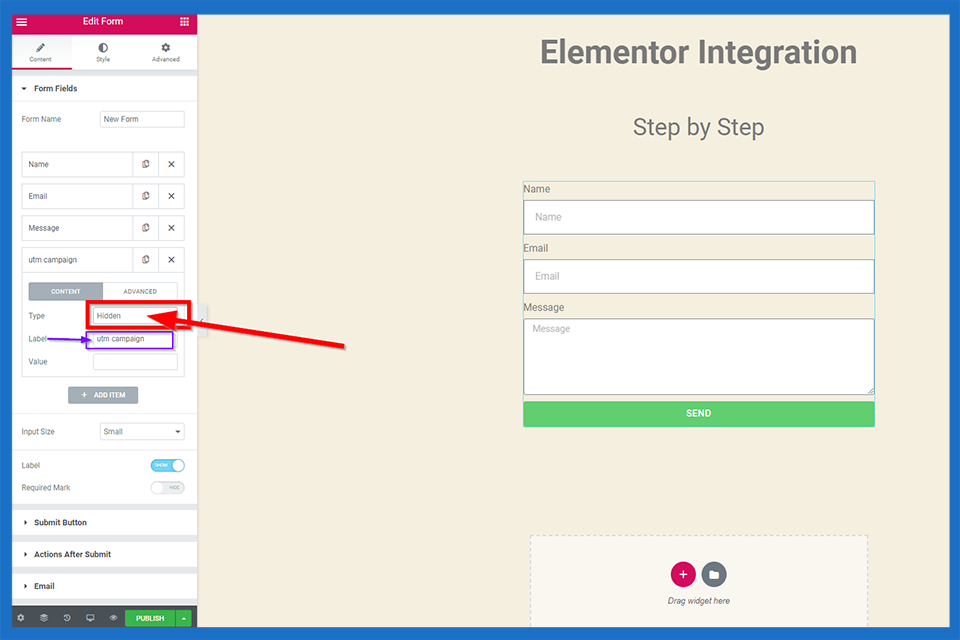
5. Select the Type as 'Hidden' and Give a name for Label
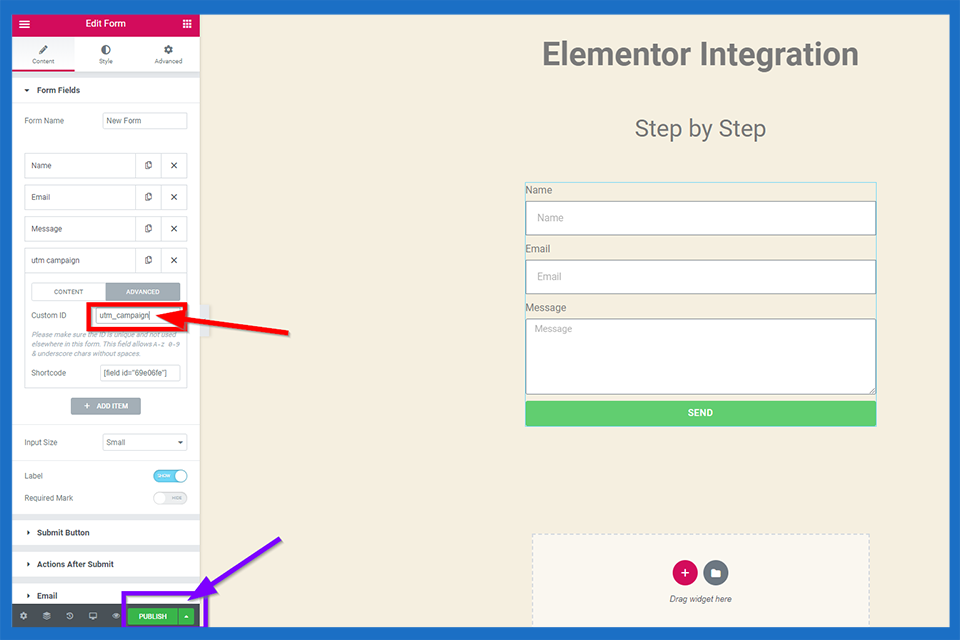
6. Click 'Advance', Give a name to Custom ID and then Click 'PUBLISH' button
🥳Now You are ready!
Add cookie support to Elementor Pro for UTM Tracking Consent
UTM attribution overview
This guide explains Add cookie support to Elementor Pro for UTM Tracking Consent with HandL UTM Grabber. It helps you respect consent choices while preserving UTM parameters for compliant WordPress attribution and keep the marketing context needed for accurate reporting across forms, bookings, signups, and sales.
This method has been officially deprecated and archive only. Please use Native Elementor Form Support
In case Elementor Pro doesn't capture UTMs as it is supposed to. You can try this reliable method that allows Elementor Pro to grab the UTMs from COOKIES.
Install the cookies module
First of all, download the cookies.php file from the attachment (left sidebar) and upload it to wp-content/plugins/elementor-pro/modules/dynamic-tags/tags
Acitvate cookies module
Go and edit the wp-content/plugins/elementor-pro/modules/dynamic-tags/module.php:52 and add Cookies in the get_tag_classes_names function's array
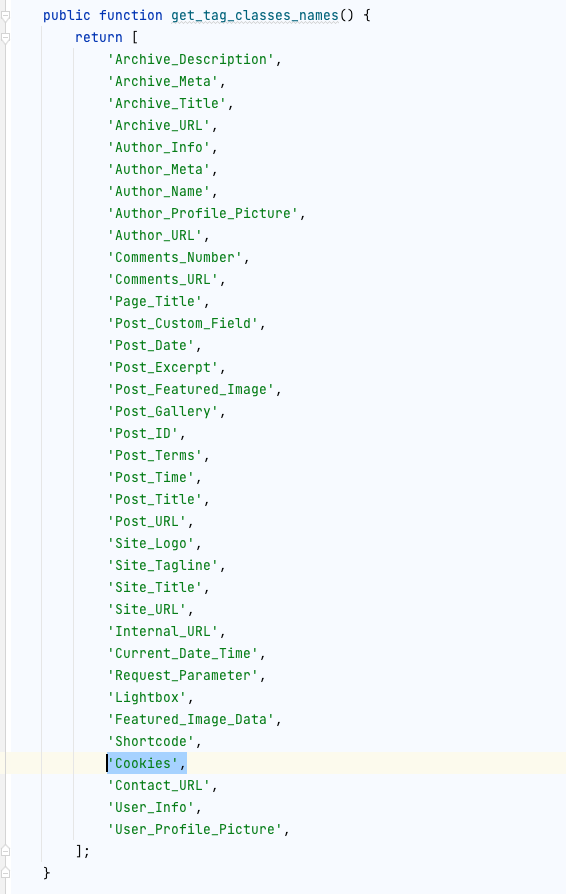
Set your field to read the value from Cookies.
Go to your form you'd like to edit, select Default Value as "Cookies" under "Advanced". And then enter the the parameter name in the text field as shown below.
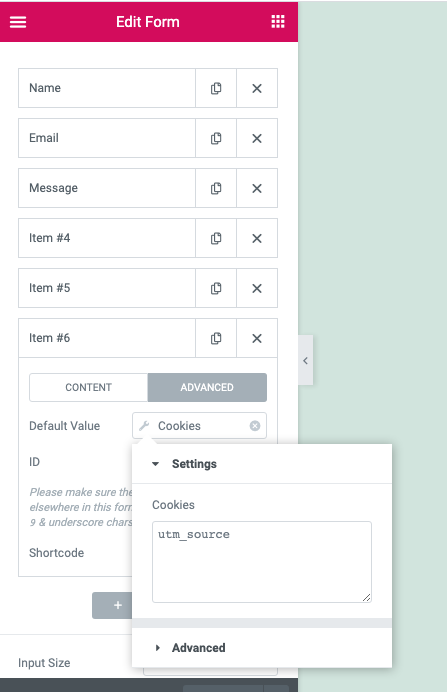
You can use any parameter name listed here Native WP Shortcodes
ActiveCampaign hidden fields to appear in Elementor Form - HandL UTM Grabber Guide
UTM attribution overview
This guide explains ActiveCampaign hidden fields to appear in Elementor Form - HandL UTM Grabber Guide. It helps you pass lead attribution into your CRM, email platform, or marketing automation workflow and keep the marketing context needed for accurate reporting across forms, bookings, signups, and sales.
By default Elementor doesn't list to map hdden fields in Elementor Form
You can't map your form field to a hidden field in Elementor...
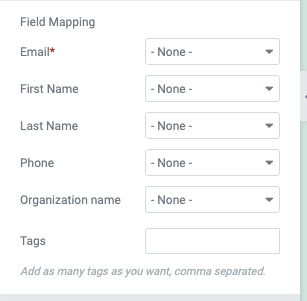
You can resolve this in two ways
-
change all the custom parameters from ActiveCampaign to text from hidden. They will immediately will be mappable.
-
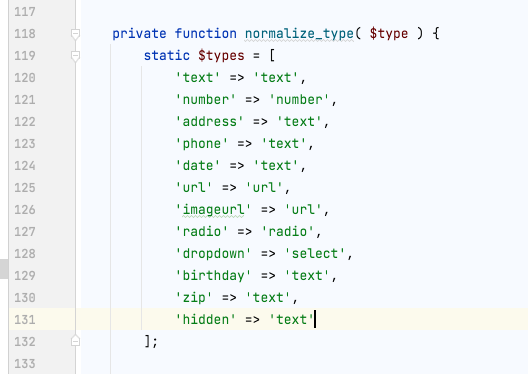
edit elementor code (single line edit) wp-content/plugins/elementor-pro/modules/forms/classes/activecampaign-handler.php:131. Add hidden => 'text' as shown in the image.
After you are done either of those, you will be able to map the fields just fine (see the image)...

Appending UTM variables using Text Editor in Elementor with HandL UTM Grabber
UTM attribution overview
This guide explains Appending UTM variables using Text Editor in Elementor with HandL UTM Grabber. It helps you capture UTM source, medium, campaign, term, content, click IDs, referrer, and landing page data and keep the marketing context needed for accurate reporting across forms, bookings, signups, and sales.
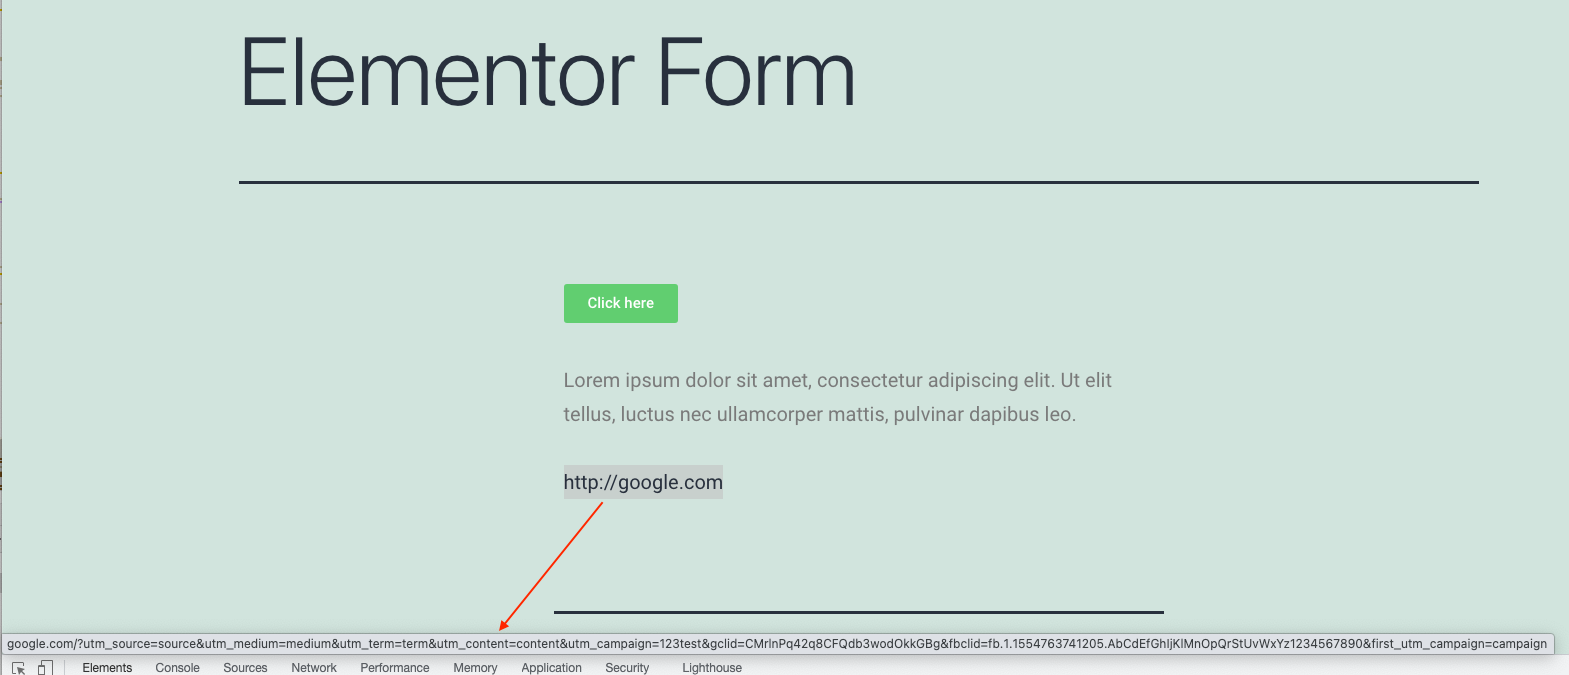
Simply add a class attribute utm-out to the your text editor...
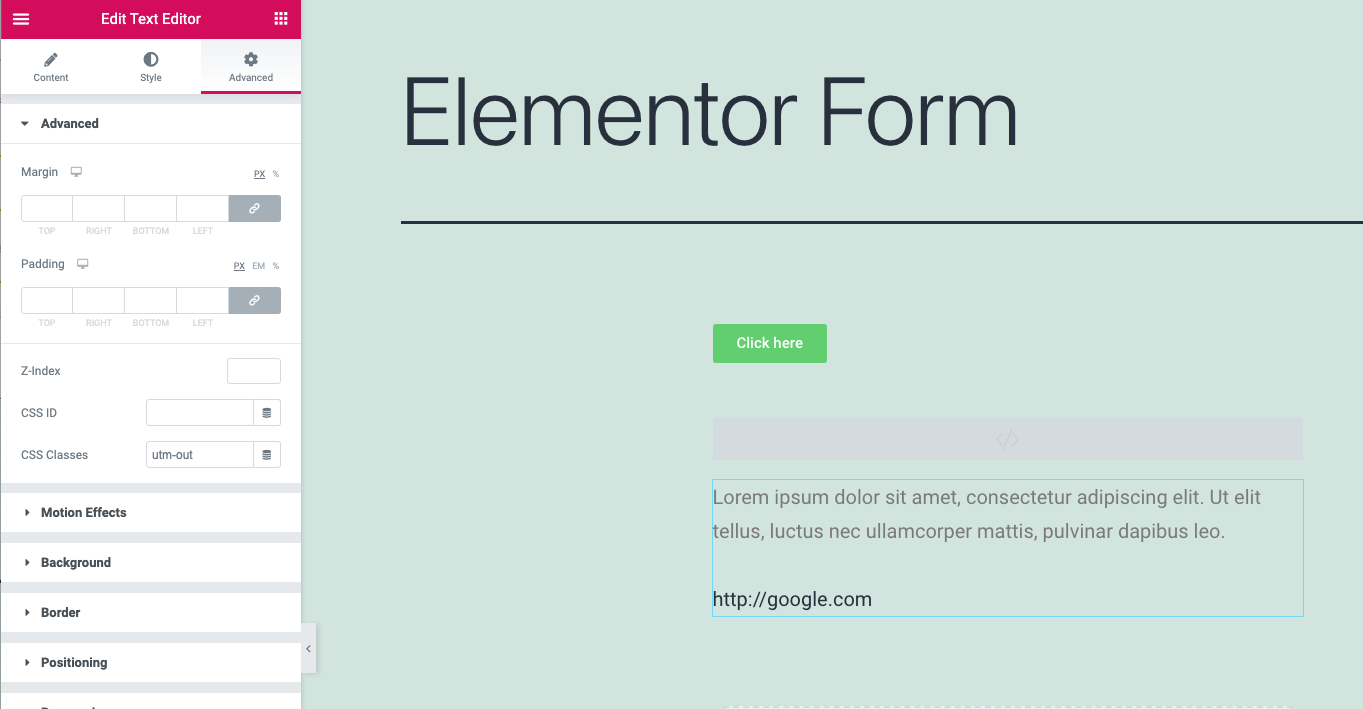
And the class variables utm-out will append UTMs to every single hyperlink within that text editor.
Appending UTMs to the selective Buttons in Elementor with HandL UTM Grabber
UTM attribution overview
This guide explains Appending UTMs to the selective Buttons in Elementor with HandL UTM Grabber. It helps you capture UTM source, medium, campaign, term, content, click IDs, referrer, and landing page data and keep the marketing context needed for accurate reporting across forms, bookings, signups, and sales.
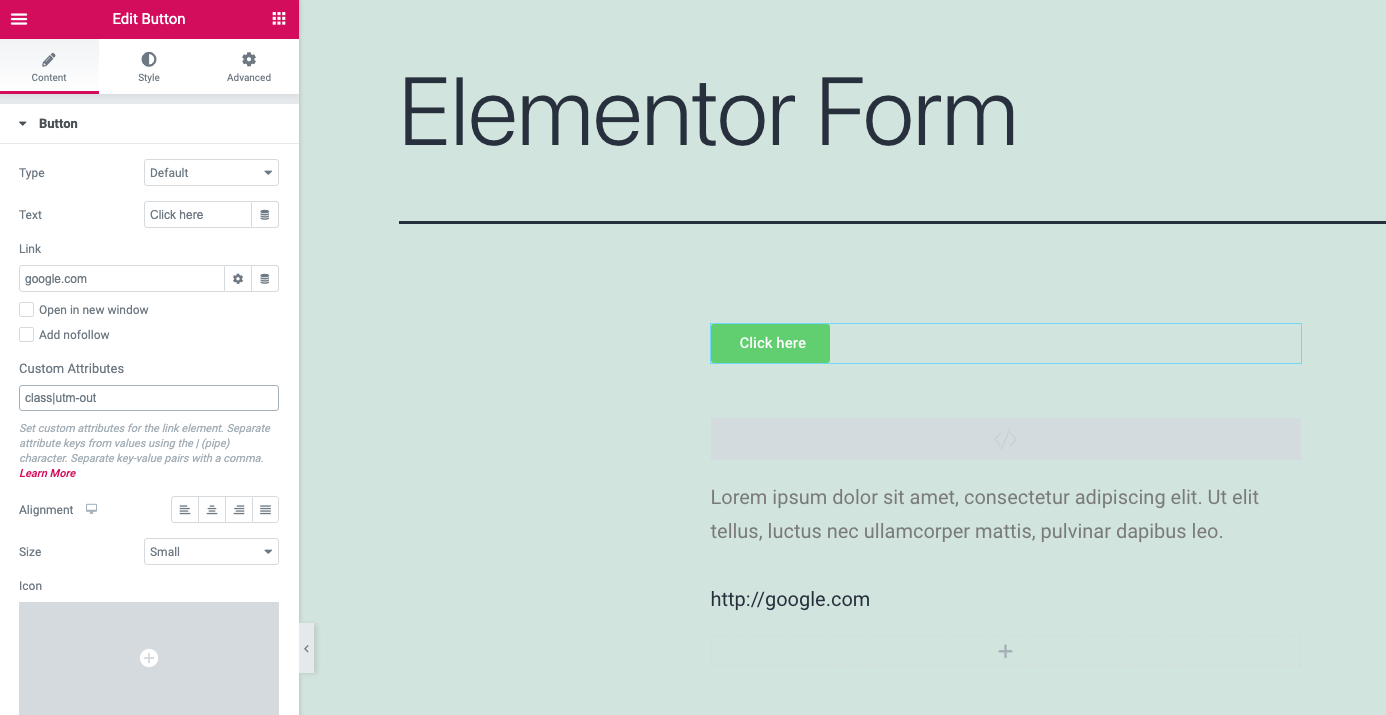
Simply add the magical utm-out class attribute to the button as custom attributes as class|utm-out
Elementor UTM Tracking Integration with Mailchimp
UTM attribution overview
This guide explains Elementor UTM Tracking Integration with Mailchimp with HandL UTM Grabber. It helps you pass lead attribution into your CRM, email platform, or marketing automation workflow and keep the marketing context needed for accurate reporting across forms, bookings, signups, and sales.
First, implement as shown here in the Native Elementor Form Support.
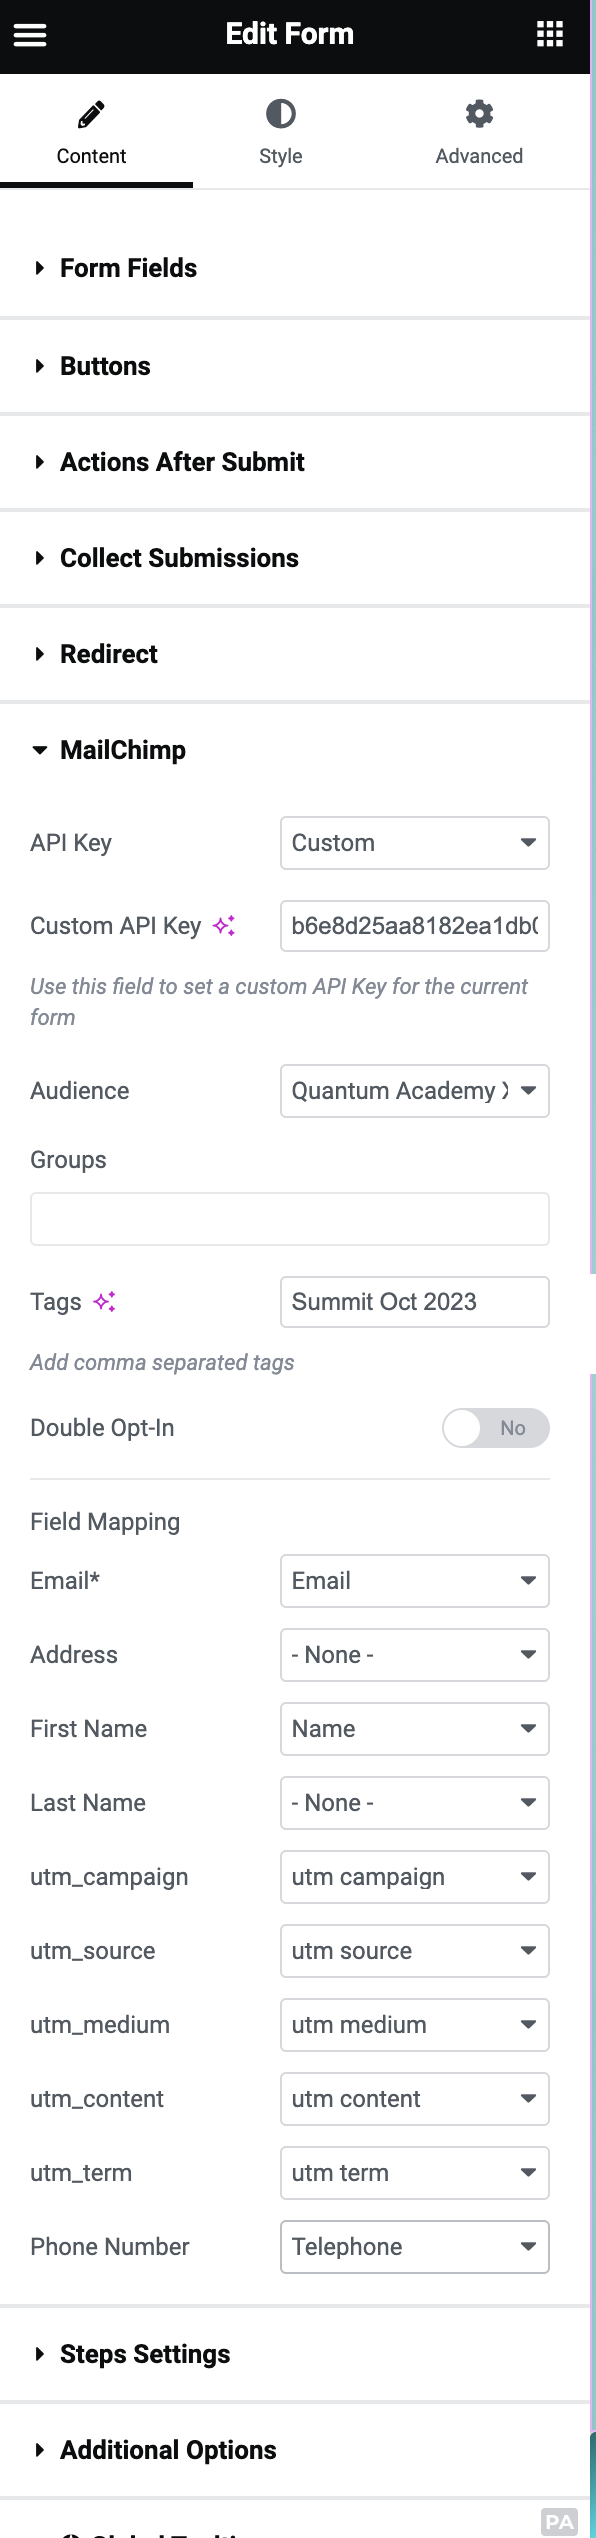
After doing so, enable MailChimp and proceed with the mapping as shown below:
Syncing the form data to your CRM via Webhook - HandL UTM Grabber Guide
UTM attribution overview
This guide explains Syncing the form data to your CRM via Webhook - HandL UTM Grabber Guide. It helps you pass lead attribution into your CRM, email platform, or marketing automation workflow and keep the marketing context needed for accurate reporting across forms, bookings, signups, and sales.
After setting up your Elementor Form with HandL UTM Grabber based on the documentation, the next step is to send this data to your CRM. One method is using a webhook service like Zapier or Integromat (Make).
- Select "Webhook" under the Action After Submit menu in Elementor.


- Copy and paste your Zapier or Make URL into the designated field. Once the form is submitted, your selected service will receive the payload, including all the UTM data collected.